
Create an HTTP Service in SAP BTP ABAP Environment
Create an HTTP service in SAP BTP ABAP environment that can be called from the browser.
Overview
You will learn
- How to create an HTTP service that can be accessed from a browser
- How to return system data using a (whitelisted) ABAP utility class
- How to expose the service for external consumption, by defining the necessary inbound communication artifacts Important: This tutorial is not suitable for SAP S/4HANA Cloud, private edition. If you would like to enable HTTP consumption from S/4HANA Cloud, private edition, see:
- Developing External Service Consumption - Outbound Communication
- Enable HTTP Communication in Your ABAP Code Throughout this tutorial, replace
XXXor000with your initials or group number.


Prerequisites
Prerequisites
- IMPORTANT: This tutorial cannot be completed on a trial account
- You have set up SAP Business Technology Platform (BTP), ABAP Environment, for example by using the relevant booster: Using a Booster to Automate the Setup of the ABAP Environment
- Tutorial: Create Your First Console Application, for a licensed user, steps 1-2
- You have installed ABAP Development Tools, latest version
Steps
Select a package and choose New > Other Repository Object from the context menu:

Image depicting step-1a-new-repo-object Enter the filter text HTTP and choose Next:

Image depicting step-1b-choose-HTTP-service Enter a Name:
Z_GET_DATE_HTTP_000and Description:Get system date for your service and choose Next:
Image depicting step-1c-name-service Choose or create a transport request:

Image depicting step-1d-transport-request
The new HTTP service is displayed on a new tab. The handler class and URL are generated automatically, in the form:
https://<server:port>/sap/bc/http/sap/<service_name>?sap-client=100

Now, you will implement the handler class, starting with a simple text output.
Open the handler class by clicking on the hyperlink:

Image depicting step-2a-open-handler-class The structure of the class and the interfaces statement for
IF_HTTP_SERVICE_EXTENSIONare generated automatically.Go to the class implementation section and insert the following statement in the method:
response->set_text('Hello!').
Image depicting step-2b-insert-method Save (
Ctrl+S) and Activate (Ctrl+F3) your class.
Go back to your HTTP Service. Test your service in the browser by clicking the URL link:
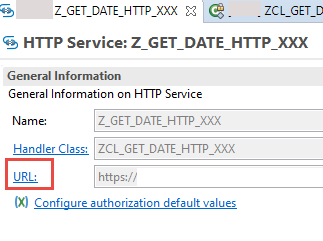
Image depicting step-4-test-http-service If necessary, log in again. The preview open automatically in a new tab and display something like this:

Image depicting step-4b-hello
Now you will add a method to get system data and format this in HTML
In the ABAP environment, you can only use whitelisted APIs. Therefore, for example, you cannot use SY-UNAME. Instead, you call the appropriate method of the class CL_ABAP_CONTEXT_INFO.
In your class definition, add the following statement:
ABAPMETHODS: get_html RETURNING VALUE(ui_html) TYPE string.You will get the error “Implementation missing…”. Resolve this by choosing Quick Assist (
Ctrl+1) and choosing Add implementation…. Ignore the two warnings for now.ABAPDATA(system_date) = cl_abap_context_info=>get_system_date( ). ui_html = |<html> \n| && |<body> \n| && |<title>General Information</title> \n| && |<p style="color:DodgerBlue;"> Hello there </p> \n | && |<p> Today, the date is: { system_date }| && |<p> | && |</body> \n| && |</html> | .Now change the method implementation of the method
handle_requestABAPresponse->set_text( get_html( ) ).Now select the warning for the method
get_htmland choose Quick Assist( Ctrl + 1 ). (You cannot resolve the warning for the methodhandle_request).Choose Add raising declaration, then choose Finish.
Format, save, and activate the class (
Shift + F1, Ctrl + S, Ctrl + F3).
Your output should look roughly like this:

Your code should look like this:
CLASS Z_GET_DATE_HTTP_000 DEFINITION
  PUBLIC
  CREATE PUBLIC .

  PUBLIC SECTION.

    INTERFACES if_http_service_extension .

    METHODS: get_html RETURNING VALUE(ui_html) TYPE string
    RAISING
        cx_abap_context_info_error.

  PROTECTED SECTION.
  PRIVATE SECTION.
ENDCLASS.


CLASS Z_GET_DATE_HTTP_000 IMPLEMENTATION.


  METHOD get_html.

    DATA(system_date) = cl_abap_context_info=>get_system_date( ).

    ui_html =  |<html> \n| &&
    |<body> \n| &&
    |<title>General Information</title> \n| &&
    |<p style="color:DodgerBlue;"> Hello there.</p> \n | &&
    |<p> Today, the date is:  { system_date }| &&
    |<p> | &&
    |</body> \n| &&
    |</html> | .

  ENDMETHOD.

  METHOD if_http_service_extension~handle_request.
    TRY.
        response->set_text( get_html(  ) ).
      CATCH cx_web_message_error cx_abap_context_info_error.
        "additional exception handling
    ENDTRY.
  ENDMETHOD.

ENDCLASS.You will now create the artifacts you need to allow other systems to call your service compliantly. This involves some overhead for one consumer; however, the advantage is that you can add several consumer systems, or users (for example, with different authentication) pointing to the same HTTP service, wrapped in the same Communication Scenario.

First, create the Communication Scenario.
Select your package, then choose New > Other Repository Object… from the context menu.

step9a-new-other Add the filter
scen, then choose Communication Scenario, then choose Next.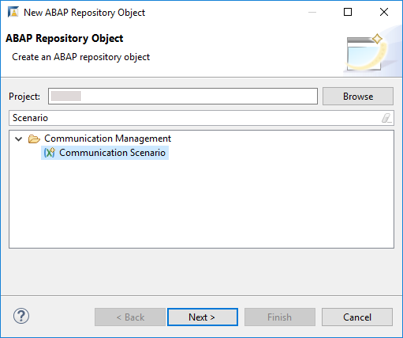
step9c-create-comm-scenario Add a Name:
Z_WRAP_HTTP_INBOUND_000and Description, choose a transport request, then choose Finish.
Your Communication Scenario appears.

On the Inbound tab, choose Add….
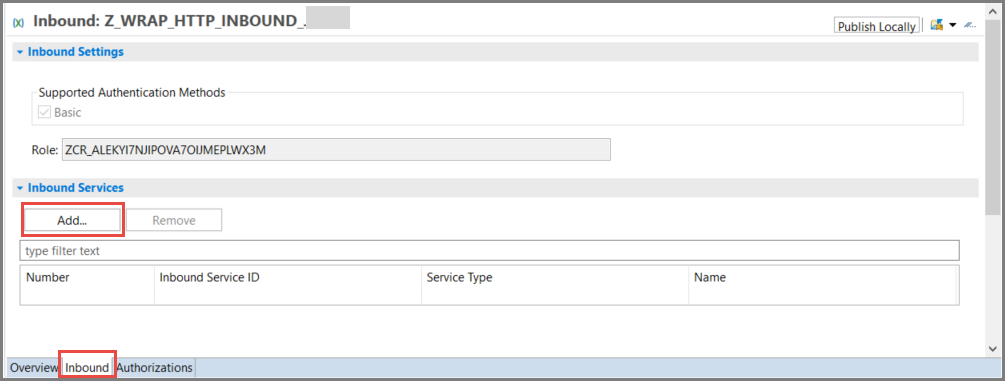
step10-add-http-service IMPORTANT: Choose Browse. You cannot simply enter the name. Then add a filter, such as
Z_HTTP, select your service, then choose Finish.
step10a-browse-for-service Your service appears. Choose Publish Locally.

step10-b-publish-locally
Open the SAP Fiori launchpad for your system. You can find the URL for this launchpad by selecting your system (that is, ABAP Project) in Project Explorer, then choosing Properties > ABAP Development from the context menu.

step11a-open-flp From the launchpad, choose the Fiori app Communication Arrangement. Then choose New.
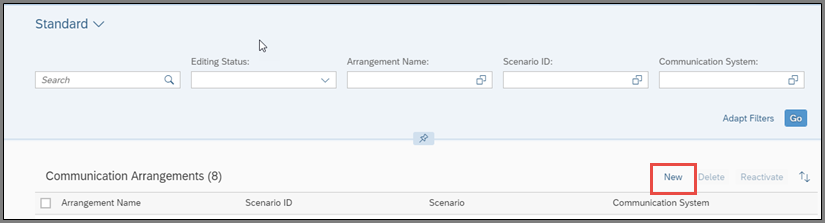
step11b-new Choose your scenario,
Z_WRAP_HTTP_INBOUND_000from the drop-down list. Accept the default (identical) Arrangement name.
step11c-name-comm-arr
From the Dashboard Home screen, choose Communication Systems.
Enter the name of your Communication Arrangement, then for Communication System, choose New.
Enter a System ID and Accept the default (identical) System name, then choose Create.
In Technical Data > General > Host Name, enter Dummy. Leave the other defaults and choose Save.
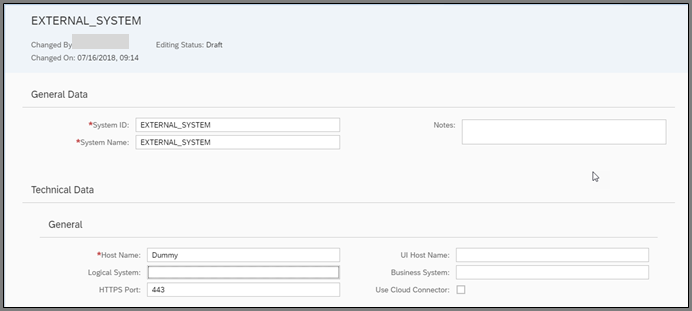
step12a-new-system
Scroll down to Users for Inbound Communication, then create a new user by choosing the + icon.

step13a-create-comm-user Choose New User and the Authentication Method: User name and password.

step13b-choose-new-user Enter a name and description, then choose Propose password, then choose Create > OK > Save.

Resources
Discussion
Share feedback on this tutorial or join the conversation in SAP Community.