
Add the SAP SuccessFactors Extension to the Launchpad
In this last phase of the development journey you will finally add your deployed extension to an SAP Fiori Launchpad on BTP.
Overview
You will learn
- How to access the Work Zone Standard Edition Site Manager
- How to prepare the business content for the Work Zone Standard Edition Site
- How to assign the application to the business content and launchpad roles
- How to create the Work Zone Standard Edition Site
- How to test the Work Zone Standard Edition Site and your application


Prerequisites
Prerequisites
- Complete the tutorial: Prepare to Develop the SAP SuccessFactors Extension
- Complete the tutorial: Jump start the SAP SuccessFactors Extension CAP Project
- Complete the tutorial: Import SAP SuccessFactors OData Services definitions
- Complete the tutorial: Create the CDS Data Model for the SAP SuccessFactors Extension
- Complete the tutorial: Create the CAP Service for the SAP SuccessFactors Extension
- Complete the tutorial: Add Business Logic to the SAP SuccessFactors Extension
- Complete the tutorial: Prepare the SAP SuccessFactors Extension UI with CDS Annotations
- Complete the tutorial: Add Security to the SAP SuccessFactors Extension
- Complete the tutorial: Deploy the SAP SuccessFactors Extension Database to SAP HANA Cloud
- Complete the tutorial: Develop the SAP Fiori Elements Application for the SAP SuccessFactors Extension
- Complete the tutorial: Deploy the SAP SuccessFactors Extension to Cloud Foundry
IMPORTANT UPDATE: As of January, 12th, 2023, SAP Launchpad Service has been re-branded to SAP Work Zone Standard Edition. As it’s been just a product renaming, there’s no impact on the functionality, hence not requiring any changes in the procedures described in this tutorial. Therefore, wherever you read SAP Launchpad Service in the tutorial, please read SAP Work Zone Standard Edition.
Steps
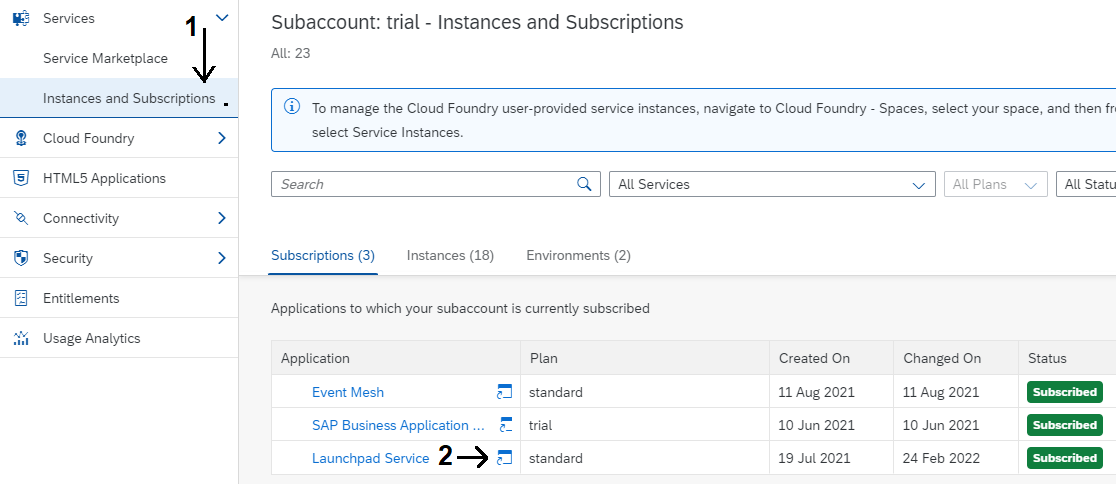
In the SAP BTP cockpit, on the left-hand pane expand the Services menu and (1) click on Instances and Subscriptions. On the right side, locate the SAP Work Zone Standard Edition under Subscriptions and (2) click on the Go to Application icon next to it.
The Site Manager UI will open-up in a new browser tab. So, the first thing you need to do is to refresh (grab) the content from the HTML5 applications repository for bring in our application from there.
(1) Click on the sandwich menu at the top-left corner of the page to expand the app menu and (2) click on the Provider Manager option. Then, (3) click on the refresh button at the far right of the HTML5 apps provider to bring-in the content from there.

To learn about the concepts managed by the SAP Work Zone Standard Edition, please refer to the official documentation in this link.
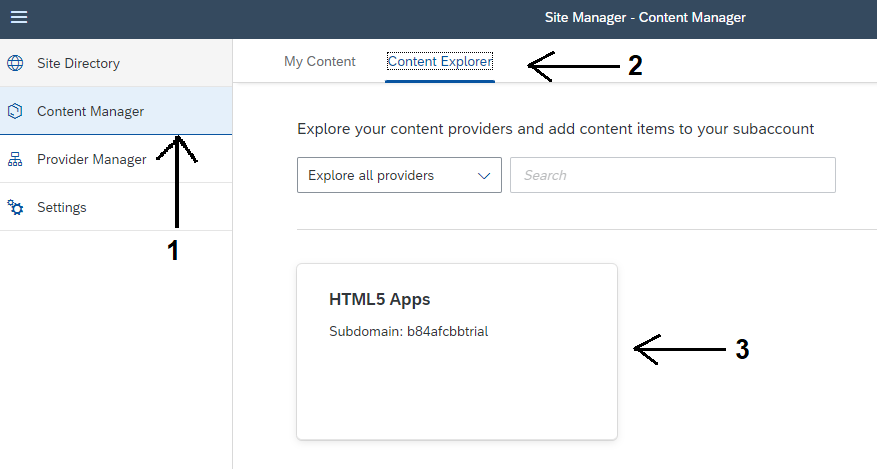
(1) Click on the Content Manager option, then (2) on the Content Explorer tab and, finally, (3) on the HTML5 Apps tile.
(1) Select the Manage Projects app, then (2) click on the Add to My Content button.

(1) Click on the My Content tab, then (2) on the New button and (3) select Catalog from the menu.

Type Project Management as Title and Project Management Catalog as Description. (1) Click on the Assign Items search bar and, then, (2) on the “+” icon to the right of the Manage Projects app. Finally, (3) click on the Save button.

Go back to the Content Manager home page, (1) click on the New button and (2) select Group from the menu.

Type SuccessFactors Extensions as Title and SuccessFactors Extensions Group as Description. (1) Click on the Assign Items search bar and, then, (2) on the “+” icon to the right of the Manage Projects app. Finally, (3) click on the Save button.

Go back to the Content Manager home page and click on the Everyone role in the list.

Click on the Edit button at the top-right and then (1) on the Assign Items search bar. (2) Click on the “+” icon to the right of the Manage Projects app. Finally, (3) click on the Save button.

(1) Click on the Site Directory option and then (2) on the Create Site button.
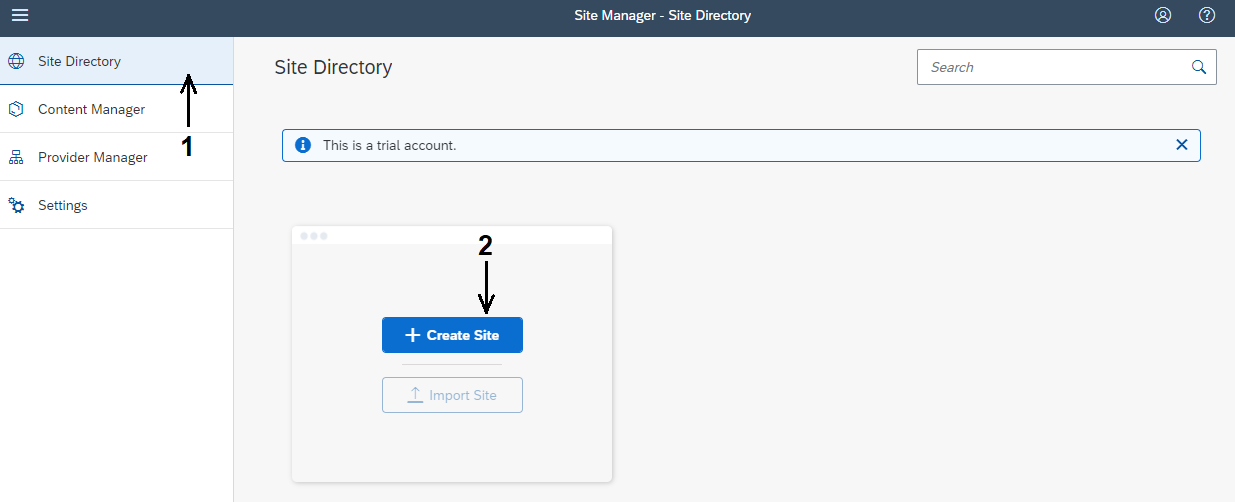
Name the site BTP Extensions and click on the Create button.

Click on the link below the URL field to launch the site, which will open-up in a new browser tab.

Click on the Maintain Projects tile to launch the application.
NOTE: the title “Maintain Projects” is taken from the SAP Fiori Launchpad (FLP) configuration that was done when the SAP Fiori Elements application has been created following this tutorial: Develop the SAP Fiori Elements Application for the SAP SuccessFactors Extension.

The List Report page for the Project entity will be loaded:

Now, click on the Go button and the initial test data (loaded to the HANA database from the CSV files) will be displayed:

And that’s it! You have successfully added a fully working SAP Fiori Elements application deployed to SAP BTP’s HTML5 Apps Repository to an SAP Work Zone Standard Edition site.
You can, now, test it at your will, in the same way you did using the Fiori Preview in step 6 of the tutorial: Prepare the SAP SuccessFactors Extension UI with CDS Annotations.
And this is the final step to Extend SAP SuccessFactors on SAP BTP with CAP!
Congratulations! After having gone through and completed the tutorials in this group you should have successfully Extended SAP SuccessFactors on SAP BTP with CAP with a simple project management application!
But there’s a lot of room for improvement in this solution, so don’t miss the opportunity to challenge yourself and go deeper in learning the technologies showcased in this tutorials group by enhancing your application!
Here’s a list of suggestions for enhancements:
- Directly assign an SAP SuccessFactors employee to a project as the “Project Owner” adding the corresponding assignment to the employee profile
- Implement a mechanism to remove the assignment from the employee profile whenever he/she is removed from a project team (either by member deletion or replacement). The same would apply to the “Project Owner”
- Implement validations such as: projects must start at least from the current date (not before) and must end after the start date and activities due dates must be within the project’s start and end dates
- Implement a mechanism to avoid activities to be added before there’s at least one member in the team to assign them
- Implement restrictions such as: users can only view/manage projects that have been created by themselves, only employees who report to the project creator can be assigned as team members, etc.
- And so on, and so forth… the sky’s the limit!
Resources
Discussion
Share feedback on this tutorial or join the conversation in SAP Community.