
Create Automated System Tests for SAP Cloud Application Programming Model Projects
Create wdi5 tests against an SAP Cloud Application Programming Model application and add them to your SAP Continuous Integration and Delivery job.
Overview
You will learn
- How to create system tests with wdi5 for SAP Cloud Application Programming Model projects using the Test Recorder
- How to add system tests as automated steps to your SAP Continuous Integration and Delivery job


Prerequisites
Prerequisites
- You use SAPUI5 in version 1.105.0 or higher.
- You have installed and configured a local Git client.
- You have installed Node.js in version 18.x.
- You have installed Visual Studio Code.
- You have installed the
cdsdevelopment kit using the commandnpm install -g @sap/cds-dk. If you encounter any problems when installing thecdsdevelopment kit, have a look at this troubleshooting section. - Your Google Chrome version is up to date. See Update Google Chrome.
- You have an SAP Business Technology Platform (BTP) Trial Account with a subaccount hosted in the region US East (VA).
- You have an account on GitHub.
- You have set up SAP Continuous Integration and Delivery (see Initial Setup).
Steps
In Visual Studio Code, set up and run your bookshop application.
Before you start working, fork this repository to your personal GitHub account. See Forking a repository.
In Visual Studio Code, choose View → Command Palette… → Git:Clone.
As Repository URL, enter:
URLhttps://github.com/<your github username>/cap-bookshop-wdi5.gitChoose Select Repository Location and select a folder into which to clone the test repository.
When asked if you want to open the cloned repository, choose Open.
As a result, the
CAP-BOOKSHOP-WDI5project is loaded into the EXPLORER pane and you can see its resources in the outline:
Resources of the project in the explorer pane In Visual Studio Code, choose Terminal → New Terminal.
Execute the following command to install the npm packages:
Shell/Bashnpm installExecute the following command to start your bookshop application:
Shell/Bashnpm run startTo open a new terminal, choose Terminal → New Terminal.
Execute the following command to call the quick start installation of wdi5:
Shell/Bashnpm init wdi5@latest -- --configPath ./app/admin-books/webapp/test/wdi5/ --specs ./**/wdi5/specs/**.js --baseUrl http://localhost:4004/fiori-apps.html\#Books-manageThe console output should look as follows:

Terminal response for the ’npm init wdi5’ command In your project in the EXPLORER pane, choose
app→admin-books→webapp→test→wdi5.Now you can see all files you need to define system tests with wdi5:
The
wdio.conf.jsfile:In this file, you’ll define the settings for the wdi5 plugin, for example the browser and reporter, as well as the URL to access the SAP Fiori app under test.
The
test.jsfile (in this case, it’s calledbookshop.test.js):In this file, you’ll define your test scenario, which comprises steps that are triggered one after the other. Within the test scenario, you’ll refer to your page objects.
Page objects (in this case, you have
pageobjects/manageBooks.page.jsfor the list of books that are added and the button to create a new book, andpageobjects/newBook.page.jsto provide the details of the new book):Page objects are design patterns that represent a significant part of an app, for example, a view. They group two kinds of elements:
 - Actions, for example, choosing the **Create** button to create a new book
 - Assertions, for example, checking if the newly created book is displayed in the list of books
Page objects reside in the
pageobjectsfolder of your project. They use locators to identify specific elements on the screen and thereby, allow test runners to see and do anything a real user would.
Execute the following command to install the timeline reporter:
Shell/Bashnpm run install --save-dev wdio-timeline-reporterThe console output should look as follows:

Terminal response for the ’npm install –save wdio-timeline-reporter’ command In the
wdio.conf.jsfile, add the following snippets to configure the timeline reporter and the Chrome browser:JavaScriptconst { TimelineService } = require("wdio-timeline-reporter/timeline-service"); exports.config = { // ...JavaScript// ... services: ['chromedriver','ui5', [TimelineService]], // ...JavaScript// ... reporters: ['spec',[ "timeline", { outputDir: "target", embedImages: true, screenshotStrategy: "before:click", }, ] ], // ...JavaScript// ... capabilities: [{ maxInstances: 5, browserName: 'chrome', acceptInsecureCerts: true, "goog:chromeOptions": { args: ["--no-sandbox", "--disable-dev-shm-usage"] } }], // ...Now, your project setup is ready. Make sure that your code looks as follows and choose File → Save.

wdio.conf.js after finishing the project setup without comments
Familiarize yourself with your test scenario before starting to code it. Later, you’ll automate the following steps so that they are automatically executed during your system tests.
As your bookshop application runs on your local server, use the following URL to access it:
URLhttp://localhost:4004/fiori-apps.html#Books-manageIn the bookshop application, choose Create.

Create button in bookshop app Enter the title of your new book, for example,
How to Cook Pancakes.From the Genre drop-down menu, choose Fiction.
From the Author drop-down menu, choose Emile Bronte.

Title of the new book Choose Create.
Verify that the Edit button is displayed.
Choose Back to return to the list of books.
Verify that the new book has been added to the list.

New book in the list The created book will persist as long as the local server with the application is running. To start with a fresh database, stop the process and restart it with
npm run start.
Create a wdi5 script to test the creation of a new book in your bookshop application.
In your project in the EXPLORER pane, choose
fiori→app→admin-books→webapp→test→wdi5→specs/bookshop.test.js.The
bookshop.test.jsfile contains your test scripts, which are divided into two sections:- The describe block, which is like a test suite and holds sets of test cases that are called
it - The
itblock, which comprises the test cases
You can have multiple
itblocks in a single spec file.In your
bookshop.test.jsfile, you’ll define the steps of your test scenario and within them, refer to your page objects.- The describe block, which is like a test suite and holds sets of test cases that are called
Into the
describefunction, implement theitfunction by adding the skeleton of thecreate new booktest:JavaScriptit("create a new book", async () => { });Your code should now look as follows:

bookshop.test.js with create new book test As a first step to create a new book, you have to choose the Create button. Implement this action as follows in the
itblock:JavaScriptawait ManageBooksPage.iClickOnCreateNewBook();Here,
iClickOnCreateNewBook()is a reference to the test function that you’ll define in the following.Your code should now look as follows:

Action to choose the create button After each step make sure to save your changes by choosing File → Save.
From the EXPLORER pane, open
pageobjects→manageBooks.page.js.This file represents the page object for your bookshop application. In page objects, you can define actions that are performed during a test and make assertions:

Structure of page objects In the bookshop application in Google Chrome, press CTRL + SHIFT + ALT + T (if you use a Windows system) or SHIFT + CTRL + OPTION + T (if you use a Mac system) to open the Test Recorder in a new browser window.
In your sample application, right-click on the Create Button and choose Press.
As a result, the Test Recorder highlights the entry to indicate its activity:

Test recorder highlights the create button Now, the Test Recorder provides a code snippet for your test:

Test recorder provides code snippet for wdi5 test Note: Make sure that the dialect
wdi5is selected.Copy the generated code snippet into the
module.exportssection of yourmanageBooks.page.jsand name the functioniClickOnCreateNewBook.
Clicking the create button action in the manageBooks page object
Create a wdi5 script to test the addition of detailed information to your newly created book.
From the EXPLORER pane in Visual Studio Code, open
bookshop.test.js.In the describe block, add the following line to declare the variable
bookTitleand assign the value"How to Cook Pancakes"to it:JavaScriptconst bookTitle = "How to Cook Pancakes";When adding detailed information to a book in the bookshop application, as a first action, you have to enter the title of the book. Implement this action as follows in the
itblock:JavaScriptawait NewBookPage.iEnterTitle(bookTitle);The
bookTitleconstant, which you have declared before, is passed as an argument, here.Now, your code should look as follows:

booksho.test.js with enter title action From the EXPLORER pane, open
pageobjects→newBook.page.js.In your bookshop application, right-click the Title input field and choose Enter Text.
As a result, the Test Recorder highlights the input field to indicate its activity:

teched.spec.js with enter title action Now, the Test Recorder provides a code snippet for your test:

The test recorder provides a code snippet for the enter title action Note: Make sure that the dialect
wdi5is selected.Copy this code snippet into the
module.exportssection of yournewBook.page.jsand name the functioniEnterTitle.Here, pass the
sBookas an argument in the function name and use it in theenterText()method.
Code snippet for enter title action in newBook page object In the
itblock of yourbookshop.test.js, add the following line to choose a value from the Genre drop-down list:JavaScriptawait NewBookPage.iSelectGenre();
Code snippet for select genre action in bookshop.test.js file In your bookshop application, right-click the Genre drop-down menu and choose Press.
As a result, the Test Recorder highlights the drop-down icon to indicate its activity:

Highlighted genre drop-down menu Now, the Test Recorder provides a code snippet for your test:

The test recorder provides a code snippet for the genre drop-down menu Note: Make sure that the dialect
wdi5is selected.Copy this code snippet into the
module.exportssection of yournewBook.page.jsfile and name the functioniSelectGenre.
Code snippet for select genre action in newBook page object From the Genre pop-up window in your bookshop application, right-click Fiction and choose Press.
Again, the Test Recorder provides a code snippet for your test. Copy it into the
module.exportssection of yournewBook.page.jsfile under the same function name (iSelectGenre).Your code should now look as follows:

Final code in newBook.page.js after adding the steps from the genre drop-down and pop-up In the
itblock of yourbookshop.test.jsfile, add the following line to choose a value from the Author drop-down list:JavaScriptawait NewBookPage.iSelectAuthor();Repeat the procedure for selecting the author (that is, copying the generated code snippets from the Test Recorder for choosing the drop-down menu and Emily Bronte from the pop-up window into your page object). Name the functions
iSelectAuthor.In the end, the code in your
newBook.page.jsshould look as follows:
newBook.page.js after adding the steps from choosing the author In the
itblock of yourbookshop.test.js, add the following line to select the Create button at the bottom of the application:JavaScriptawait NewBookPage.iPressCreate(); await NewBookPage.iSeeEditButton()Now, at the footer in the bookshop application, right-click the Create button and choose Press.
Copy the generated snippet into the
module.exportssection of yournewBook.page.jsfile. Name the functionsiPressCreateand add the expected behavior to yourbookshop.test.jsfile.
newBook.page.js after adding the code snippet for pressing the Create button To ensure that the saving action was successful, verify that the Edit button is displayed. Add the expected behavior to your
bookshop.test.jsfile:
bookshop.test.js after adding the code snippet for verifying that the edit button is displayed In the bookshop application, right-click the Edit button and choose Highlight.
On the right side of the Test Recorder window, you can find a section with Properties and Bindings. Choose the icon that is located on the left of the property
enabled. This will addexpect(enabled).toBeTruthy();to the code snippet.
Code snipped with property “enabled” Copy the generated code snippet from the Test Recorder into the
module.exportssection in yournewBook.page.jsfile and name the functioniSeeEditButton.It should look as follows:

Page object after adding the code snippet from the test recorder Let’s proceed with our test scenario by implementing another
itfunction in thebookshop.test.jsfile. To achieve that, we need to add the skeleton of theshould check book is addedtest function:JavaScriptit("should check book is added", async () => { });In this
itfunction, we need two steps. First an action to navigate back to the list of books and a second step to assert that our newly created book is contained in the list. Implement this as follows in theitblock:JavaScriptawait NewBookPage.iNavigateBack(); await ManageBooksPage.theBookListContains(bookTitle);Now, your test is complete. Make sure that it looks as follows:

Complete test in newBook.page.js To get the code snippet for the implementation of the
NewBookPage.iNavigateBackaction, right-click the < (Go Back) button and choose Press in the bookshop application.
Test recorder highlights the navigate back button Again, copy the generated code snippet into the
module.exportssection of yournewBook.page.jsfile and name itiNavigateBack.Your page object should now look as follows:

Page object with action for pressing the back button In your bookshop application, choose the < (back) button. As a result, you should see the list of all books including the one you’ve added.
In the list of books of your bookshop application, right-click the title of the book you’ve created and choose Highlight.
Note: Make sure that only the specific title of the row is highlighted in blue and not the whole row.
On the right side of the Test Recorder window, you can find a section with Properties and Bindings. Choose the icon that is located on the left of the property
visiblein theInheritedsection. This will addexpect(visible).toBeTruthy();to the code snippet.
Test recorder highlights the book entry Copy the generated code snippet into the
module.exportssection of yourmanageBooks.page.jsfile and name the functiontheBookListContains. Here, pass thesBookas an argument in the function name and use it in the locator to identify the control by its text.It should look as follows:
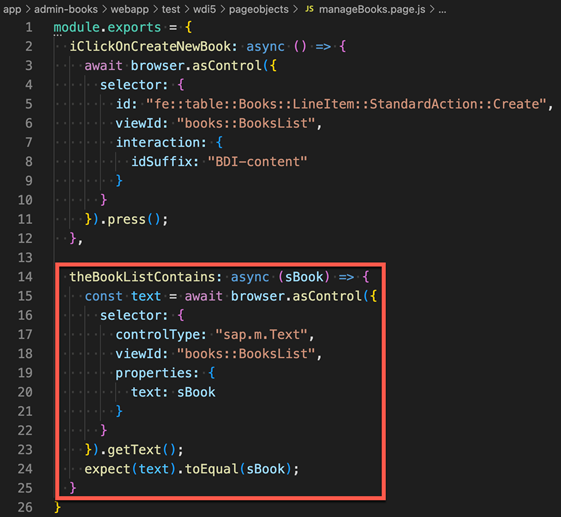
Page object after adding the code snippet from the test recorder Choose File → Save.
Right-click your
test\wdi5folder in the EXPLORER pane and choose Open in Integrated Terminal.Execute the following command to run your test:
Bash/Shellnpm run wdi5If your test run was successful, your terminal response should look as follows:

Terminal output after successful test You might face a timeout error as shown in the following screenshot:

error snippet from console for step timeout The timeout property is applicable at each step definition. However, if you want to increase the timeout because your test takes longer than the default value, you need to set it in the mocha framework options. In the
wdio.conf.jsfile, set the time as follows:JavaScript// wdio.conf.js exports.config = { //..... mochaOpts: { ui: 'bdd', timeout: 60000 } //..... }Another known timeout error is while waiting for the UI5 controller to load as shown in the following screenshot:

error snippet from console for ui5timeout If you are getting timeout errors while waiting for an UI5 element to load, consider increasing the maximum waiting time for the availability of UI5 control. In the
wdio.conf.jsfile, set the time as follows:JavaScript/// wdio.conf.js exports.config = { //..... wdi5: { waitForUI5Timeout: 60000, }, //..... }In the EXPLORER pane, right-click the
timeline-report.htmlin thetargetfolder and choose Reveal in File Explorer.Double-click the
timeline-reportin the file explorer:
timeline-report.html in the file explorer
Create credentials for deploying your application to SAP BTP, Cloud Foundry environment.
In the Credentials tab in SAP Continuous Integration and Delivery, choose + (Create Credentials).

Credentials For Name, enter a freely chosen name for your credentials, which is unique in your SAP BTP subaccount, for example
cfdeploy.As Type, select Basic Authentication.
For Username, enter your username for the SAP BTP cockpit.
For Password, use your password for the SAP BTP cockpit.

CI/CD CF Deploy Credentials Choose Create.
Note: If your GitHub repository is not private, you can skip this section.
If your GitHub repository is private, configure credentials for it, so that SAP Continuous Integration and Delivery can connect to it.
In the Credentials tab in SAP Continuous Integration and Delivery, choose + (Create Credentials).
For Name, enter a freely chosen name for your credential, which is unique in your SAP BTP subaccount, for example
github.As Type, select Basic Authentication.
For Username, enter your GitHub username.
For Password, use a personal access token.
Note: When creating the token, select repo as scope.
Choose Create.
Connect SAP Continuous Integration and Delivery to the repository in which your project sources reside.
In SAP Continuous Integration and Delivery, choose Repositories → + (Add).

Repositories In the Add Repository pane, add a name for your repository.
In GitHub, copy the HTTPS clone URL of the repository that contains your application.
Paste it into the Clone URL field in the Add Repository pane in SAP Continuous Integration and Delivery.
(Optional) If your GitHub repository is private, choose the GitHub credentials you’ve created in the previous step from the Credentials drop-down list.
Choose Add.
Note: Optionally, you can automate SAP Continuous Integration and Delivery builds through webhooks. Thereby, builds are triggered through creating and committing a code change in your GitHub project. For more information, see Add a Webhook in GitHub.
Configure a basic SAP Continuous Integration and Delivery job and automate your system tests by integrating them into it.
Execute a Git commit and push the content of your local
CAP-BOOKSHOP-WDI5project into your GitHub repository.In SAP Continuous Integration and Delivery, go to the Jobs tab and choose + (Create job).
In the General Information section of the Create Job pane, enter the following values:
- Job Name: Freely choose a unique name for your job, for example,
cap-bookshop-wdi5. - Repository: From the drop-down list, choose your repository.
- Branch: Enter the branch of your repository for which you want to configure your CI/CD job, for example,
main. - Pipeline: From the drop-down list, choose SAP Cloud Application Programming Model.
- Version: If you create a new job, the latest version is selected by default.
- State: To enable your job, choose ON.

General CI/CD Job Information - Job Name: Freely choose a unique name for your job, for example,
In the Build Retention section, keep the default values.
In the Stages section, choose Job Editor as Configuration Mode.
For the Build stage, keep the default values.
For the Acceptance stage, enter the following values for the Deploy to Cloud Foundry Space step:
- Application Name: Enter a unique application name.
- API Endpoint: Enter the URL of your SAP BTP, Cloud Foundry API Endpoint. You can find it in the overview of your subaccount in the SAP BTP cockpit, under the Cloud Foundry Environment: tab.
- Org Name: Enter the name of your Cloud Foundry organization. You can also find it in the overview of your subaccount.
- Space: Enter the name of the Cloud Foundry space in which you want to test your application.
- Credentials: From the drop-down list, choose the SAP BTP credentials you created.

Deploy to CF Space in the UI Enter the following values for the WebdriverIO Test step:
npm Script: Use the same script name that is used to execute for local execution of the tests (
wdi5).Base URL: Enter the URL of the application against which the tests shall be executed. The application will be available under the following URL:
URLhttps://<Org Name>-<Space>-bookshop-srv.cfapps.us10-001.hana.ondemand.com/fiori-apps.html#Books-manageNote: Depending on your region,
us10-001could be different.Space: Enter the name of the Cloud Foundry space in which you want to test your application.
Credentials: As your test application doesn’t require credentials, leave this field empty.
Switch all other stages off and choose Create.
Note: As this tutorial focuses on how to get started with SAP Continuous Integration and Delivery, we’ve decided to configure only a very basic CI/CD pipeline in it. For how to configure more elaborate ones, see Supported Pipelines.
To run your CI/CD pipeline, choose Run.
As a result, a build of the connected job is triggered and a new build tile appears in the Builds section of your job. If you choose it, the Build Stages view opens and you can watch the individual stages of your build run through. The pipeline run might take a few minutes.
You can get an overview of the test results in the detailed log of your build:

Resources
Discussion
Share feedback on this tutorial or join the conversation in SAP Community.