
Overview
You will learn
- How to add extended tables to an existing information model


Prerequisites
Prerequisites
- Tutorials: “Creating a Calculation View from the Union of In-Memory and Extended Tables”
Steps
Time to Complete
15 Min
We have converted the original information into all calculation views so that they can support other calculation views. We then created a new calculation view which was a union between hot and warm data. Now we will replace ORDERS_CS with the new calculation view inside of AV_ORDERS.
Under the tutorial_All_Calc package, open up AV_ORDERS in the graphical viewer. Under Projection, right click ORDERS_CS and click Remove.
Note: You may need to expand Projection by clicking the
+button beside its name.

You will receive a warning that column references will get removed because of this action. Click Yes and OK to confirm.
Similar to the previous tutorial, we will drag CA_UNION view over from the Systems panel, and drop it into the Projection node.
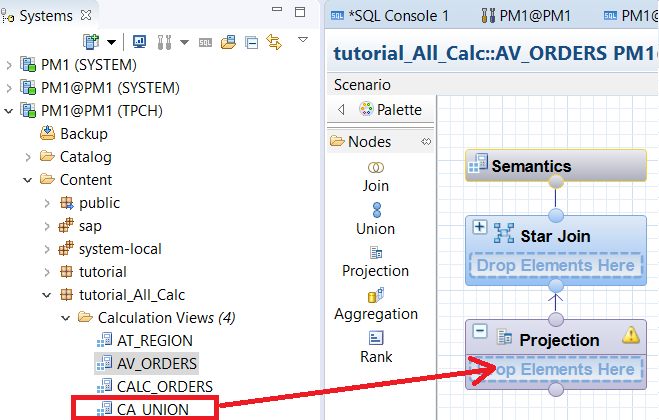
Afterwards, select the Projection node to edit its details in the Details panel. Click the gray dots for O_CUSTERKEY, O_ORDERSTATUS, O_TOTALPRICE, and O_ORDERDATE. This will add them to the output and the color of the dots will change to orange to indicate that they are now included in the output.

Now, select the Star Join node to edit it. Toggle all the gray circles to become orange, except for the O_CUSTKEY from Projection. Then, connect O_CUSTKEY with C_CUSTKEY. This is done by clicking anywhere on one row, and dragging your cursor to another row.

You may see a warning sign above the Projection node. If it reads “No columns added to the output” when you have already done so (denoted by the orange dots), you may ignore this warning.
Next, we will select the Semantics, to ensure each column is set as the right type. Toggle the type so that O_ORDERDATE and ORDERSTATUS are attributes (denoted by a blue diamond), and O_TOTALPRICE is a measure (denoted by an orange bar) with a “Sum” aggregation.

Navigate to tutorial_All_Calc in Systems. Under tutorial_All_Calc > Calculation Views, right click AV_ORDERS and click Activate.

We have successfully added extended tables to an existing information model! In summary, we took the old AV_ORDERS used the in-memory table called ORDERS_CS, and combined it with AT_REGION to create a result set showing each customer key with its corresponding region name, order status, order data, and total price from the last year. This new AV_ORDERS view combines the new CA_UNION view (which is a union of ORDERS_CS and ORDERS_DT) with AT_REGION, creating a result with the same fields as before, but now includes data from all years, including the data that has been aged out to the extended table in Dynamic Tiering.
Resources
Discussion
Share feedback on this tutorial or join the conversation in SAP Community.