
Refine the Object Page with Annotations
Display data in fields and tables on the object page using annotations.
Overview
You will learn
- How to add a title and a subtitle to the object page header
- How to add key data to the object page header
- How to add a section and use field groups to structure data
- How to add a table
- How to include pictures in a table
- How to modify an SAP Fiori elements application to add features like flexible column layout and initial load of data
- How to update the metadata in your frontend application
- How to add side effects using guided development


Prerequisites
Prerequisites
- You have prepared your OData service as described in the previous tutorial Prepare the RAP-Based Travel Service.
- Ensure that you have finished all steps in previous tutorials: Prepare the RAP-Based Travel Service Generate an SAP Fiori Elements Application based on a RAP-based Service Refine the List Report with Annotations
Steps
Intro
Whenever your unique suffix for creating objects is needed, the object names within this tutorial are named with suffix “######”. For the screenshots the suffix “000100” was used.
Clicking on any item of the list report will show the object page for this item. The object page currently shows only some standard buttons and does not contain any further fields or actions. In this step you will add annotations to show a title and a subtitle in the object page header.
Open the metadata extensions for the Travel view
ZC_FE_TRAVEL_######. In the previous tutorial Refine the List Report with Additional Annotations you already defined header information in step 3. Now you will enhance the annotation@UI.headerInfowith atitleand adescriptionproperty.CDS... @UI: { headerInfo: { typeName: 'Travel', typeNamePlural: 'Travels', title: { type: #STANDARD, value: 'Description' }, description: { value: 'TravelID' } }, ...Choose Save and Activate.
Refresh the app preview. You will see an object page containing a title and a subtitle in the header and an empty content section.
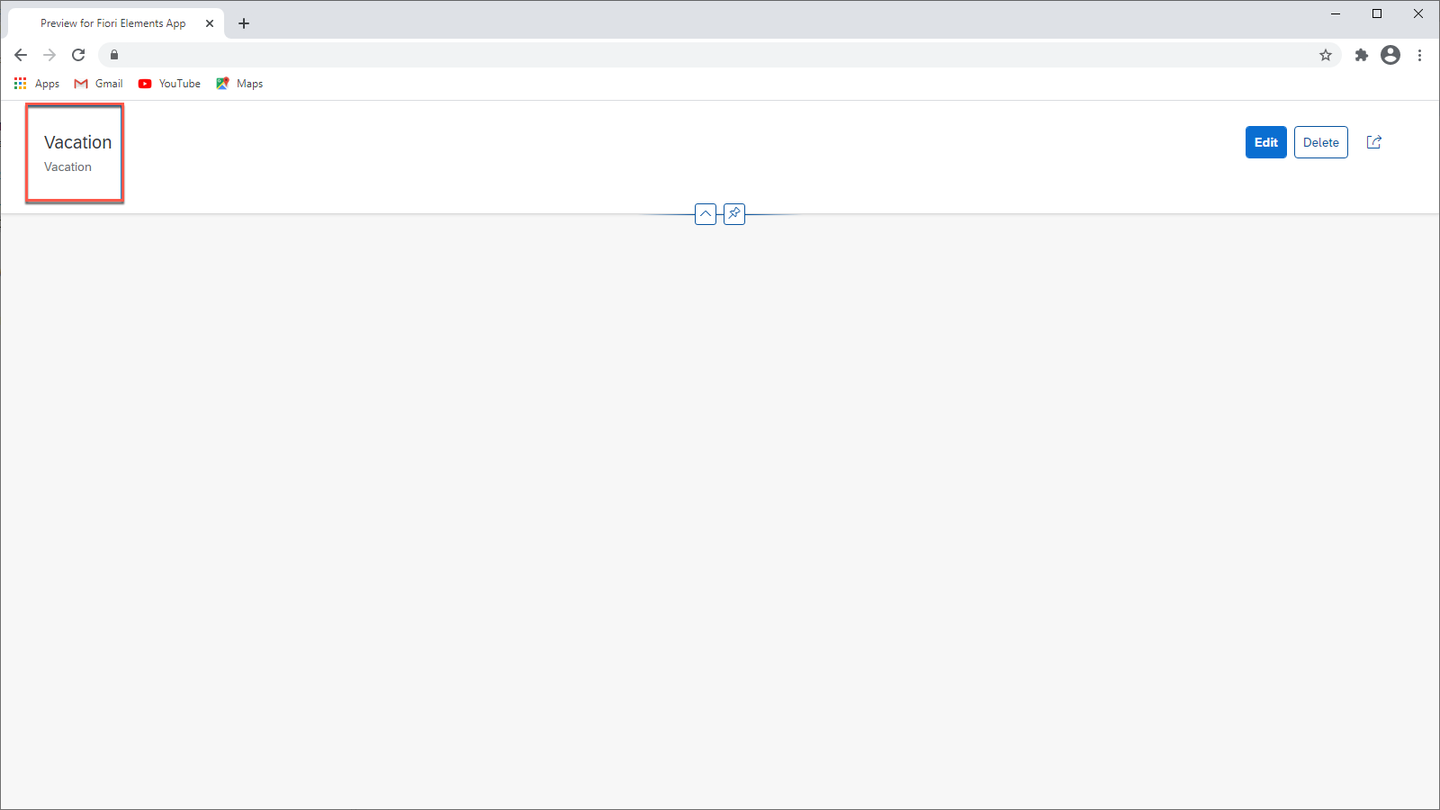
App object page title
In this step you will add some key information to the object page header using data points.
As in the steps before, open the metadata extensions file for the Travel view
ZC_FE_TRAVEL_######.Add the
@UI.facetannotation with two objects of type#DATAPOINT_REFERENCE.CDS... annotate view ZC_FE_TRAVEL_###### with { @UI.facet: [ { id: 'TravelHeaderPrice', purpose: #HEADER, type: #DATAPOINT_REFERENCE, position: 10, targetQualifier: 'PriceData' }, { id: 'TravelHeaderOverallStatus', purpose: #HEADER, type: #DATAPOINT_REFERENCE, position: 20, targetQualifier: 'StatusData' } ] @UI.lineItem: [{ position: 10}] TravelID; ...Annotating properties
TotalPriceandOverallStatuswith@UI.datapointusing thetargetQualifierfrom the facet definition in step 1 will assign the properties to the header facet accordingly.CDS... @UI.lineItem: [{ position: 70}] @UI.dataPoint: { qualifier: 'PriceData', title: 'Total Price'} TotalPrice; @UI.lineItem: [{ position: 80, criticality: 'OverallStatusCriticality' }] @UI.selectionField: [{ position: 30}] @UI.textArrangement: #TEXT_ONLY @UI.dataPoint: { qualifier: 'StatusData', title: 'Status', criticality: 'OverallStatusCriticality' } OverallStatus; ...Choose Save and Activate.
Refresh the app preview. The two new data points show up in the object page header. The labels are taken from property
title, the color of Status from propertycriticalityof thedatapointannotations .
App Data Points
In this step you will add a section to the content area of the object page. The section will contain a form with three data fields.
Open the metadata extensions file for the Travel view
ZC_FE_TRAVEL_######and enter the facet annotations that define the section General Information as a collection facet, using the typeCollection. Add a second facet as a child of General Information with facet type#IDENTIFICATION_REFERENCEto create a form with title General. Add the code from line 8 to line 21 to your existing UI facet definition.CDS... annotate view ZC_FE_TRAVEL_###### with { @UI.facet: [ ... { label: 'General Information', id: 'GeneralInfo', type: #COLLECTION, position: 10 }, { label: 'General', id: 'Travel', type: #IDENTIFICATION_REFERENCE, purpose: #STANDARD, parentId: 'GeneralInfo', position: 10 } ] ... }Add a new property
Descriptionand annotate this and the propertiesAgencyIDandCustomerIDwith@UI.Identificationto position these fields under General.CDSannotate view ZC_FE_TRAVEL_###### with { ... @UI.lineItem: [{ position: 10}] TravelID; @UI.identification: [{ position: 10 }] Description; @UI.lineItem: [{ position: 20}] @UI.selectionField: [{ position: 10}] @UI.identification: [{ position: 30 }] AgencyID; @UI.lineItem: [{ position: 30}] @UI.selectionField: [{ position: 20}] @UI.identification: [{ position: 20 }] CustomerID; ... }Choose Save and Activate.
Refresh the app preview. The new form General is shown in section General Information containing the three fields.

App section GeneralInfo
A field group contains one or more data fields inside a UI container. In this step you define two field groups in the section General Information.
Open the metadata extensions file for the Travel view
ZC_FE_TRAVEL_######.First, define a field group for the beginning and end date of a travel item and for the prices. The facet type for a field group is
#FIELDGROUP_REFERENCE. Add the code from line 8 to line 25 to the end of the@UI.facetsection.CDSannotate view ZC_FE_TRAVEL_###### with { @UI.facet: [ { ... { id: 'Dates', purpose: #STANDARD, type: #FIELDGROUP_REFERENCE, parentId: 'GeneralInfo', label: 'Dates', position: 30, targetQualifier: 'DatesGroup' }, { id: 'Prices', purpose: #STANDARD, type: #FIELDGROUP_REFERENCE, parentId: 'GeneralInfo', label: 'Prices', position: 20, targetQualifier: 'PricesGroup' } ] ... }Annotate the properties
BeginDateandEndDatewith@UI.fieldGroup. Make sure you use the same field group qualifierDatesGroupbut different positions in each annotation. Apply the same for the propertiesBookingFeeandTotalPriceusing field group annotations with qualifierPricesGroup.CDS... @UI.lineItem: [{ position: 40}] @UI.fieldGroup: [{ qualifier: 'DatesGroup', position: 10 }] BeginDate; @UI.lineItem: [{ position: 50}] @UI.fieldGroup: [{ qualifier: 'DatesGroup', position: 20 }] EndDate; @UI.lineItem: [{ position: 60}] @UI.fieldGroup: [ { qualifier: 'PricesGroup', position: 10} ] BookingFee; @UI.lineItem: [{ position: 70}] @UI.fieldGroup: [{ qualifier: 'PricesGroup', position: 20 }] TotalPrice; ...Choose Save and Activate.
Refresh the app preview. There are two additional field groups showing price and date information.

App field Groups
In this step you will add a new section that contains a table with booking information. This requires access to another entity Booking via an association and an additional metadata extensions file.
Open the metadata extensions file for the Travel view
ZC_FE_TRAVEL_######. In the facet annotation block, add a new facetBookingwith type#LINEITEM_REFERENCE. Add the code from line 7 to line 14 to the end of the@UI.facetsection. Choose Save and Activate.CDS... annotate view ZC_FE_TRAVEL_###### with { ... @UI.facet: [ ... { id: 'Booking', purpose: #STANDARD, type: #LINEITEM_REFERENCE, label: 'Bookings', position: 20, targetElement: '_Booking' } ] ...The property
targetElement: _Bookingreferences the association to the booking table that will be shown in the booking section. You can look up the definition of Booking in the projection view of TravelZC_FE_TRAVEL_######.In the project explorer open the folder
Data Definitions, right-click on projection viewZC_FE_BOOKING_######and create a new metadata extensions file from the context menu. EnterZC_FE_BOOKING_######as name andMetadata Extension for Booking viewas description.
add Metadata Extension for Booking Choose Next and then Finish.
In the metadata extensions file
ZC_FE_BOOKING_######use@UI.lineItemannotations to add some fields from the Booking viewZC_FE_BOOKING_###### Projection View for Bookingto the bookings table. AddtextArrangementfor CustomerID and CarrierID like you did it for list report. Replace the content ofZC_FE_BOOKING_######by the following code:CDS@Metadata.layer: #CORE annotate view ZC_FE_BOOKING_###### with { @UI.lineItem: [ { position: 10 } ] BookingID; @UI.lineItem: [ { position: 20 } ] BookingDate; @UI.lineItem: [ { position: 30 } ] @UI.textArrangement: #TEXT_ONLY CustomerID; @UI.lineItem: [ { position: 40 } ] @UI.textArrangement: #TEXT_ONLY CarrierID; @UI.lineItem: [ { position: 50 } ] ConnectionID; @UI.lineItem: [ { position: 60 } ] FlightDate; @UI.lineItem: [ { position: 70 } ] FlightPrice; }Choose Save and Activate.
Refresh the app preview. The booking table is now displayed in the new Bookings section of the object page.
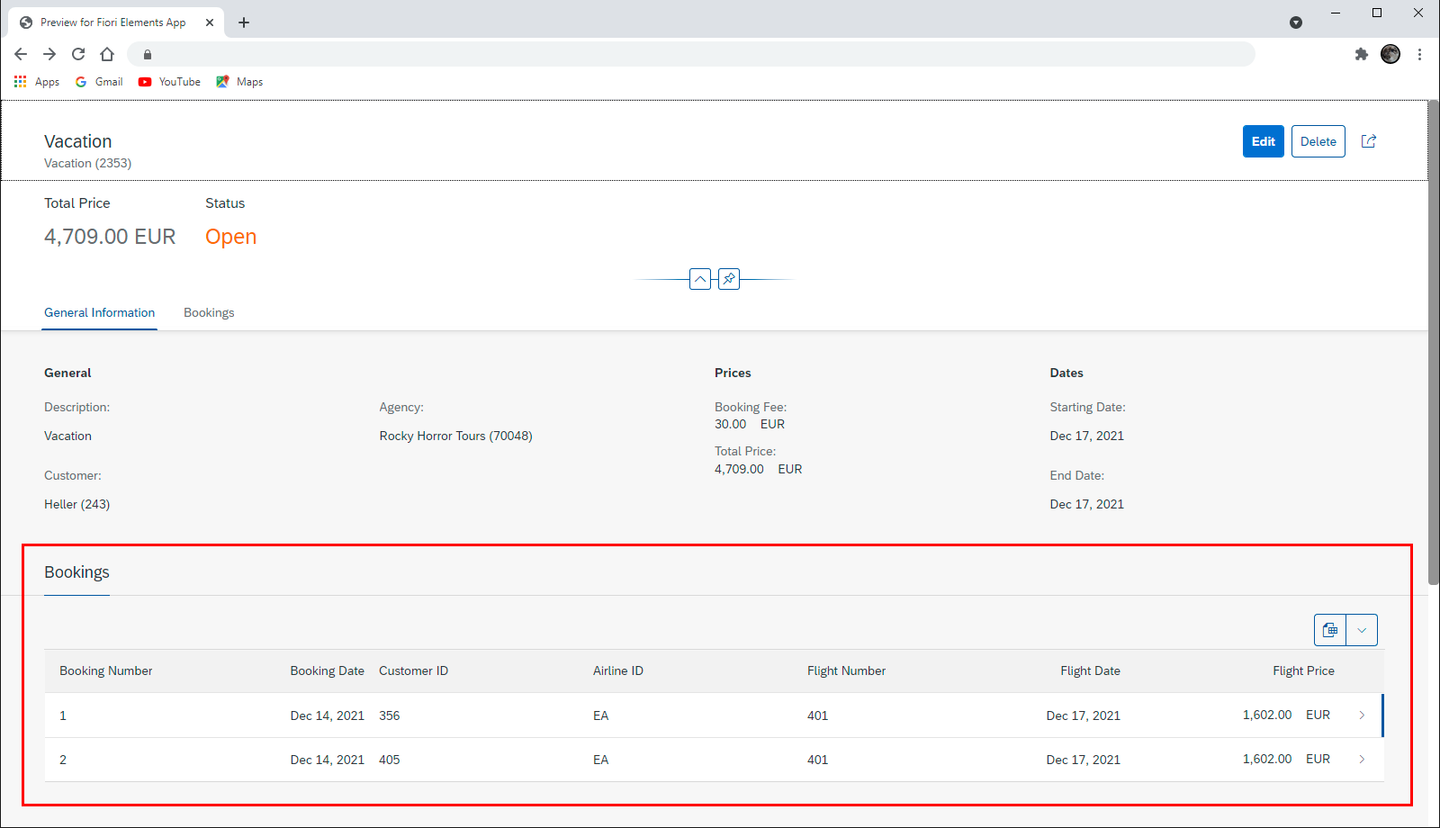
App booking table Instead of showing IDs for the fields Customer ID and Airline ID, one would preferably show descriptions or names.
This will be made possible by using specific annotations which are implemented within the projection view
ZC_FE_BOOKING_######. Therefore, open the projection view which contains the root view definitions for the booking entity.Add the
@ObjectModeland@EndUserTextannotations to the fields as shown in the coding fragments below.Annotation
@EndUserText.labeldefines the column label for the related fields. Using annotation@ObjectModel.text.elementcontrols the source of the content shown for the related field. FieldsCarrierIDandCustomerIDwill get their content through the corresponding association.CDS@EndUserText.label: 'Customer' @ObjectModel.text.element: ['LastName'] CustomerID, _Customer.LastName as LastName,CDS@EndUserText.label: 'Airline' @ObjectModel.text.element: ['CarrierName'] CarrierID, _Carrier.Name as CarrierName,
Choose Save and Activate.
Refresh the app preview. The booking table is now displayed in the new Bookings section of the object page with descriptions for Customer and Airline.
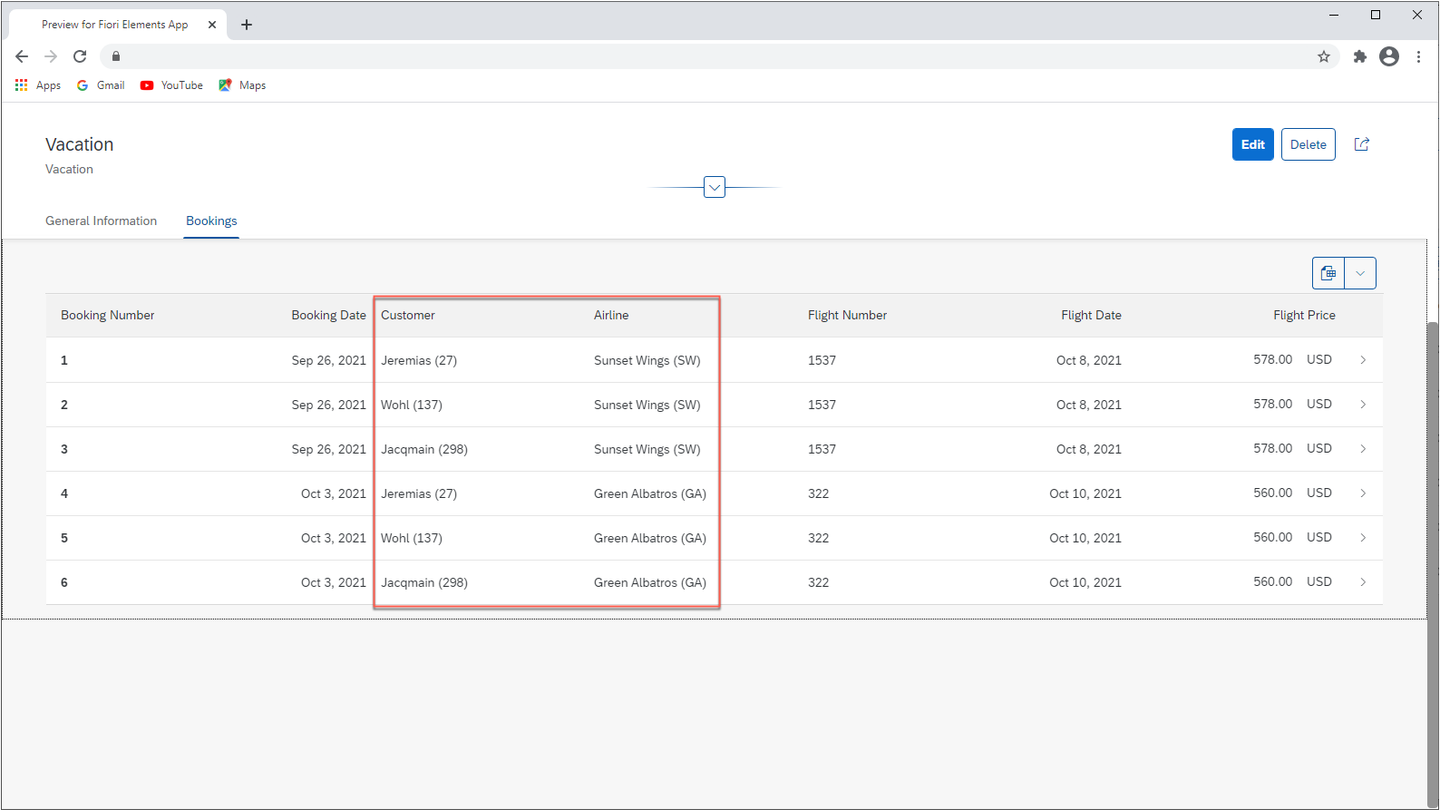
App booking table
In this step you will add the airline logo in a new column at the beginning of the booking table.
To achieve this, open the metadata extensions file
ZC_FE_BOOKING_######and add the following code lines to the annotation structure.CDS... @UI.lineItem: [ { position: 05, label: ' ', value: '_Carrier.AirlinePicURL' } ] _Carrier; ...Choose Save and Activate.
Refresh the app preview. The booking table is now displayed with the airline logo in the first column.

App airline logos
With the flexible column layout you can have the list report and the object page open at the same time without the need to navigate back and forth between them.
In the SAP Business Application Studio open the context menu by right clicking on your
webappfolder and select the menu entry Show Page Map.
Right-click on webapp folder In the left area of the page map you see the UI structure of your application showing the two pages, the list report and the object page. In the right area you can see the property panel with the application settings. Choose option Flexible Column Layout and then select the Mid-Expanded option for the two columns layout. Leave the default for the three columns layout unchanged.

The Page Map with page map and layout settings The application is refreshed automatically. Choose Go to load data into the list report table. Select any of the items within the table to open the object page.

Click go on list report after refresh Now the object page is displayed together with the list report. When you select another item in the list report, the object page is updated.
In this step you will activate the initial load feature that will trigger the loading of data within the list report automatically, i.e. without having to choose Go.
Open the page map once again as shown in the previous step by choosing the Show Page Map option in the context menu of your application folder.
In the UI structure of your application switch to edit mode of the List Report tile.

Configure Page icon on list report block Now the structure of the list report is shown. Open the properties of the list report table by selecting the Table component.
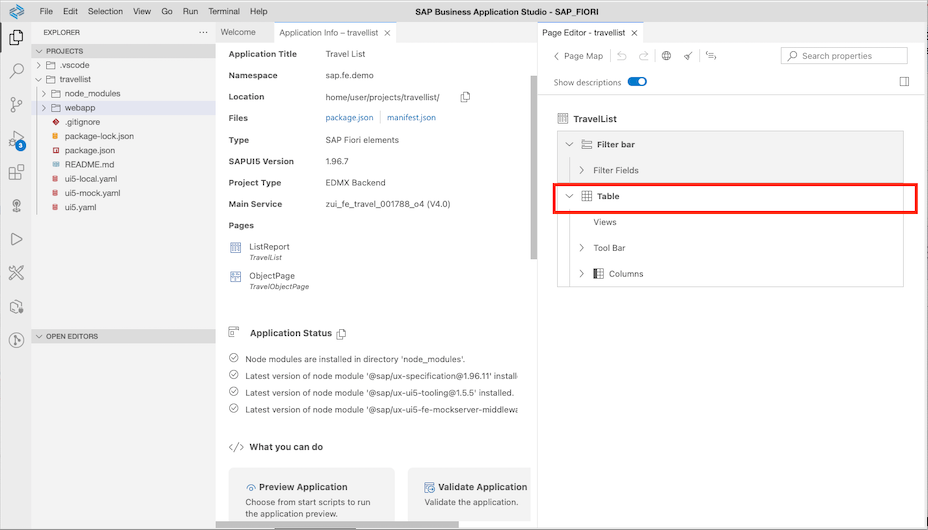
Click on table in page editor In the list of table properties select the value Enabled for the table property Initial Load. This setting is immediately active without the need of any confirmation.

Select true for initial load in drop down field Your application is updated and you will see that the data of the list report table is loaded immediately without choosing Go.

Restart the app and see the initial load of data
You will need to update the local copy of the metadata in order to work with the annotations locally in Fiori tools extensions such as XML Annotation LSP, Guided Development or Page Editor.
As long as your application preview is based on the real service metadata, you will see the changes you made in the backend without refreshing the local metadata.
You will now learn how to update the metadata with the next steps.
Switch to the SAP Business Application Studio with your generated application from second tutorial Generate an SAP Fiori Elements Application based on a RAP-based Service. If the application preview is already running in other browser tab, then you do not need to stop it.
From the hamburger menu, open View->Command Palette…, type
Service Manager, and select Fiori: Open Service Mananger.In the main service row click the
edit button.
Start Service Manger Choose Refresh to update local metadata of your application.

Refresh Service The Service Manager has updated the service metadata in the application’s webapp/localService folder.
For the managed scenario with draft, you need to define side effects on the travel entity for immediate feedback on the Fiori Elements UI. The side effect will trigger the recalculation of the Total Price on every change of the Booking Fee.
There are several ways to add side effects. One is via the local annotations in the app and another one is directly in the backend via ABAP CDS. Users choose the right one for themselves. In this tutorial we will show you how to add the local annotations using guided development.
But first you need to define the internal action reCalcTotalPrice in the behavior definition and implement it in the behavior implementation class for Travel. The action reCalcTotalPrice is called by determinations if changes on prices in the travel entity itself or in the child entities are executed. The total price on the travel entity is then recalculated.
Define the internal action reCalcTotalPrice.
In Eclipse open the behavior definition for the Travel
ZI_FE_TRAVEL_######in Behavior Definitions folder and add the following code line to define the internal action.CDSdefine behavior for ZI_FE_Travel_###### alias Travel { ... internal action reCalcTotalPrice; ... }Choose Save and Activate.
Remember: Internal actions can only be called from BO internal consumers. In our demo scenario, the action is called from determinations on all BO entities, whenever a booking fee or a currency code field is changed.
Implement the internal action reCalcTotalPrice in the behavior implementation class for Travel.
Via a quick fix assist (Ctrl+Shift+1), you can generate the method declaration in the behavior pool directly from the behavior definition editor (your method will be in the implementation class
ZBP_I_FE_TRAVEL_######->LHC_TRAVEL).
Using a quck fix assist The added method declaration will look like:
ABAPreCalcTotalPrice FOR MODIFY IMPORTING keys FOR ACTION Travel~reCalcTotalPrice,Implementation: To determine the total price of a travel, all prices must be converted to the travel currency and then summed up. This is done for each BO entity separately.
Add the following code lines to the method
reCalcTotalPrice. Replace ###### inZI_FE_Travel_######with your number.ABAPMETHOD reCalcTotalPrice. TYPES: BEGIN OF ty_amount_per_currencycode, amount TYPE /dmo/total_price, currency_code TYPE /dmo/currency_code, END OF ty_amount_per_currencycode. DATA: amount_per_currencycode TYPE STANDARD TABLE OF ty_amount_per_currencycode. " Read all relevant travel instances. READ ENTITIES OF ZI_FE_Travel_###### IN LOCAL MODE ENTITY Travel FIELDS ( BookingFee CurrencyCode ) WITH CORRESPONDING #( keys ) RESULT DATA(travels). DELETE travels WHERE CurrencyCode IS INITIAL. LOOP AT travels ASSIGNING FIELD-SYMBOL(<travel>). " Set the start for the calculation by adding the booking fee. amount_per_currencycode = VALUE #( ( amount = <travel>-BookingFee currency_code = <travel>-CurrencyCode ) ). " Read all associated bookings and add them to the total price. READ ENTITIES OF ZI_FE_Travel_###### IN LOCAL MODE ENTITY Travel BY \_Booking FIELDS ( FlightPrice CurrencyCode ) WITH VALUE #( ( %tky = <travel>-%tky ) ) RESULT DATA(bookings). LOOP AT bookings INTO DATA(booking) WHERE CurrencyCode IS NOT INITIAL. COLLECT VALUE ty_amount_per_currencycode( amount = booking-FlightPrice currency_code = booking-CurrencyCode ) INTO amount_per_currencycode. ENDLOOP. CLEAR <travel>-TotalPrice. LOOP AT amount_per_currencycode INTO DATA(single_amount_per_currencycode). " If needed do a Currency Conversion IF single_amount_per_currencycode-currency_code = <travel>-CurrencyCode. <travel>-TotalPrice += single_amount_per_currencycode-amount. ELSE. /dmo/cl_flight_amdp=>convert_currency( EXPORTING iv_amount = single_amount_per_currencycode-amount iv_currency_code_source = single_amount_per_currencycode-currency_code iv_currency_code_target = <travel>-CurrencyCode iv_exchange_rate_date = cl_abap_context_info=>get_system_date( ) IMPORTING ev_amount = DATA(total_booking_price_per_curr) ). <travel>-TotalPrice += total_booking_price_per_curr. ENDIF. ENDLOOP. ENDLOOP. " write back the modified total_price of travels MODIFY ENTITIES OF ZI_FE_Travel_###### IN LOCAL MODE ENTITY travel UPDATE FIELDS ( TotalPrice ) WITH CORRESPONDING #( travels ). ENDMETHOD.Choose Save and Activate.
Define the determination calculateTotalPrice.
The actual calculation of the total price is done by the action recalcTotalPrice. The determination just executes the action.
Define a determination on modify with operation trigger create and field triggers BookingFee and CurrencyCode. Also define the field TotalPrice as read only, as the value must no be defined externally.
In the behavior definition for the Travel
ZI_FE_TRAVEL_######add the following code lines.CDSdefine behavior for ZI_FE_Travel_###### alias Travel { ... field ( readonly ) TotalPrice; determination calculateTotalPrice on modify { create; field BookingFee, CurrencyCode; } ... }Choose Save and Activate.
Implement the method calculateTotalPrice.
Via a quick fix assist (Ctrl+Shift+1), you can generate the method declaration in the behavior pool directly from the behavior definition editor (your method will be in the implementation class
ZBP_I_FE_TRAVEL_######->LHC_TRAVEL).Implementation: Execute the action recalcPrice when the trigger fields are changed.
Add the following code lines to the method
calculateTotalPrice. Replace ###### inZI_FE_Travel_######with your number.ABAPMETHOD calculateTotalPrice. MODIFY ENTITIES OF ZI_FE_Travel_###### IN LOCAL MODE ENTITY Travel EXECUTE reCalcTotalPrice FROM CORRESPONDING #( keys ). ENDMETHOD.Choose Save and Activate.
At this point the backend implementation for the total price recalculation is finished. Now if you start the application preview in SAP Business Application Studio, navigate from List Report to Object Page, click on Edit, change the booking fee and Save the data. The total price is recalculated. Note that Total Price field is read only now.
With the next steps you will learn how to add side effects to update the total price after changing the booking fee directly. This means, if you change the field
booking feeand jump into another field, the total price is already re-calculated without the need to save the data. For this we will use Guided Development.Switch to the SAP Business Application Studio with your generated application.
From the hamburger menu, open View->Command Palette…, type Guided Development, and select Fiori: Open Guided Development.
In the Search guides field type
side effectsand then select the Configure side effects guide. This guide contains two steps.In the right upper corner you can use the Fullscreen button, to hide/show the search view.

Open Configure Side Effects Guide Switch to the first step of the guide. Here you will configure the property BookingFee from Entity Type Travel as a source of the side effect.

Add Side Effect Source Options In the code snippet preview you will see the annotations and the file name, which will be changed.
Choose Insert Snippet.

Check and insert Code Snippet The anonnotations.xml file editor opens with newly added annotations for side effect source.

Annotations result in the file Switch to the second step of the guide. Here you will configure the TotalPrice as a side effect target.
Choose Insert Snippet.

Check and insert Code Snippet The anonnotations.xml is adopted with a new lines.

Check and insert Code Snippet Refresh the application and choose Go to load data into the list report table. Select any of the items within the table to open the object page. Choose Edit to start chaining data of the draft.
Change the amount of Booking Fee and step out of the field. The side effect is triggered and the Total Price is recalculated.

Check and insert Code Snippet Self study (OPTIONAL): at this point the recalculation is triggered if the Booking Fee amount is changed. What do you need to change in the backend and side effects to trigger Total Price recalculation, if the Flight Price of a Booking is changed on the UI? Hint: the Travel entity has an association to Booking entity with the property FlightPrice.
Use the suggested solution in points 9-12 below for the self-check.
(OPTIONAL) Define the determination calculateTotalPrice in Booking behavior.
The actual calculation of the total price is done by the action recalcTotalPrice. You need the determination in Booking behavior to execute the action.
Define a determination on modify with operation trigger create and field triggers FlightPrice and CurrencyCode.
In the behavior definition for the Travel
ZI_FE_TRAVEL_######add the following code lines.CDSdefine behavior for ZI_FE_Booking_###### alias Booking { ... determination calculateTotalPrice on modify { create; field FlightPrice, CurrencyCode; } ... }Choose Save and Activate.
(OPTIONAL) Implement the method calculateTotalPrice.
Via a quick fix assist (Ctrl+Shift+1), you can generate the method declaration in the behavior pool directly from the behavior definition editor (your method will be in the implementation class
ZBP_I_FE_BOOKING_######->LHC_TRAVELclass).Implementation: Execute the reCalcTotalPrice on root node when the trigger fields are changed.
Add the following code lines to the method
calculateTotalPrice. Replace ###### inZI_FE_Travel_######with your number.ABAPMETHOD calculateTotalPrice. " Read all parent UUIDs READ ENTITIES OF ZI_FE_Travel_###### IN LOCAL MODE ENTITY Booking BY \_Travel FIELDS ( TravelUUID ) WITH CORRESPONDING #( keys ) RESULT DATA(travels). " Trigger Re-Calculation on Root Node MODIFY ENTITIES OF ZI_FE_Travel_###### IN LOCAL MODE ENTITY Travel EXECUTE reCalcTotalPrice FROM CORRESPONDING #( travels ). ENDMETHOD.The backend implementations is finished.
Choose Save and Activate.
(OPTIONAL) Switch again to the SAP Business Application Studio and the Configure Side Effects Guide. Configure the property FlightPrice via navigation property Booking as a source and the property TotalPrice remains as a target for the new side effect.
Change the side effect qualifier name as this will be an additional side effect.

Add Side Effect Source Options Choose Insert Snippet for source and then in step 2 insert corresponding snippet for TotalPrice as target.
The resulting annotations.xml file opens with newly added source and target annotations for your second side effect.

Annotations result in the file (OPTIONAL) Refresh the application and choose Edit on object page to start changing data of the draft.
Now change the amount of Flight Price and step out of the field. The side effect is triggered and the Total Price is recalculated.

Check and insert Code Snippet
Over the past four tutorials, you have used the SAP ABAP RESTful Application Programming Model, SAP Fiori tools and SAP Fiori elements for OData V4 to build this application. You have learned how to:
Use the wizard-style approach of SAP Fiori tools to generate an application based on an existing service
Refine a RAP based service with additional annotations to improve the user interface
Configure the application using the Page Map and Page Editor
Refresh the local copy of service metadata in SAP Business Application Studio with Service Manager
Add side effects using Guided Development
All of these tools (and more) can be used with any of the available SAP Fiori elements page types. Enjoy your future projects!
Resources
Discussion
Share feedback on this tutorial or join the conversation in SAP Community.