
Overview
You will learn
- How to create a client X.509 certificate for a non-productive or demo system
- How to configure SAP HANA Cloud to accept authentication requests using X.509
- How to use the client certificate in HDBSQL
- How to use the client certificate in a Node.js application


Prerequisites
Prerequisites
- Access to and administrative rights to an SAP HANA Cloud instance such as a free-tier or trial account
- The SAP HANA Client installed on Microsoft Windows, Linux, or macOS
- An installation of Node.js
Steps
Intro
As described at User Authentication Mechanisms, there are multiple methods to authenticate a user when connecting to an SAP HANA Cloud database. A very common mechanism is a user name and password. This tutorial demonstrates X.509 Certificate-Based User Authentication.
X.509 certificates can be generated with a user supplied validity period, in addition to not being prone to phishing attacks. They can also be used in single sign-on environments and for technical users. A self-signed certificate authority will be created and used to sign a client certificate. An SAP HANA instance will be configured to trust certificates signed by the certificate authority. On authentication, the provided client certificate is matched to a database user.
The SAP HANA Client can use different cryptographic service providers on the operating systems shown below.
Note: these steps will vary slightly depending on the operating system and security library used.
| Operating System | Security Library | X.509 Support |
|---|---|---|
| Microsoft Windows | SAP Cryptographic Library | Yes |
| Microsoft Windows | MSCrypto | No |
| Linux | OpenSSL | Yes |
| Linux | SAP Cryptographic Library | Yes |
| macOS | LibreSSL | Yes |
| macOS | SAP Cryptographic Library | Yes |
As a first step, we will ensure that basic connectivity is working with a user name and password. The steps below check the version of the SAP HANA Client, create a test user, and attempt to connect using basic authentication with mscrypto or OpenSSL. The SQL commands can be run by an admin user such as DBADMIN in the SQL console or hdbsql.
Check the version of SAP HANA Client on your machine and ensure it is a recent release.
Shellhdbsql -v
hdbsql version Go to HANA Cloud Central and open a SQL console for your SAP HANA instance.

Open SQL console in HCC Execute the following SQL to create a user to attempt to connect with.
SQLCREATE USER TESTUSER PASSWORD Password1 NO FORCE_FIRST_PASSWORD_CHANGE SET USERGROUP DEFAULT;
Create a test user in the SAP HANA database explorer Attempt to connect with hdbsql using basic authentication. Be sure to replace the SQL endpoint value with the SQL endpoint of your HANA instance.
Shellhdbsql -j -A -sslprovider mscrypto -u TESTUSER -p Password1 -Z traceFile=stdout -Z traceOptions=debug=warning,flush=on -n xxxxxxxx-xxxx-xxxx-xxxx-xxxxxxxxxxxx.hana.trial-us10.hanacloud.ondemand.com:443 "SELECT CURRENT_USER, CURRENT_SCHEMA FROM DUMMY;"Shellhdbsql -j -A -sslprovider openssl -u TESTUSER -p Password1 -Z traceFile=stdout -Z traceOptions=debug=warning,flush=on -n xxxxxxxx-xxxx-xxxx-xxxx-xxxxxxxxxxxx.hana.trial-us10.hanacloud.ondemand.com:443 "SELECT CURRENT_USER, CURRENT_SCHEMA FROM DUMMY;"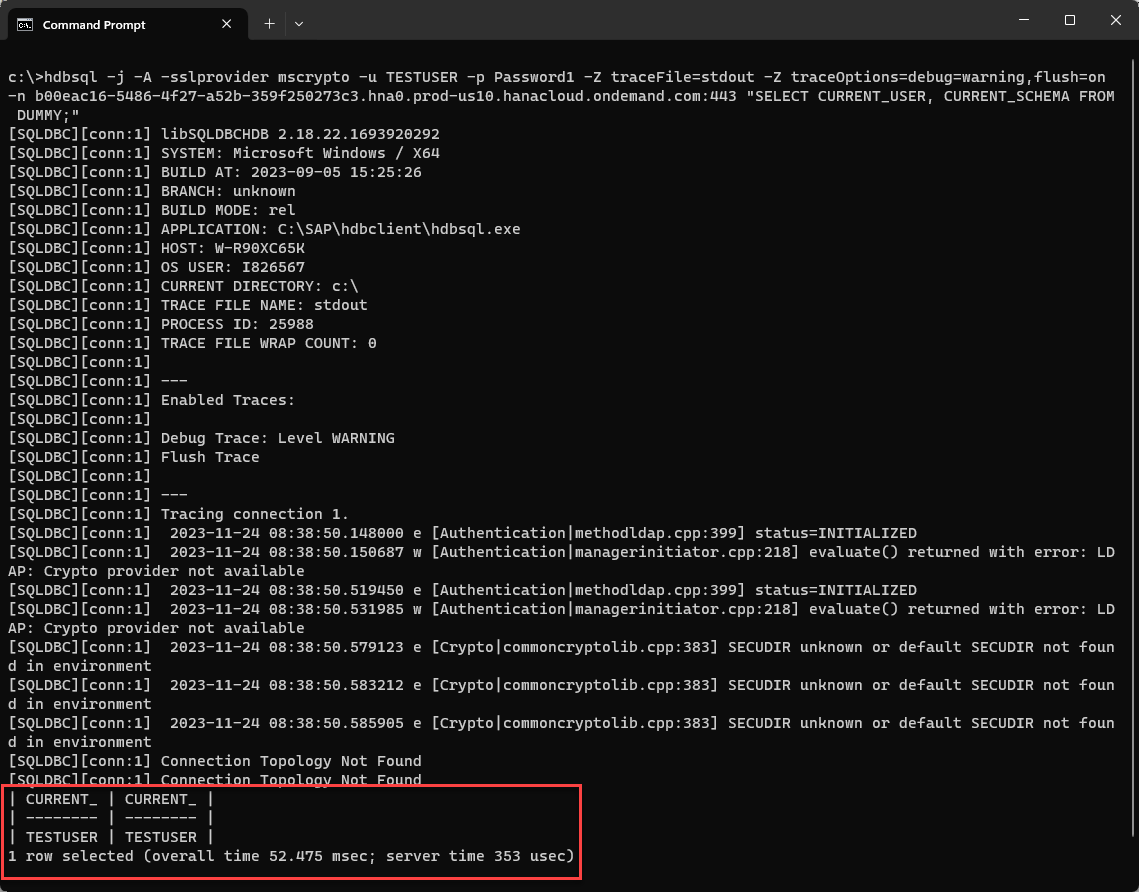
successful connection with user and password authentication
The following steps were performed on Linux (using WSL) with an installation of SAP HANA Client. The result will be a directory named certs containing a private key and a public certificate for a new certificate authority. In a non-demo environment, a trusted certification authority could be used instead.
Verify that OpenSSL is installed.
Shellopenssl versionIf OpenSSL is installed a value such as “OpenSSL 3.0.8 7 Feb 2023” will be shown.
On openSUSE Leap 15.5, the command is openssl-3.
LibreSSL will appear instead of OpenSSL when using macOS.
Create a folder where the generated certificates will be stored. Create a private key and public certificate for a self-signed certificate authority.
Shellmkdir ~/certs cd ~/certs openssl genrsa -out demorootca.key 4096 openssl req -x509 -new -nodes -key demorootca.key -sha256 -days 365 -subj "/CN=DEMO_ROOT_CERT_AUTH/ST=ON" -out demorootca.crt ls -al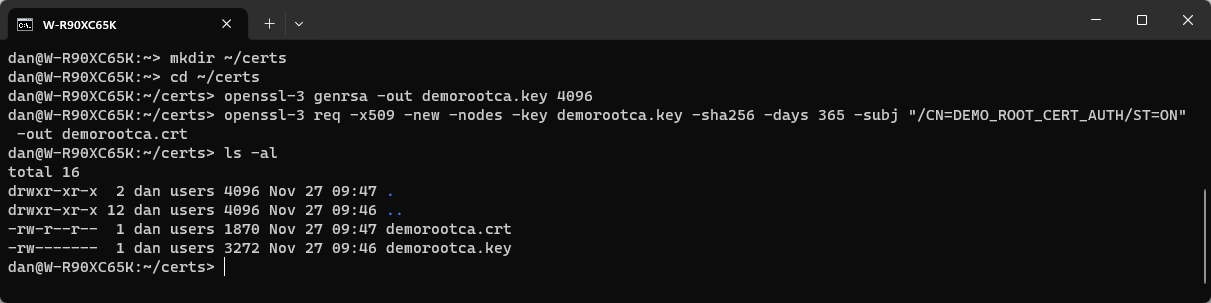
create a certificate authority Further details on OpenSSL commands can be found at OpenSSL commands.
Create a private user key and a certificate signing request.
Shellopenssl genrsa -out test_x509_user.key 2048 openssl req -new -nodes -key test_x509_user.key -out test_x509_user.csr -subj "/CN=TESTX509" ls -al
create client certificate Create a client certificate that has been signed by the certificate authority.
Shellopenssl x509 -req -in test_x509_user.csr -CA demorootca.crt -CAkey demorootca.key -CAcreateserial -days 31 -out test_x509_user.crt ls -al
create client certificate Perform the following steps in your selected environment to verify that the user certificate has been signed by the certificate authority.
Shellopenssl verify -CAfile demorootca.crt test_x509_user.crtDisplay the client certificate using openssl and by examining the certificate once imported into SAP HANA.
Use openSSL to display the certificate.
Shellopenssl x509 -text -noout -in test_x509_user.crt
client certificate Import the client certificate into the SAP HANA Cloud database.
View the contents of the certificate using the following command:
Shellcat test_x509_user.crtOpen the SQL Console for your SAP HANA database instance. Execute the below SQL to import and view the certificate. Before executing, update the FROM content to reflect your certificate.
SQLCREATE CERTIFICATE X509_USER_CERT FROM '-----BEGIN CERTIFICATE----- MIIDuDCCAaACFD8uRrS2MgGqakcJZ6bPOyl7f5NfMA0GCSqGSIb3DQEBCwUAMB4x ... eHDFB5AyicWtbXoqVohrcv1QIG9S5eFP3ub5ijruUatC0UTVRyWMLjZtvDY= -----END CERTIFICATE-----'; SELECT CERTIFICATE_NAME, SUBJECT_DISTINGUISHED_NAME, ISSUER_DISTINGUISHED_NAME, ISSUER_COMMON_NAME FROM CERTIFICATES WHERE CERTIFICATE_NAME='X509_USER_CERT'; --DROP CERTIFICATE X509_USER_CERT; --This cert is only imported so we can view it. It can be dropped at any time
View client certificate in the SAP HCC SQL console Notice that the value of the ISSUER_DISTINGUISHED_NAME is slightly different than what was specified when the certificate authority was originally created. The State or ST value is shown as SP. Additional details on this can be found at SAP Note: 2094102 - Certificate DName attributes mapping between RFC 2256 and the CommonCryptoLib. This becomes important in step 6 when an X.509 certificate provider is created.
The details of the client certificate needed for authentication will be stored in a PEM file when using OpenSSL or a Personal Security Environment (PSE) file when using SAP CommonCryptoLib. A PSE can either be file based or be an object in the SAP HANA database. The SAP HANA Client needs to be able to access certificate details when connecting to the database and hence needs the certificate details to be stored in a file.
Create a PEM file for use with OpenSSL.
Commandcat test_x509_user.key test_x509_user.crt demorootca.crt > test_x509_user.pemPowerShellGet-Content test_x509_user.key, test_x509_user.crt, demorootca.crt | Set-Content test_x509_user.pemOptionally create a PSE for use with SAP CommonCryptoLib. sapgenpse is included in an install of the SAP HANA Client that is downloaded from the SAP Software Center.
Shellsapgenpse import_p8 -p ~/certs/test_x509_user.pse -x "" ~/certs/test_x509_user.pemAdditional details on sapgenpse can be found by entering
sapgenpse -h or sapgenpse import_p8 -h.
View the contents of the
demorootca.crtfile.Shellcat demorootca.crtIn the SAP HANA Cloud Central SQL console, execute the following SQL to create a certificate from the self-signed certificate authority.
SQLCREATE CERTIFICATE DEMOROOTCA_CERT FROM ''; --Past the contents of the demorootca.crt file SELECT CERTIFICATE_NAME, SUBJECT_DISTINGUISHED_NAME, ISSUER_DISTINGUISHED_NAME, ISSUER_COMMON_NAME FROM CERTIFICATES WHERE CERTIFICATE_NAME = 'DEMOROOTCA_CERT'; --It may also be of interest to import the test_x509_user.crt file and view its contents with in the same way as shown above.
details of the DEMOROOTCA_CERT Further details can be found at CREATE CERTIFICATE Statement.
Execute the following queries in the SQL console.
SQLCREATE X509 PROVIDER DEMO_X509_PROVIDER WITH ISSUER 'SP=ON, CN=DEMO_ROOT_CERT_AUTH'; SELECT * FROM X509_PROVIDERS; CREATE PSE X509_PSE; SELECT * FROM PSES; ALTER PSE X509_PSE ADD CERTIFICATE DEMOROOTCA_CERT; SELECT * FROM PSE_CERTIFICATES; SET PSE X509_PSE PURPOSE X509 FOR PROVIDER DEMO_X509_PROVIDER; SELECT * FROM PSES;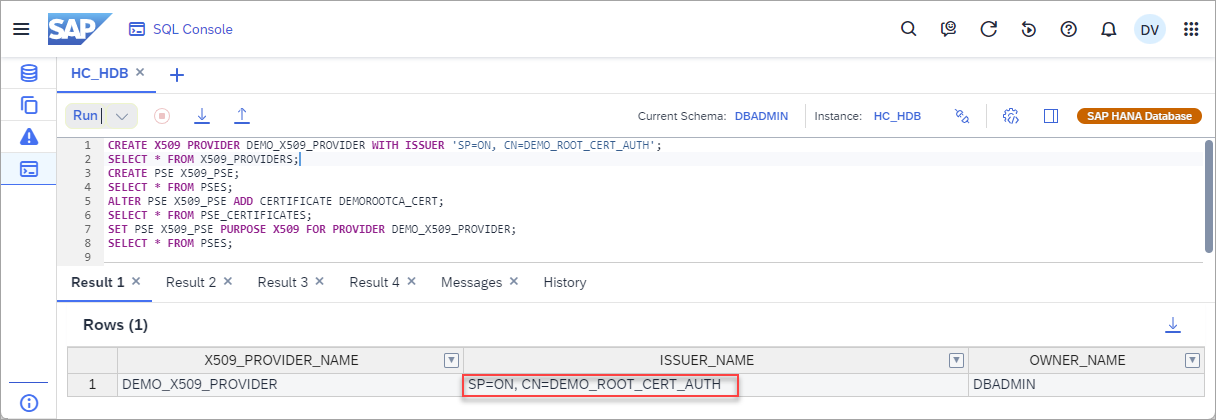
create a provider and pse There must be a match between the issuer value in the X509 provider and the ISSUER_DISTINGUISHED_NAME of the client certificate. The needed value was shown at the end of step 3.
Further details can be found at CREATE X509 PROVIDER Statement and CREATE PSE statement.
Execute the following SQL statement to create a database user.
CREATE USER TESTX509_TECHNICAL WITH IDENTITY 'CN=TESTX509' FOR X509 PROVIDER DEMO_X509_PROVIDER SET USERGROUP DEFAULT;
SELECT * FROM USERS WHERE USER_NAME = 'TESTX509_TECHNICAL';
The above is known as an explicit mapping. The common name, or CN value, in the user matches to CN value in the client certificate. It is also possible to use matching rules specified on the provider.
Further details can be found at CREATE USER Statement.
Open the SAP HANA database explorer.

open SAP HANA database explorer from SAP HANA Cloud Central Choose to add an instance, select SAP HANA Database, and choose Authenticate using an X.509 certificate.

Add an instance of SAP HANA Database Specify the Host, Port, upload test_x509_user.crt, test_x509_user.key for the Client Certificate and Client Key, and provide a Display Name for the instance.

upload certificates After pressing OK, a connection will be made to the specified instance using the provided X.509 certificate.
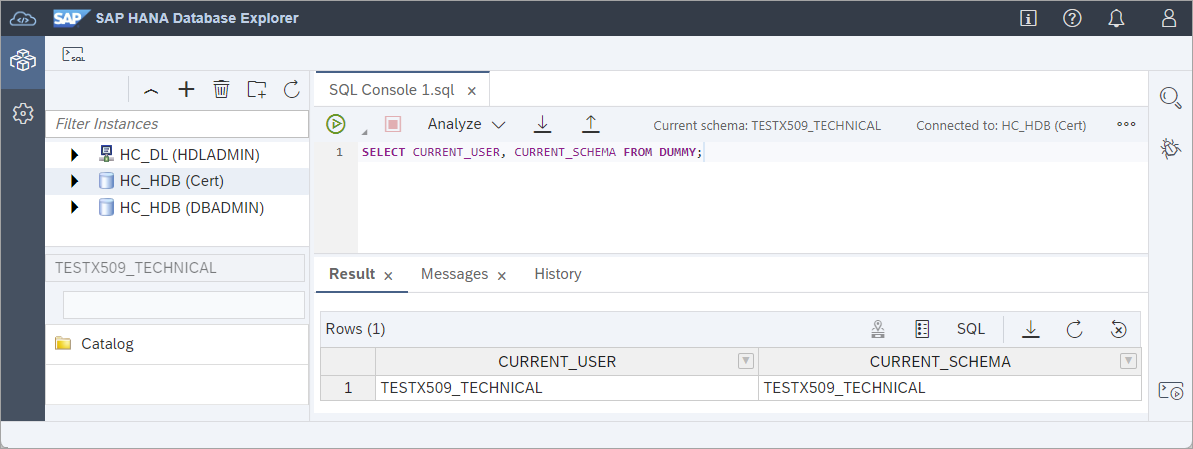
successful connection
Use hdbsql to connect to a HANA instance using a certificate. Adjust the location of the test_x509_user.pem and the host and port values accordingly.
Shellhdbsql -j -A -sslprovider openssl -Z authenticationMethods=x509 -Z authenticationX509=test_x509_user.pem -Z traceFile=stdout -Z traceOptions=debug=error,flush=on -n xxxxxxxx-xxxx-xxxx-xxxx-xxxxxxxxxxxx.hana.trial-us10.hanacloud.ondemand.com:443 "SELECT CURRENT_USER, CURRENT_SCHEMA FROM DUMMY;"
successful connection using the client certificate Some of the used connection options are summarized in the table below. Further details can be found at SAP HANA HDBSQL Options and SQLDBC Connection Properties
hdbsql Option Description j switch the page by page scroll output off A switch to aligned output mode sslprovider Specifies the crypto provider to use such as commoncrypto, OpenSSL, mscrypto Z sets SQLDBC connect options authenticationMethods A comma-separated list of authentication methods to be used by the client authenticationX509 A string containing the X509 certificate or the name of a file containing the X509 certificate
A few steps are required to enable the usage of CommonCryptoLib such as the setting of an environment variable named SECUDIR to the location of the SAP HANA Client install and the creation of a personal security environment file that contains the root certificate of the SAP HANA Cloud database. Follow the steps documented in the tutorial Create a User, Tables and Import Data Using SAP HANA HDBSQL (in a note in step 1) to use commoncrtypo.
Connect using CommonCryptoLib.
Notice that the changes are to the parameters sslprovider and the pse is used rather than the pem for the authenticationX509 parameter. Adjust the location of the test_x509_user.pse if necessary and be sure to replace the placeholder SQL endpoint with the SQL endpoint of your instance.
Shellhdbsql -j -A -sslprovider commoncrypto -Z authenticationMethods=x509 -Z authenticationX509=~/certs/test_x509_user.pse -Z traceFile=stdout -Z traceOptions=debug=error,flush=on -n xxxxxxxx-xxxx-xxxx-xxxx-xxxxxxxxxxxx.hana.trial-us10.hanacloud.ondemand.com:443 "SELECT CURRENT_USER, CURRENT_SCHEMA FROM DUMMY;"When using macOS, you may need to specify the full path to the PSE file instead of using ~.

HDBSQL connection with commoncrypto
Create a folder named
nodeX509OpenSSLand enter the newly created directory.Shellmkdir %HOMEPATH%\HANAClientsTutorial\nodeX509OpenSSL cd %HOMEPATH%\HANAClientsTutorial\nodeX509OpenSSLShellmkdir -p $HOME/HANAClientsTutorial/nodeX509OpenSSL cd $HOME/HANAClientsTutorial/nodeX509OpenSSLInitialize the project and install the
hana-clientdriver from NPM.Shellnpm init -y npm install @sap/hana-clientOpen a file named
nodeQuery.jsin an editor.Substitute
picoor notepad below for your preferred text editor.Shellnotepad nodeQuery.jsShellpico nodeQuery.jsAdd the code below to
nodeQuery.js.JavaScript'use strict'; var util = require('util'); var hana = require('@sap/hana-client'); var connOptions = { //Option 1, retrieve the connection parameters from the hdbuserstore serverNode: '@X509UserKey', //host, port, authenticationMethod, and pem retrieved from hdbuserstore //Option 2, specify the connection parameters rather than use the values from a key //serverNode: 'host:port', //authenticationX509: '~/certs/test_x509_user.pem', //.pem if using OpenSSL and .pse if using commoncrypto //authenticationX509: 'C:\\Users\\xxx\\certs\\test_x509_user.pse', //Microsoft Windows //sslValidateCertificate: 'false', //Must be set to false when connecting to an on-premise instance that uses a self-signed certificate. //traceFile: 'stdout', //traceOptions: 'debug=error,flush=on', sslCryptoProvider: 'openssl', //openssl or commoncrypto authenticationMethods: 'x509' }; var connection = hana.createConnection(); connection.connect(connOptions); var sql = 'select CURRENT_USER FROM DUMMY;'; var result = connection.exec(sql); console.log(util.inspect(result, { colors: false })); connection.disconnect();If you are using commoncrypto, be sure to replace the contents of
sslCryptoProviderwithcommoncrypto.The values for host, port, and pem can be retrieved from an
hdbuserstorekey, such as X509UserKey, or they can be specified in the application. Be sure to replace the placeholder SQL endpoint with the SQL endpoint of your instance. Further details can be found at hdbuserstore Commands.Shellhdbuserstore SetX509 X509UserKey xxxxxxxx-xxxx-xxxx-xxxx-xxxxxxxxxxxx.hana.trial-us10.hanacloud.ondemand.com:443 ~/certs/test_x509_user.pem hdbuserstore listRun the app
Shellnode nodeQuery.js
Running nodeQuery.js Should you wish to use SAP CommonCryptoLib, make sure the changes in the previous step to set were completed and then change the parameter sslCryptoProvider from openssl to commoncrypto and the authenticationX509 parameter to point to the pse file.
If you wish to undo the steps in this tutorial, execute the following SQL and commands.
DROP USER TESTX509_TECHNICAL;
DROP PSE X509_PSE;
DROP CERTIFICATE DEMOROOTCA_CERT;
DROP CERTIFICATE X509_USER_CERT;
DROP X509 PROVIDER DEMO_X509_PROVIDER;
DROP USER TESTUSER;cd %HOMEPATH%/certs
del * /Qcd ~/certs
rm *Congratulations! You have now used an X.509 client certificate when connecting to an SAP HANA Cloud database.
Resources
Discussion
Share feedback on this tutorial or join the conversation in SAP Community.