
Overview
You will learn
- How to set up and configure the App Router component as a central entry point to your microservice landscape to handle authentication and authorization
- How to protect your Java microservice so that it only accepts requests based on a valid JSON Web Token (JWT) that is received from the App Router
- Assign roles and scopes to your application users and let your backend deal with authorization information


Prerequisites
Prerequisites
- You completed all steps until Connect to OData Service on Cloud Foundry Using SAP Cloud SDK.
Steps
Before diving deeper into the real setup of the architecture, let’s quickly review the architecture this tutorial intends to go for.
Figure 1 presents the final setup. First, there still is your existing “Hello World” or “Business Partner” Java-based microservice that you have created in the previous tutorials. However, instead of letting the customer access this application directly, you will use the so-called Application Router (App Router) that serves two purposes.
On the one hand, the App Router is a general entry point into the world of microservices. The main idea is that you can split an application into multiple microservices with independent deployability, polyglot runtimes & persistence, and independent teams. Therefore, a central entry component is required that hides the complexity of the microservice landscape from the end customer.
On the other hand, the App Router is mainly responsible for managing authentication flows. The App Router takes incoming, unauthenticated requests from users and initiates an OAuth2 flow with the Extended Services for User Account and Authentication (XSUAA). The XSUAA service is an SAP-specific extension of CloudFoundry's UAA service to deal with authentication and authorization (it may again delegate this aspect to other providers such as external Identity Providers, see later in this tutorial). If the user authenticates at the XSUAA, it will respond with a JSON Web Token (JWT) containing the authenticated users as well as all scopes that he or she has been granted.

The JWT is passed by the App Router to the underlying microservices so that they are freed up from this task. At the same time, these microservices can only be accessed with a valid JWT, hence, are protected from unauthenticated traffic.
The JWT contains a signature that needs to be verifiable by every microservice to establish trust. Hence, every service requires a key (client-secrets or public keys) to verify this signature and reject any requests with non-valid JWTs. Therefore, every service has to maintain a service binding to the XSUAA that provides this information for runtime verification (Figure 2). To enable this, every microservice binds to a dedicated XSUAA instance which writes this information into the VCAP_SERVICES environment variable which the microservices can use to verify any token’s validity.
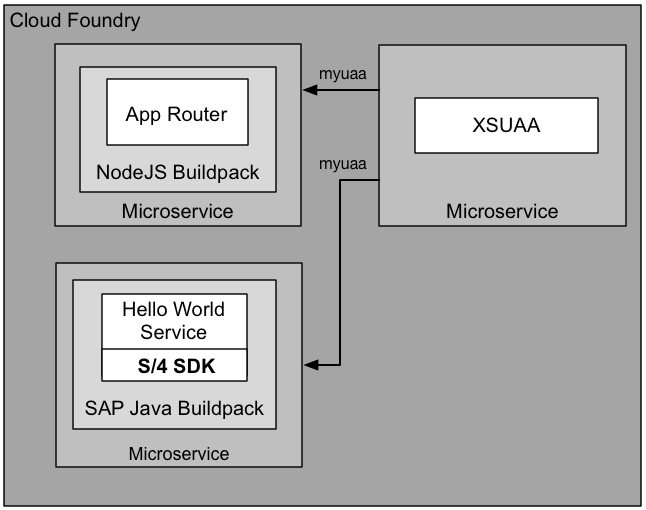
Figure 2: Provisioning view with XSUAA binding
With these basics in mind, let’s create the picture of Figure 1 and Figure 2 by setting up the App Router, XSUAA and backend microservices to enable full application security.
You will let Cloud Foundry retrieve the App Router automatically on deployment. To achieve this, you will first set up the necessary structure.
Create a new directory for the router
securityand create theapprouterdirectory inside it:Shellmkdir security cd security mkdir approuter cd approuterPlace the following
package.jsonin yourapprouterdirectory:JSON{ "name": "approuter", "dependencies": { "@sap/approuter": "*" }, "scripts": { "start": "node node_modules/@sap/approuter/approuter.js" } }Within
security/approutercreate a new file calledxs-app.jsonwith the following content:JSON{ "welcomeFile": "index.html", "routes": [{ "source": "/", "target": "/", "destination": "app-destination" }] }Last but not least create a new
manifest.ymlfile withinsecurityfor the app router microservice with the following content:YAML--- applications: - name: approuter routes: - route: approuter-<subdomain>.cfapps.<region_id>.hana.ondemand.com path: approuter memory: 128M buildpacks: - nodejs_buildpack env: TENANT_HOST_PATTERN: 'approuter-(.*).cfapps.<region_id>.hana.ondemand.com' destinations: '[{"name":"app-destination", "url" :"<APPLICATION_URL>", "forwardAuthToken": true}]' services: - my-xsuaaAdapt the file as follows:
Replace
<subdomain>with your subdomain. You will find your subdomain in the CF cockpit by heading to the overview page of your sub-account:
Subomain and Tenant ID in the CF Cockpit Swap out both instances of
<region_id>with your specific region (e.g.us10-001). You can find it for instance included in the API endpoint (also listed in the image above) just beforehana.ondemand.com. More details on the region specific URLs can be found here.In
destinationsreplace<APPLICATION_URL>with the actual URL of your previously deployed app. Again you can find it in the CF cockpit or by listing all existing routes viacf routes. Note: The URI specified for<APPLICATION_URL>must be absolute, e.g.https://<app-name>.cfapps.<region>.hana.ondemand.com.
On Cloud Foundry every sub-account is assigned exactly one subdomain which is associated to exactly one tenant. In a multi-tenant scenario the app router needs to know which tenant to forward to the XSUAA service. This is achieved by including the subdomain in the host, from which the app router will extract it. That is where the TENANT_HOST_PATTERN comes into play. It is a variable that declares the pattern how tenants in the URL are identified and handled. This tutorial expects the host to conform to approuter-<subdomain>. If you desire different URL patterns, you need to change the route and TENANT_HOST_PATTERN accordingly.
Note that the TENANT_HOST_PATTERN variable is only required in real multi-tenant application, i.e, applications where a physical deployment serves multiple clients from the same deployment. This tutorial series assumes that you want to build multi-tenant applications, as it is aimed towards cloud-native development. However, this variable is not necessary if you have a single-tenant application. To realize this, the xs-security.json security descriptor may declare "tenant-mode": "dedicated" (see step 5 below).
Moving on to the destinations entry. It is a variable that declares the internal routes from the App Router to the underlying backend microservices. As you have only one microservice yet, you may define only one destination called app-destination here. This app-destination is referenced by the previously created xs-app.json file.
Last but not least the services section declares to bind your own XSUAA service instance to the App Router. This binding will ensure a corresponding VCAP_SERVICES entry that holds the client ID, client secret and public key that is required to validate any incoming OAuth token/JWT from the XSUAA service:

Now you need to create a service binding to the XSUAA service. As a prerequisite you require an xs-security.json (security descriptor) file that contains a declaration about authorization scopes you intend to use in your application. For example, simply declare a DISPLAY scope that will be used later on to authorize your users. In addition, a so-called role template called Viewer that references your DISPLAY scope is declared.
Put this file to security/xs-security.json. For a more detailed explanation on scopes and role templates, see the appendix of this tutorial. More details on the syntax of the xs-security.json can be found here.
The
xsappnamehas to be unique within the entire XSUAA instance. We suggest you follow the same pattern of<app-name>-<subdomain>.
As explained above, the
"tenant-mode": "shared"assumes a multi-tenant application and will require theTENANT_HOST_PATTERNvariable to be declared. You may also use"tenant-mode": "dedicated"if you develop a single-tenant application.
security/xs-security.json:
{
  "xsappname": "firstapp-<subdomain>",
  "tenant-mode": "shared",
  "scopes": [
    {
      "name": "$XSAPPNAME.Display",
      "description": "display"
    }
  ],
  "role-templates": [
    {
      "name": "Viewer",
      "description": "Required to view things in your solution",
      "scope-references"     : [
        "$XSAPPNAME.Display"
      ]
    }
  ],
  "oauth2-configuration": {
    "redirect-uris": [
      "https://*.cfapps.us10-001.hana.ondemand.com/login/callback"
    ]
  }
}
Create the file and change the app name just like before.
Then create a service instance called my-xsuaa of the XSUAA service by issuing the following command and using the xs-security.json file:
cf create-service xsuaa application my-xsuaa -c xs-security.jsonNote: If you are not currently in the security folder, you need to specify the path to the xs-security.json file in the command above.
If you have created this instance of the XSUAA service before without the xs-security.json parameter, you can unbind and delete the existing instance with these commands before creating it with the above command:
cf unbind-service firstapp my-xsuaa
cf delete-service my-xsuaa
After you have created the XSUAA service instance, deploy the app router using the following (with the appropriate API endpoint of your Cloud Foundry region):
cd security
cf push
Afterwards you should be able to locate the app router from within your browser using the host name of your deployment. In my case this is https://approuter-p1942765239trial.cfapps.eu10.hana.ondemand.com/hello which should face you with the following login page where you can use your user e-mail and password:

After logging in you should see the HelloWorld servlet which is now served by the App Router as a proxy to your Java application:

After authentication works with the App Router, your java backend service is still fully visible in the web and not protected. Therefore, you need to protect your java microservices as well so that they accept requests with valid JWTs for the current user only. In addition, you will setup the microservice in a way that it deals with authorization, i.e., understands the OAuth scopes from the JWT that you have configured previously using the xs-security.json file.
In the following, you will use the security capabilities of the SAP BTP Spring Security Client Library to protect the microservices.
In your applications pom.xml ensure the following dependencies are present:
<dependency>
    <groupId>org.springframework.boot</groupId>
    <artifactId>spring-boot-starter-security</artifactId>
</dependency>
<dependency>
<groupId>com.sap.cloud.security</groupId>
<artifactId>resourceserver-security-spring-boot-starter</artifactId>
</dependency>
This provides the necessary capabilities of the XSUAA library for Spring.
Leverage them in setting up a SecurityConfiguration:
package com.sap.cloud.sdk.tutorial;

import com.sap.cloud.security.spring.config.IdentityServicesPropertySourceFactory;
import com.sap.cloud.security.spring.token.authentication.AuthenticationToken;
import com.sap.cloud.security.token.TokenClaims;
import org.springframework.beans.factory.annotation.Autowired;
import org.springframework.context.annotation.Bean;
import org.springframework.context.annotation.Configuration;
import org.springframework.context.annotation.PropertySource;
import org.springframework.core.convert.converter.Converter;
import org.springframework.security.authentication.AbstractAuthenticationToken;
import org.springframework.security.config.annotation.method.configuration.EnableMethodSecurity;
import org.springframework.security.config.annotation.web.builders.HttpSecurity;
import org.springframework.security.config.annotation.web.configuration.EnableWebSecurity;
import org.springframework.security.config.http.SessionCreationPolicy;
import org.springframework.security.core.GrantedAuthority;
import org.springframework.security.core.authority.SimpleGrantedAuthority;
import org.springframework.security.oauth2.jwt.Jwt;
import org.springframework.security.web.SecurityFilterChain;

import java.util.ArrayList;
import java.util.Collection;
import java.util.Collections;
import java.util.List;
import java.util.stream.Collectors;

@Configuration
@EnableWebSecurity( debug = true ) // TODO "debug" may include sensitive information. Do not use in a production system!
@EnableMethodSecurity(securedEnabled = true, jsr250Enabled = true )
@PropertySource( factory = IdentityServicesPropertySourceFactory.class, ignoreResourceNotFound = true, value = { "" } )
public class SecurityConfiguration
{
    @Autowired
    Converter<Jwt, AbstractAuthenticationToken> authConverter; // Required only when Xsuaa is used

    @Bean
    public SecurityFilterChain filterChain( HttpSecurity http )
            throws Exception
    {
        // @formatter:off
        return http
                .sessionManagement(management -> management.sessionCreationPolicy(SessionCreationPolicy.STATELESS))

                .authorizeHttpRequests(registry -> registry
                        .requestMatchers("/**").hasAuthority("Display")
                        .requestMatchers("/**").authenticated()
                        .anyRequest().denyAll())

                .oauth2ResourceServer(oauth2Config -> oauth2Config
                        .jwt(jwtConfig -> jwtConfig
                                .jwtAuthenticationConverter(new MyCustomHybridTokenAuthenticationConverter())))   // Adjust the converter to represent your use case
                // Use MyCustomHybridTokenAuthenticationConverter when IAS and XSUAA is used
                // Use MyCustomIasTokenAuthenticationConverter when only IAS is used
                .build();
        // @formatter: on
    }

    //Workaround for hybrid use case until Cloud Authorization Service is globally available.
    class MyCustomHybridTokenAuthenticationConverter implements Converter<Jwt, AbstractAuthenticationToken>
    {
        @Override
        public AbstractAuthenticationToken convert( Jwt jwt )
        {
            if( jwt.hasClaim(TokenClaims.XSUAA.EXTERNAL_ATTRIBUTE) ) {
                return authConverter.convert(jwt);
            }
            return new AuthenticationToken(jwt, deriveAuthoritiesFromGroup(jwt));
        }

        private Collection<GrantedAuthority> deriveAuthoritiesFromGroup( Jwt jwt )
        {
            Collection<GrantedAuthority> groupAuthorities = new ArrayList<>();
            if( jwt.hasClaim(TokenClaims.GROUPS) ) {
                List<String> groups = jwt.getClaimAsStringList(TokenClaims.GROUPS);
                for( String group : groups ) {
                    groupAuthorities.add(new SimpleGrantedAuthority(group.replace("IASAUTHZ_", "")));
                }
            }
            return groupAuthorities;
        }
    }

    //Workaround for IAS only use case until Cloud Authorization Service is globally available.
    class MyCustomIasTokenAuthenticationConverter implements Converter<Jwt, AbstractAuthenticationToken>
    {
        @Override
        public AbstractAuthenticationToken convert( Jwt jwt )
        {
            final List<String> groups = jwt.getClaimAsStringList(TokenClaims.GROUPS);
            final List<GrantedAuthority>
                    groupAuthorities =
                    groups == null ?
                            Collections.emptyList() :
                            groups.stream().map(SimpleGrantedAuthority::new).collect(Collectors.toList());
            return new AuthenticationToken(jwt, groupAuthorities);
        }
    }
}The above will require authentication via a JWT for all endpoints of your service.
In addition all JWTs are required to contain the Display scope.
Depending on your setup your integration tests may now fail if they are not authenticated. In that case leverage the XSUAA testing library to mock request authentication.
Add the testing capabilities via the following dependency into your
application/pom.xml:XML<dependency> <groupId>com.sap.cloud.security</groupId> <artifactId>java-security-test</artifactId> <scope>test</scope> </dependency>Annotate your test class
HelloWorldControllerTestwith (This code snippet would be commented your test classHelloWorldControllerTest, just uncomment them):
@TestPropertySource(
        properties = {
                "sap.security.services.xsuaa.uaadomain=http://localhost:9001",
                "sap.security.services.xsuaa.xsappname=xsapp!t0815",
"sap.security.services.xsuaa.clientid=sb-clientId!t0815" } )- Create a JWT for testing (This code snippet would be commented your test class
HelloWorldControllerTest, just uncomment them):
@RegisterExtension
static SecurityTestExtension extension = SecurityTestExtension.forService(Service.XSUAA) // or Service.IAS
        .setPort(9001);

static String jwt = "Bearer " + context.getPreconfiguredJwtGenerator()
        .withLocalScopes("Display")
        .createToken()
.getTokenValue();- Add the JWT in the authorization header of your test requests.
ThreadContextExecutor.fromNewContext().execute(() -> {
    mvc
    .perform(MockMvcRequestBuilders.get("/hello")
    .header(HttpHeaders.AUTHORIZATION, jwt)
    )
    .andExpect(status().isOk())
    .andExpect(content().json(IOUtils.toString(inputStream, StandardCharsets.UTF_8)));
    });
Run the integration tests again. They should now pass. Note: For the purpose of this tutorial, we are only adjusting the
HelloWorldControllerTestclass, you would also have to make similar changed toBusinessPartnerControllerTestclass. We would be skipping that for now.(You could also comment the test cases inBusinessPartnerControllerTestclass to proceed with the tutorial).Also enhance your
manifest.ymlfile by adding an environment variable and a service binding for the XSUAA service instance:
  env:
    TARGET_RUNTIME: main
    SPRING_PROFILES_ACTIVE: 'cloud'
    JBP_CONFIG_SAPJVM_MEMORY_SIZES: 'metaspace:128m..'
    JBP_CONFIG_COMPONENTS: 'jres: [''com.sap.xs.java.buildpack.jre.SAPMachineJRE'']'
    JBP_CONFIG_SAP_MACHINE_JRE: '{ use_offline_repository: false, version: 17.+ }'
+   xsuaa_connectivity_instance_name: my-xsuaa
  services:
+ - my-xsuaa
  - my-destination
At this point you should now rebuild your application and push it to Cloud Foundry.
cd /path/to/firstapp/application
mvn clean install
cd /path/to/firstapp
cf push
If you now call the /businesspartners endpoint of your application you will see a 401 Unauthorized status code, as you were not authorized by the App Router. Calling the /businesspartners endpoint via your App Router on the other hand will give you a 403 Forbidden status code meaning that you do not have the necessary authorization to see this page. This is to be expected, as you secured the endpoint with the annotation above without assigning the requested role Display to your user. You will fix this in the next step.
To regain access to your secured endpoint, you need to get the Display OAuth scope assigned. This is done using the BTP cockpit.
First, go to your account on Cloud Foundry and find the Role Collections menu under the Security module.
Second, create a new role collection which you can give an arbitrary name. For example, you might call the role collection Business Partner Manager.
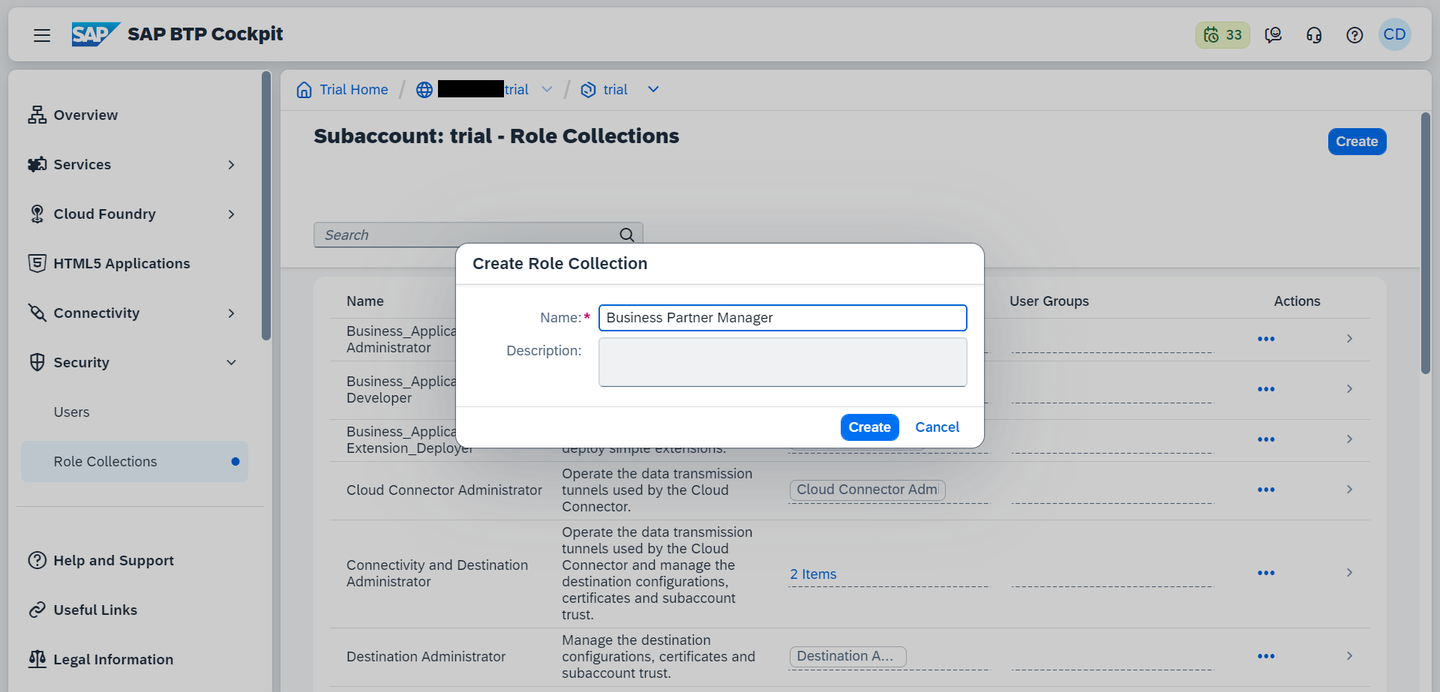
- Afterwards, select the role collection Business Partner Manager, select Edit, and add a new role. From the menu, select your application and the corresponding role template and role. Finish up the process by adding the newly created role and saving the Business Partner Manager.

Afterwards, the user has to be assigned to the newly created Business Partner Manager in order to receive the Display scope. To do this, select Users from the security menu and select the user that should receive the permissions from the list.
On the right hand side, under the Role Collections headline, select Assign Role Collection and choose the Business Partner Manager collection. Confirm the selection by clicking on the Assign Role Collection button.
Afterwards you have the Display OAuth scope assigned to your user, which allows you to access the secured endpoints again.
You should now be able to access your application using the App Router as entry point:

And accessing your backend service directly is still not possible and result in the following message:

The following picture explains how the various concepts are related to each other.

Gray Box: As a BTP developer (e.g., SAP, partner, customer) of the business application (gray box), you define role templates which may contain multiple OAuth scopes. The developer here define the scope, role templates and additional attributes within the xs-security.json as explained in this tutorial which is used when creating the service instantiation to the XSUAA.
Orange Box: As an BTP tenant administrator of the business application (customer), you can create a role collection which is spanning multiple roles reflecting the role templates. This way you can achieve, on the one hand, a fine-granular authorization control for the microservices and, on the other hand, compose them very flexibly in coarse-grained role collections. The idea behind this is, that, for example, the Business Partner Manager role collection may span multiple applications and microservices all having individual scopes. The role collections resolves the roles and scopes and returns a union of all scopes which are composed by the role collection.
Green Box: As an administrator of the users (customer), you can assign the role collection to the final user using the SAML attribute Groups.
Sometimes it might be necessary to investigate the JWT on the backend microservice during development to check for potential errors. Here is an example servlet that prints the JWT out.
@RestController
public class AccessorsSpringController {
    private ResponseEntity<?> getResponseEntity(@Nonnull Try<?> maybeValue) {
        return maybeValue.isFailure()
                ? ResponseEntity.internalServerError().body(maybeValue.getCause())
                : ResponseEntity.ok(maybeValue.get());
    }

    @GetMapping("/authToken")
    public ResponseEntity<?> getAuthToken() {
        return getResponseEntity(AuthTokenAccessor.tryGetCurrentToken());
    }
}
Call the <your-application-url>/authToken endpoint to print the JWT.
Afterwards you may use https://jwt.io/ to decode the token. Note: You should never use this with any productive JWT as these tokens are shared on a public website. Fallback to local solutions.
In addition, you may use the XSUAA to see which current scopes and roles a particular users has. You could do this with your XSUAA tenant-specific URL, which you can find in the credentials of your XSUAA service instance:
Use the url value and append /config?action=who to it:
<url-from-XSUAA-credentials>/config?action=who
Resources
Discussion
Share feedback on this tutorial or join the conversation in SAP Community.