
Create Sales Order Business Process
Create a business project and process to build and extend business processes.
Overview
You will learn
- How to create a SAP Build Process Automation project.
- How to create a process that automates sales order creation and approval.
- How to create an API trigger to integrate with any applications like SAP Build Apps, CAP etc.
- How to send an Email notification.


Prerequisites
Prerequisites
- Access to a SAP BTP tenant with SAP Build Process Automation
- Configure SMTP Destination to send mail notifications.
Steps
Intro
IMPORTANT: Please refer to sample Sales Order Management (MI04) in the SAP Build Store if you face any issues while following the tutorials. To retrieve the sample refer to step 6 of Run the Sales Order Business Process.
With the new citizen automation user experience, you will get access to a new scope of opportunities for running your day-to-day workflows. In this tutorial, you will learn how a low-code and no-code tool can help you build the business process you need at the speed your business demands, using visual drag-and-drop tools for application development.
There are many use cases where you can make a difference using SAP Build Process Automation. During this tutorial, you will see how the Sales Order Approval process can be built using forms where a sales order is a document which confirms a sale that is generated by the seller after receiving a purchase order from the buyer. These sale order requests have to be reviewed and approved by the supplier to ensure that the sales orders are delivered on time. Once approved or rejected, the requester will be notified.
In the Lobby, choose Create.
The lobby is a central page for creating, accessing, and managing your projects in SAP Build. You can access business application processes, company configured templates, and other resources for your end-to-end business process.

Lobby Select Automated Process and choose Next.

Create a Project Select Process and choose Next.
Business Process Projects are a collection of skills in SAP Build Process Automation. Projects are part of the internal business processes of a company and are defined based on business scenarios. A project can contain a set of processes, forms, automations and decisions, which are reusable artifacts.

Create a Project In the Create a Business Process project dialog box, do the following:
Enter a Project Name that starts with
Sales Orders Management. In workshops, we recommend using the user identifier and then your initials, something like this:Sales Orders Management_001_JFK.Tip: Always use a name that would help users distinguish your workspace from others.
Enter a Description: Sales Orders Management Project.
Choose Review.

Project information In the Create Project dialog box, choose Create.
Once you have successfully created a Business Process Project, you will create a Business Process to automate the Sales Order Approval Process.
A new tabs opens with the newly created project.
In the Create Process dialog box, provide the following:
- Enter a Name: Order Processing
- Enter a Description for your process: A process to handle sales orders
- Choose Create
Inside a project, you can create a process. This process is equivalent to a workflow in any business scenario. You can create this process from different skills such as forms, decisions, automations.

Create Process The form Identifier field is auto-filled.
You are navigated to the Process Builder canvas.
This is a visual canvas on which you map out your business process from start to finish. Other process artifacts are then added to this canvas, with process controls and connectors used to decide how information flows when the process is running.

Canvas In the next step, you will create a data type which would be used to integrate with SAP Build Apps and SAP Build Process Automation.
A data type is an artifact describing a data structure that can be used as an input and/or an output parameter in automations or processes.
You have two options to create the fields in data type. You can either import an excel file or define the fields manually.
In this option, you will be importing an excel file to create the data type. Based on the values present in the excel, the type of field is determined automatically and the fields are created accordingly. For example orderAmount is maintained as 19000, hence the type of the field orderAmount is determined as Number.
Download this excel file for Sales Order datatype.

Create data type Navigate to your project. Click on the Project Content icon on the top left corner > + > Create > Data Type .

Create data type Name the data type Sales Order.

6.1 Click on Import Excel File.

6.2 Click on Browse to select the excel file.
Select Import an Excel File.

6.5 Your final data type looks as below.

DataType
You have two options to create the fields in data type. You can either import an excel or define the fields manually.
In this option you will be defining each field with field name and type of field manually.
Click on the Project Content icon on the top left corner > + > Create > Data Type.
Create data type Name the data type Sales Order.
6.1 Click on New Field to add new fields to the data type Sales Order.

6.7 Repeat the process to add all the fields of the type as shown below.
Field Name Type materialString orderAmountNumber shipToPartyString salesOrderTypeString salesOrganisationString distributionChannelString shippingCountryString expectedDeliveryDateDate divisionString IMPORTANT: The spelling and casing of the fields, as well as any extra spaces, is crucial because the API to trigger the process will require the fields exactly as written.
Your final data type looks as below.
DataType Click Save to save the data type.
You will build the initial screen of Sales Order Approval process using SAP Build Apps in the next tutorial. This API trigger will be invoked on a click of Get Approval button in SAP Build Apps.
The process can be triggered with a Form or using an API trigger. Since you are integrating a Sales Order Approval Process with SAP Build Apps, you will create an API trigger for the process. The inputs and outputs are configured for the API trigger and these inputs can then be used as input fields in your process, for example, in a form or approval form.
Back on your Order Processing process page, in the process builder canvas, click on Add a Trigger.

New API Trigger Choose API Trigger.

New API Trigger Enter the name as Sales Order Trigger and choose Create. The identifier is generated based on the name.

7.1 Open the Process Details side panel.

7.1 Choose Variables. Then choose Configure to configure inputs.

Inputs In the Configure Process Inputs window, choose Add Input to add parameters.
Add the following parameter:
Name Type Sales Order DetailsSales OrderNote: Type is a dropdown field which contains “Sales Order” as datatype.
Check the Required box.
Apply changes.

Add Inputs Save the project.
The inputs are now displayed in the process details side panel.
These input fields will be mapped to fields in SAP Build Apps.

Add Inputs Select the Sales Order Trigger to view the outputs.
The API trigger outputs are synchronized from the process inputs.

Add Inputs
Approvals are an important part of business processes, whether performed manually or automatically approved based on process conditions. In the Sales Order Approval Process, Supplier needs to review and approve the Sales Order requests.
With SAP Build Process Automation, you can manage approvals by creating and adding an approval form to a business process. Hence, you would create an Approval form for the Supplier where he/she can Accept/Reject the Sales Order request.
You can create interactive forms in SAP Build Process Automation. Forms can be used:
- as a start trigger for a process.
- as Approval Forms.
- as additional steps added in the same process.
Navigate back to the Process Builder canvas to create an Approval Form.
Go to the Order Processing process and choose + below the Trigger.
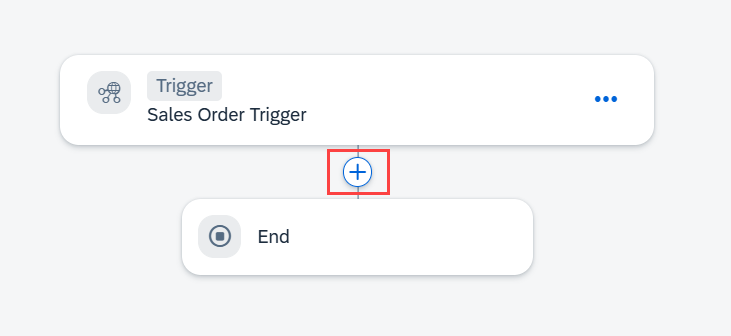
Approval Choose Approval.

Approval Choose Blank Approval.

Approval In the Create Approval dialog box, do the following:
- In the Name field enter: Approval Form
- In the Description field enter: Form to approve or reject the sales order
- Choose Create

Approval Form Click on Open Editor to edit the form.

Edit form Design the form by dragging and dropping the corresponding form elements as shown below.
Field Settings with Label Form Fields Configuration (Read Only) Approve Sales Order HeadLine 1 A new order has been received. Please review and confirm whether the requirements can be met or not. Paragraph Material Text X Order Amount Number X Customer Name Text X Expected Delivery Date Date X I acknowledge that we have received your order and will process it based on the availability Checkbox Message to Buyer Text Area 
8.4 Save the form.
Back within the process, click on the Approval Form and configure the Subject and Recipients.
In the Subject section:
- Enter Please review
- Select Material from the sales order details

8.5 In the Recipients section, enter your login ID (the email you used to sign into the SAP Build lobby).

8.5 Configure the inputs of the Approval Form. Navigate to Inputs and map the fields accordingly.

8.6 Choose Save.
In this step, you will create and design a form which will be sent as notification to the seller if the Sales order is approved. Upon the execution of the process, this notification form will be available in the SAP Build Lobby Inbox which will be covered in the later part of the exercise.
To add a confirmation to the process, select + below the Approve option.

Notifications Choose Form.

Notifications Choose Blank Form.

Notifications In the Create Form dialog box, do the following:
- In the Name field, enter Order Confirmation Form
- In the Description field, enter Notification form to inform whether the sales order is approved by the supplier
- Choose Create

Order confirmation form Click on Open Editor to edit the form.

9.2 Design the form by dragging and dropping the corresponding Form elements as shown below.
Form Fields Field Settings with Label Configuration (Read Only) Headline 1 Order Confirmation Paragraph Your order has been received and accepted for delivery. We will send you the details as soon as the order is shipped. You can find the details of your order below, please review and verify your request: Text Area Message from the supplier: X Text Material X Text Customer Name X Number Order Amount X Date Expected Delivery Date X Paragraph Please press the SUBMIT button to acknowledge the order status. 
9.3 Save the form.
Back in the process, click on the Order Confirmation Form and configure the Subject and Recipients.
In the Subject section:
- Enter Your order
- Select Material from the sales order details
- Enter has been approved
In the Recipients section, enter your login ID (email).
In this tutorial, to complete the process, you will play the dual role of Supplier and Seller. Hence, you would map your email ID in the Notification Form as well.

9.4 Configure the inputs of Order Confirmation Form. Navigate to Inputs and map the fields accordingly.
Choose Save.

9.5
Notifications can be sent via an Email or to the SAP Build Inbox of the Seller. Before adding mail notifications to a process, you must first configure your SMTP mail destinations for SAP Build Process Automation. Please refer to the pre-requisites to learn how to configure SMTP destination to send mail notifications.
In this step, you will send out an email notification to the Seller if the Sales order is rejected. You need to configure the mail server to use the Mail Artifact.
To add an email notification to the process, select + below the Reject option.

Notifications Choose Email.

Notifications Once you have successfully added Email, you will configure Mail Header and Mail Body.
In the To section, enter your personal or work email address.
Our SAP Build Process Automation is connected to a SMTP (i.e., mail) server and this process will send out a real email, so you want to enter an email address that you can check.
In the Subject section, enter Order Rejection Notification.

Mail_2 Click on Open Mail Body Editor.
- Enter Your order
- Select material from the
Sales Order Details - Enter has been rejected.
- Click on Apply

Mail_3 Click on Save.

Mail_4
Once the process with forms is designed, define which process flow should run based on if/else condition criteria. During the Sales Order Approval process, the Sales order can be approved automatically based on certain condition. In this step, you will add a condition where the Sales order goes for Supplier approval if the Order amount is greater than 100000 else the Sales order is approved automatically.
To add a condition to a process open the Process Builder. Choose + below the Trigger.

Process Condition Choose Controls and Events.

Process Condition Choose Condition.

Process Condition To configure the condition, choose Open Condition Editor.

Process Condition Process content will contain a list of attributes that have been defined in previous skills. For example: in the screenshot, you can see attributes from the API trigger. You will use this process content to configure different skills during business process modelling.
Edit your branch condition:
- Set
orderAmountfrom the process content - Select is greater than
- Enter 100000 as the value
- Choose Apply

Process Condition You have configured your if branch to: if Order Amount is greater than 100000. Both If and Default link branches are connected to the Approval Form.
- Set
Choose Save.

Process Condition With this process condition, only the sales order above a specific amount will be sent for approval and the rest will be auto-approved. You have to add a notification form in the If connection to notify the requester of the auto-approval and terminate the process.
In this step, you will create a notification form which would be received by supplier if the order is approved automatically without any approvals. With the Low-code capabilities, you need not to re-design the Form. Let’s explore the Duplicate feature in SAP Build Process Automation.
To add the new form, you will use the Duplicate feature.
- Select the Overview.
- Find Order Confirmation Form under the Artifacts section and choose Duplicate.

Duplicate Copy functionality is used to copy the artifacts between two different projects.
In the Duplicate Artifact pop-up window, change the name to Auto Approval Notification and select Duplicate.

10.1 The form is automatically opened in the form builder. Change the Auto approval form in the form builder to reflect the data for auto approval use case.
Design the notification form, the same way as in the previous steps, to send another notification to the requester about auto-approval.
Modify the Layout fields:
Form Fields Field Settings with Label Configuration(Read Only) Headline 1 Automatic Order Confirmation Paragraph Your order has been received and we will send you the details as soon as the order is shipped. You can find the details of your order below, please review and verify your request: Paragraph Your Sales Order Details: Text Material X Text Customer Name X Number Order Amount X Date Expected Delivery Date X Paragraph Please press the SUBMIT button to acknowledge the order status 
Auto Approval Save your work.
Go back to the Process Builder and add the auto approval form, choose + below the Default branch.

Auto Approval Choose Form.

Auto Approval Choose Auto Approval Notification.

Auto Approval Configure the General section.
Under Subject:
- Enter: Your order
- Choose: material from
Sales Order Details - Enter: has been approved automatically
Under Recipients, enter your login ID (email).

Auto Approval Configure the Inputs section.
Form Input Fields Process Content Entry Customer Name shipToPartyExpected Delivery Date expectedDeliveryDateMaterial materialOrder Amount orderAmount
Auto Approval Click on Save.
Below Auto Approval Notification, select +.

Process Condition Choose Controls and Events.

Process Condition Choose End.

Process Condition
Click on Save to save your work.
Once you have successfully completed the project, your final process looks as below.

Final Process This completes the process design with condition criteria that will decide what process flow is executed and whether there will be an auto-approval or a one-step approval route. Now the business process is ready to integrate with SAP Build Apps.
Resources
Discussion
Share feedback on this tutorial or join the conversation in SAP Community.