
Overview
You will learn
- How to create a new workspace
- How to add content to it and design the layout


Prerequisites
Prerequisites
- You have an environment set up and you can access your SAP Build Work Zone, advanced edition.
- You have created an app in SAP Build Apps and a process in SAP Process Automation by following this mission: Create Sales Order Workflow with SAP Build
SAP Build Work Zone, advanced edition isn’t available in a trial account.
Steps
Intro
In this tutorial, you’re going to create a workspace where employees who are part of the sales team can interact with other members of the workspace, ask questions, and find information, tools, and assets to help them close more deals.
Before you start, download these image files so that they’re on your computer ready for you to add to your workpage for the workspace that you’ll create.


Workspaces are the building blocks of SAP Build Work Zone, advanced edition. You can add all kinds of content to your workspace and you can invite other users to join as members.
In your site, click Workspaces in the top-level menu, and then click New Workspace. You can also use the New Workspace button on the right.

Create workspace Select No Template from the dropdown list of available templates.

Select template You can also select one of SAP’s out-of-the-box templates. In this case, you’ll get a professionally designed workpage with widgets including everything you need to get started quickly. You can then customize the content to suit your needs. For this tutorial, you won’t use a template.
Enter this name for your workspace:
Sales Management. In workshops, use:<your unique identifier>_Sales Management.Tip: Always use a name that would help users distinguish your workspace from others.
Copy and paste this description for your workspace:
Use this workspace to manage our team sales orders and collaborate!Select
Private.Selecting private makes your workspace available to a specific set of members that you’ve invited to the workspace. If you later want to make it public so that everyone in the company can see it, click Edit Workspace Settings at the top of your screen and change the setting to
Public.Click Create.

New workspace settings
Your workspace is created and you can now start building your workspace.

Now, let’s add content to the workspace.
When you create a new workspace, the header has a dark and light blue background. You can replace this background with your own.
Hover over the background in the workspace header to expose the Edit cover photo button and select Upload Photo.

New cover photo Browse for the following image that you downloaded:
workspace_sales_header.Reposition your photo to display it as you want, and then click Save.

Save cover image
In this step, you’ll add a workpage to your workspace - this workpage will describe the purpose of the workspace and will feature relevant content.
Click + to add a tab for your workpage to the workspace navigation bar.

Add page tab From the Add Tab to Navigation Bar screen, select the Workpage tile.

Add workpage Enter a title for the workpage:
Sales Orders.
Enter workpage title Select the Workpage Type. You can either select an existing workpage or you can create a new one. In this tutorial, we’ll select New Workpage. Select the folder where you want to save it (usually the Content folder), and click Add.

New Workpage
This is your new workpage and you can start adding content to it:

In this step, you’ll add two text widgets next to each other in the first section of the workpage.
Click + to add a section to your workpage.

Add section Click Add Widget in the first section to open the widget gallery.

Add widget Select the Text widget.

Add text widget Design the Text widget as follows:
| :————- | :————- | Text | Type in the following:
Verify your sales orders with our sales managers. | Font | Select the text and change to Arial 14pt. | Color | With the text already selected, choose black from the chart.
Design text widget On the right side of the widget that you’ve just added, click the + to add another column.

Add second widget Click Add Widget in the second column and select the Text widget.
Design the Text widget as follows:
| :————- | :————- | Text | Type in the following:
More Information| Font | Select the text and change to Arial 14pt. | Color | With the text already selected, choose black from the chart.
In this step, you’ll add images to the second section.
Click the + under the first section to add a new section.

Add a second row In the second section, click Add Widget.

Add widget to row 2 Select the Image widget.

Add image widget Click the link in the widget to browse for the image that you’ve saved on your computer and open it:
workspace_row2_image 1
Empty image widget Hover over the image to expose the settings at the top right and click the cog icon to edit the image widget.

Open image settings Design the Image widget as follows:
| :————- | :————- | Caption |
Carla Grant, Sales Manager| Caption Layout | Inline | Caption Alignment | LeftClick Save.

Define widget settings On the right side of this widget, click the + to add a new column.

Add column Click Add Widget in the new column, select the Image widget, and then click the link in the widget to add this image that you saved on your computer:
workspace_row2_image2.On the top right of the widget that you’ve just added, click the cog icon to edit your image widget.

Open settings for second image widget Design the second Image widget as follows and then click Save.
| :————- | :————-
| Caption | Michael Hill, Sales Fulfillment Manager
| Caption Layout | Inline
| Caption Alignment | Left
Click + next to the second image widget to open a third column.
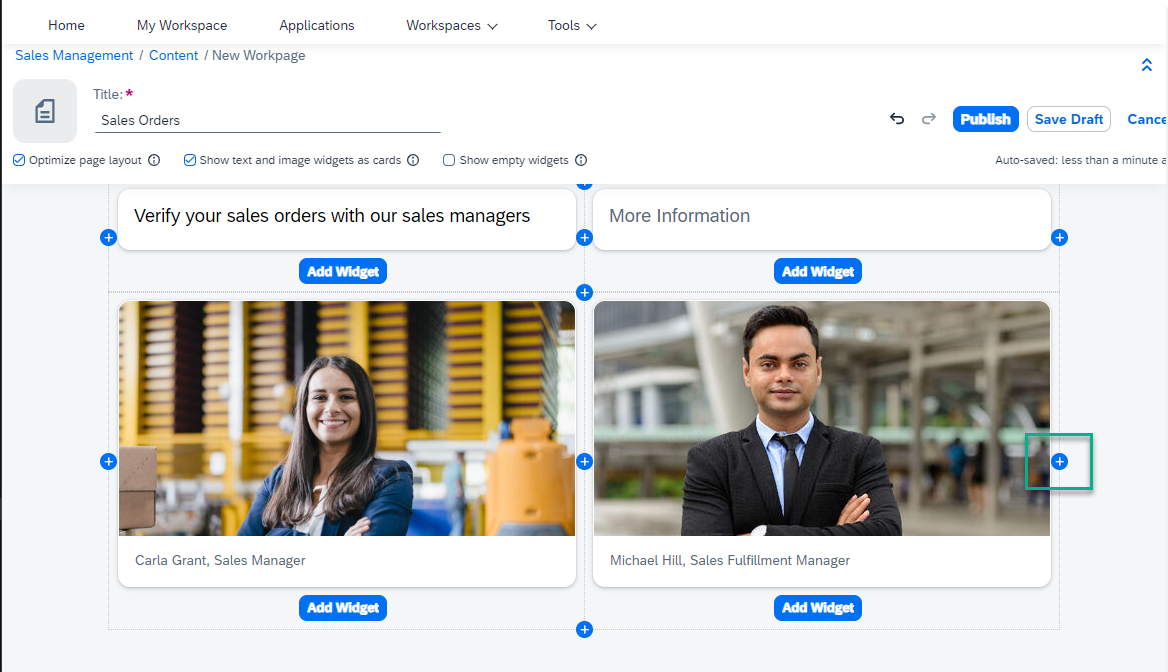
Add another column Add the following 4 image widgets one under each other in the third column. Keep clicking Add Widget and select an image each time until you’ve added all these images:
| :————- | :————- | First image |
workspace_image_with_icon1| Second image |workspace_image_with_icon2| Third image |workspace_image_with_icon3| Fourth image |workspace_image_with_icon4
Add widget 4 times Click the cog icon at the top right of the first image widget and design as follows. When you’re done, click Save.
| :————- | :————-
| Caption |Sales Invoices| Caption Layout |Overlay | Background Opacity |0% | Caption Alignment |LeftIn the same way, design the other 3 images as follows. When you’re done click Save each time:
| :————- | :————-
| Caption | Second image:Product DocumentationThird image:| Link To |Add this link to the second image widget that you namedConsider Your Sales PitchFourth image:Stay InvolvedProduct Documentation: https://help.sap.com/viewer/product/WZ/Cloud/en-USOnce you’ve published your site, you can click on this image to open the SAP Work Zone documentation product page.| Caption Layout |All images: Overlay | Background Opacity |All images: 0% | Caption Alignment |All images: LeftUse the dividers between the 3 columns to align all the images. Also make sure to adjust the
More Informationheading in line with the third column.
Align images This is how your second section looks:

First preview To increase the spacing between this section and the first section, hover over the section to expose the settings on the right, and click the cog icon to edit the spacing.

Edit section settings Under Padding Top, add the value
30pixels and click Save.
Edit row pixels
In this step, you’ll add an Action widget, a Forum widget, and a Feed widget.
Click + at the bottom of the second section to add another section.

Add the third section Click Add Widget.
Select the Action widget in the new section.
Adding an Action widget enables workspace members to choose from a selection of commonly used action types. In this tutorial, we want the workspace members to ask questions or add ideas.

Add an action widget Enter the Widget Title:
Add Your Questions & Ideas.Uncheck all options except for Ask a Question and Add an Idea. Click Save to add the widget to your workpage.

Design actions widget Now let’s create the Forum widget.
Click the + next to the widget you just created to add another column.

Add another column Click Add Widget.

Add a widget to 2nd column Select the Forum widget.
Adding a Forum widget enables a workspace member to view questions, ideas, and discussions submitted by their workspace members.

Add a forum widget Under Maximum Items to Display, move the slider to number 2, change the title to
What would you like to know?, and click Save.On the workpage, only 2 of the questions, ideas or discussions from the forum will be displayed.

Design the forum widget To increase the spacing between this section and the section above, hover over the section to expose the settings on the right, and click the cog icon to edit the spacing.

Edit row settings Under Padding Top, add the value
30pixels and click Save.Now let’s add the Feed widget.
Add another section.

Click Add Widget

Add another section Select the Feed widget and keep the default setting to show all events in the feed. Click Save.
Now Publish the workpage to make it visible to members of the workspace. Without doing this, the workpage is only visible to you.
You can save your workpage as a draft so check how it looks before publishing.

Publish In the popup, leave the Show in Feed Updates selected and click Publish.

Publish again By leaving the Show in Feed Updates checked, all workspace members will be informed of your changes. In the future, if the changes you make to your workspace aren’t significant, you can uncheck this option.
Apart from the Forum widget, you’re going to add a dedicated Forum tab to the navigation bar of your workspace. From this tab, workspace members can see all the questions, ideas, and discussions in the forums that have been created for the workspace.
Click the + icon.

Add new page tab In the Add Tab to Navigation Bar screen, under the Content category, select the Forums tile to add it as a tab to your workspace navigation bar. You’ll get a list of all the forum topics in the workspace.
In the next steps, you’ll ask a question in the forum.
Go back to your workpage by clicking the Sales Orders workpage in the navigation bar.

Go back to overview page Scroll down to your Actions widget that you added previously and click Ask a Question.

Add new question Add this question:
What is our sales forecast for the coming year?Then click Publish so that members will be able to see your question. You’ll get a confirmation message that your question was created.
Add first questions Go back to your workspace by using the breadcrumbs at the top.

Go back to Forums page
Note that your question has been added to your workpage as well as to your feed.

This is how your workspace looks:

Closing
Resources
Discussion
Share feedback on this tutorial or join the conversation in SAP Community.