
Overview
You will learn
- How to create an analytical query based on booking supplement as CDS View Entities
- How to connect an ABAP System to SAP Analytics Cloud
- How to consume analytical queries on SAP Analytics Cloud by creating models and stories


Prerequisites
Prerequisites
- You need the standard developer authorization profile to create ABAP development objects.
- You need a SAP Analytics Cloud account.
- Install
ABAPGitPlugin in ADT. See http://eclipse.abapgit.org/updatesite/ - To get the Flight Model into the system, follow the description at https://github.com/SAP/abap-platform-refscen-flight/blob/master/README.md
- Requires Customer or Partner License.
- You can find an intermediate tutorial for SAP Analytics Cloud here https://developers.sap.com/tutorials/abap-environment-analytics.html.
Steps
Intro
Always replace #### with your initials or group number.
The new RAP based InA service exposure enables the SAP Business Technology Platform ABAP Environment developers to develop analytical queries(based on ABAP-CDS analytical data models) and expose them via the InA (Information Access) service protocol. In this Tutorial you will create a complete Analytical Data Model for Booking data. This consists out of dimensions for Carrier, Customer, Connection and Agency data, as well as an interface CDS view for Booking data which acts as a data source for the cube and query.
These analytical queries can be further consumed in the SAP Analytics cloud to create analytical models, stories, multi-dimensional reports and more.

As a first task you will start to import templates that you will use in this tutorial to create Analytical CDS views such as dimension views, cubes and queries.
The templates already contain certain annotations that are mandatory for the above mentioned analytical CDS views. If values such as the name of a property have to be added this can then simply be done by using code completion.
Click on the following link to display the file analytical_templates.xml. Templates↓
Right-click on the browser window and save the content as an xml-file called analytical_templates.xml.

- Open ADT. In the menu choose Window > Preferences.

- In the Templates dialogue choose Import.

- Select the XML file analytical_templates.xml that you have saved.

The Import-Dialog only allows to select files having the extension
.xml.When you have downloaded the file using a different file extension you have first to rename your file so that it gets the extension.xml.
- You will see that three new templates have been imported that you will use in the following tutorial.
Press Apply and Close

Dimensions views are links to various master data, which are later used in reporting as further attributes (according to which different aggregations can be made) and thus make up the versatility of our Analytical Model.
In the following you will create seven dimension views for Travel Agencies, Carrier, Customers, Connections, Airport, Booking and Supplements so that you can visualize our measures Quantity, Sales and Average Sales in relation to these dimensions.
Open ADT and login to your ABAP System. If you do not have a package, create a new one.
Right-click your package and choose New > Other ABAP Repository Object.

new Choose Core Data Services > Data Definition and click Next.

new data definition Enter the following values
- Name:
ZRAP500_I_Agency_#### - Description:
Dimension for Agencies - Referenced Object:
/dmo/agency
- Name:
and click Next.
By selecting a table or another CDS view as Referenced object the wizard will use this object as a data source for the new CDS view and it will automatically add all fields into the DDL source code and it will also create camel Case aliases if needed.

- Choose a transport request and click Next.
Do NOT press Finish, because otherwise the wizard will not provide us the option to choose a specific template but would choose the template that you have used the last time.

In the Templates dialogue choose the Define a View Entity for a Dimension and press Finish. The Define a View Entity for a Dimension template is one of the new data definition templates that you have imported in the last step. This template contains certain annotations which will be explained below that are mandatory for dimension views.

define view
- Now you need to edit the dimension view. Here you can use code completion to add the values for the annotations
@ObjectModel.representativeKey
and
@ObjectModel.text.element
that are needed for our dimension view.

- Click on
representativeKey, delete the placeholderrepresentativKeyso that you get an empty string ’’ , press CTRL + Space and chooseAgencyID. You defineAgencyIDas the representative key to be able to refer to it using@ObjectModel.foreignKey.association

- Click on
textElement, delete the placeholder stringtextElement, press CTRL + Space and choose Name.

You state that attribute Name contains the text element for a given AgencyId. With that, you can deliver texts in our analytical query using annotation '@AnalyticsDetails.query.display: #TEXT' on attribute AgencyId and it is not necessary to expose attribute name separately via the query to show the name of an agency.
- To make
@ObjectModel.text.element: ['Name']work, you need to annotate the attribute Name as being text via@Semantics.text: true

Build an association to
I_Countryto be able to retrieve associated texts (country names). Add this association in your code:association [1] to I_Country as _Country on Agency.country_code = _Country.Country

Add as Agency to the define view entity line, to avoid any syntax error:
define view entity ZRAP500_I_Agency_#### as select from /dmo/agency as Agency
- Define a
foreignKey associationviaCountryCode(therepresentative keyofI_Country) to be able to fetch and expose country information (ID and text) asAgencyCountryin the cube and in the query.

You expose the Country association to be able to access country information in the cube and query.

country Remove these fields because they are too long for our analytics scenarios
//   email_address as EmailAddress,

//   web_address as WebAddress
Change @AccessControl.authorizationCheck: from
#CHECKto#NOT_REQUIRED.Save and activate the dimension.

- Your final code should look like following:
@AccessControl.authorizationCheck: #NOT_REQUIRED
@EndUserText.label: 'dimension for Agency'
@Metadata.ignorePropagatedAnnotations: true

@Analytics.dataCategory: #DIMENSION
@Analytics.internalName: #LOCAL
@ObjectModel.representativeKey: 'AgencyID'

define view entity ZRAP500_I_Agency_#### as select from /dmo/agency as Agency
association [1] to I_Country as _Country on Agency.country_code = _Country.Country
{
@ObjectModel.text.element: ['Name']
key agency_id           as AgencyId,
    @Semantics.text: true
    name                as Name,
    street              as Street,
    postal_code         as PostalCode,
    city                as City,

    @ObjectModel.foreignKey.association: '_Country'
    country_code        as CountryCode,
    phone_number        as PhoneNumber,

    /*Associations*/
    _Country
}Right click Data Definition > New Data Definition. Enter following values and press Next:
- Name:
ZRAP500_I_Airport_#### - Description:
Dimension for Airport - Referenced Object:
/dmo/airport

airport - Name:
Select a transport request and press Next.
Select again the template Define a View Entity for Dimension and press Finish.
Choose the property
AirportIdfor the annotation @ObjectModel.representativeKey and chooseNamefor the annotation @ObjectModel.text.element.

The same mechanisms are implemented as with dimension Agency, i.e., - modeling a dimension with a representative key - denoting and exposing a text element Name - modeling and exposing an association to
I_CountryChange @AccessControl.authorizationCheck: from
#CHECKto#NOT_REQUIRED.Save and activate the dimension.
- Your final code should look like following:
@AbapCatalog.viewEnhancementCategory: [#NONE]
@AccessControl.authorizationCheck: #NOT_REQUIRED
@EndUserText.label: 'Airport Dimension'
@Metadata.ignorePropagatedAnnotations: true

@Analytics.dataCategory: #DIMENSION
@ObjectModel.representativeKey: 'AirportId'

define view entity ZCM_I_Airport
  as select from /dmo/airport as Airport

  association [1] to I_Country as _Country on Airport.country = _Country.Country

{
@ObjectModel.text.element: ['Name']
key airport_id as AirportId,
    @Semantics.text: true
    name as Name,
    city as City,

    @ObjectModel.foreignKey.association: '_Country'
    country as Country,

    /*Associations*/
    _Country
}Right click Data Definition > New Data Definition. Enter following values and press Next:
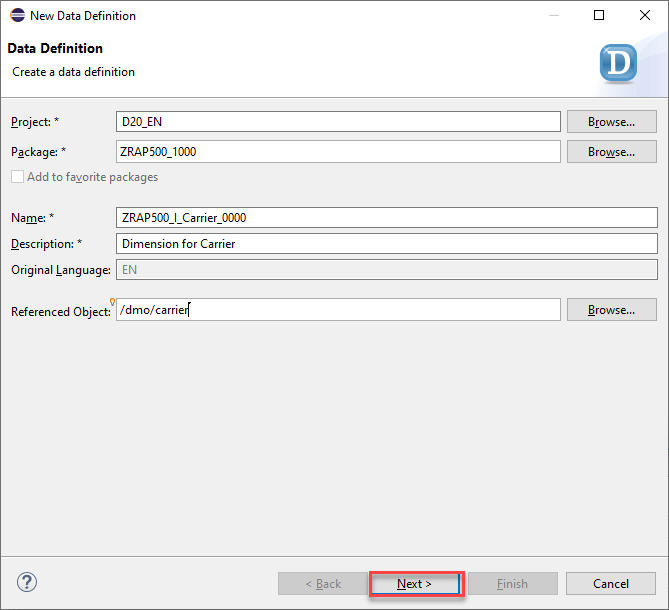
- Name:
ZRAP500_I_Carrier_#### - Description:
Dimension for Carrier - Referenced Object:
/dmo/carrier
airport - Name:
Select a transport request and press Next.
Select again the template Define a View Entity for Dimension and press Finish.
Choose the property
CarrierIdfor the annotation @ObjectModel.representativeKey and chooseNamefor the annotation @ObjectModel.text.element.

The same mechanisms are implemented as with dimension Agency and Airport except that we do not expose any other association, i.e., - modeling a dimension with a representative key - denoting and exposing a text element Name
Change @AccessControl.authorizationCheck: from
#CHECKto#NOT_REQUIRED.Save and activate the dimension.
- Your final code should look like following:
@AbapCatalog.viewEnhancementCategory: [#NONE]
@AccessControl.authorizationCheck: #NOT_REQUIRED
@EndUserText.label: 'Carrier View - CDS View Entity Model'
@Metadata.ignorePropagatedAnnotations: true

@Analytics.dataCategory: #DIMENSION
@ObjectModel.representativeKey: 'CarrierId'

define view entity ZCM_I_Carrier
  as select from /dmo/carrier as Carrier
{
@ObjectModel.text.element: ['name']
key carrier_id as CarrierId,
    @Semantics.text: true
    name       as Name
}Right click Data Definition > New Data Definition. Enter following values and press Next:
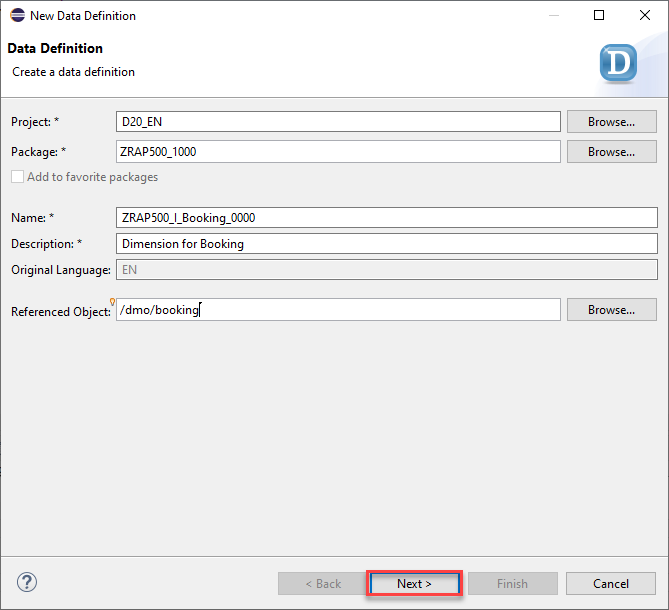
- Name:
ZRAP500_I_Booking_#### - Description:
Dimension for Booking - Referenced Object:
/dmo/booking
airport - Name:
Select a transport request and press Next.
Select again the template Define a View Entity for Dimension and press Finish.
Choose the property
BookingIdfor the annotation @ObjectModel.representativeKey.You need to define and expose a foreign Key for
TravelIdbecause analytics needs a foreign key relationship on the key attributeTravelId. - Define the associationassociation [1..1] to /DMO/I_Travel_U as _Travel on $projection.TravelId = _Travel.TravelID. - Remove the @ObjectModel.text.element annotation and add the annotation @ObjectModel.foreignKey.association:_Travelon the top oftravel_idkey.Although
/dmo/bookingcontains more information, we just exposeBookingDateandFlightDatehere. Other interesting attributes (Customer, Carrier, Connection) are exposed via their own dimension views. The other potential measure attributeFlightPriceis not used in this tutorial (because we analyze Booking Supplements). Remove this lines of code:
//  customer_id as CustomerId,
//  carrier_id as CarrierId,
//  connection_id as ConnectionId,
//  flight_price as FlightPrice,
//  currency_code as CurrencyCode,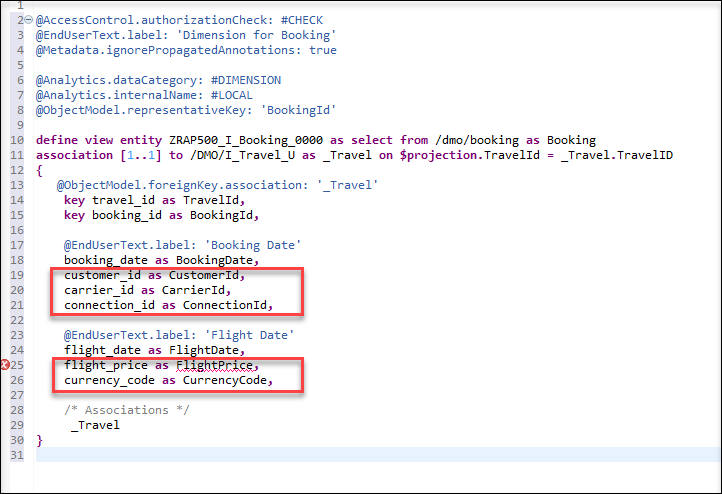
Add annotations to
BookingDateandFlightDate:@EndUserText.label: 'Booking Date'and@EndUserText.label: 'Flight Date'Change @AccessControl.authorizationCheck: from
#CHECKto#NOT_REQUIRED.Save and activate the dimension.
- Your final code should look like following:
@AbapCatalog.viewEnhancementCategory: [#NONE]
@AccessControl.authorizationCheck: #NOT_REQUIRED
@EndUserText.label: 'Booking View - CDS View Entity Model'
@Metadata.ignorePropagatedAnnotations: true

@Analytics.dataCategory: #DIMENSION
@ObjectModel.representativeKey: 'BookingId'

define view entity ZCM_I_Booking
  as select from /dmo/booking as Booking

  association [1..1] to /DMO/I_Travel_U as _Travel on $projection.TravelId = _Travel.TravelID

{
@ObjectModel.foreignKey.association: '_Travel'
key travel_id     as TravelId,
key booking_id    as BookingId,

    @EndUserText.label: 'Booking Date'
    booking_date  as BookingDate,

    @EndUserText.label: 'Flight Date'
    flight_date   as FlightDate,

    /* Associations */
    _Travel
}Right click on the folder Data Definitions > New > Data Definition.
Enter the following values and press Next.
- Name:
ZRAP500_I_Connection_#### - Description:
Dimension for Connections - Referenced Object:
/dmo/connection
- Name:

- Select a transport request and press Next.
- Select again the template Define a View Entity for Dimension and press Finish.
- Choose the property
connectionIdfor the annotation @ObjectModel.representativeKey. - Add three associations for
_Carrier,_DepartureAirportand_DestinationAirport:
association [1] to ZRAP500_I_Carrier_#### as _Carrier on $projection.CarrierId = _Carrier.CarrierId association [1..1] to ZRAP500_I_Airport_#### as _DepartureAirport on $projection.DepartureAirportId = DepartureAirport.AirportId association [1..1] to ZRAP500_I_Airport#### as _DestinationAirport on $projection.DestinationAirportId = _DestinationAirport.AirportId
and expose them in the field list by adding _Carrier, _DepartureAirport and _DestinationAirport

The Connection dimension shall expose attributes around departure and destination locations. It therefore references the same dimension Airport twice, as Departure Airport and as Destination Airport.
- Add the following annotation to the key field
CarrierId
@ObjectModel.foreignKey.association: '_Carrier'
Add two annotations
@EndUserText.label: 'Departure Airport'and@ObjectModel.foreignKey.association: '_DepartureAirport'to the fieldairport_from_id as AirportFromIdto referring to theAirportIdof the departure airport to expose the ID and text of the airport. You can changeAirportFromIdtoDepartureAirportId.Add two annotations
@EndUserText.label: 'Destination Airport'and@ObjectModel.foreignKey.association: '_DestinationAirport'to the fieldairport_to_id as AirportToIdto referring to theAirportIdof the destination airport to expose the ID and text of the airport. You can changeAirportToIdtoDestinationAirportId.Add @EndUserText.label: annotations for
DepartureTimeandArrivalTime.Remove these two elements because we do not need them:
    connection.distance as Distance,
    connection.distance_unit as DistanceUnit
Add
DepartureCity,DepartureCountry,DestinationCityandDestinationCountrywith @EndUserText.label: annotation and expose them in the field list by adding_DepartureAirport._Country as _DepartureCountryand_DestinationAirport._Country as _DestinationCountryChange @AccessControl.authorizationCheck: from
#CHECKto#NOT_REQUIRED.Save and activate the dimension view.
Your final code should look like the following:
  @AccessControl.authorizationCheck: #NOT_REQUIRED
  @EndUserText.label: 'Dimension for Connections'
  @Metadata.ignorePropagatedAnnotations: true

  @Analytics.dataCategory: #DIMENSION
  @Analytics.internalName: #LOCAL
  @ObjectModel.representativeKey: 'ConnectionId'

  define view entity ZRAP500_I_Connection_#### as select from /dmo/connection as connection
  association [1] to ZRAP500_I_Carrier_#### as _Carrier on $projection.CarrierId = _Carrier.CarrierId
  association [1..1] to ZRAP500_I_Airport_####  as _DepartureAirport   on $projection.DepartureAirportId   = _DepartureAirport.AirportId
  association [1..1] to ZRAP500_I_Airport_#### as _DestinationAirport on $projection.DestinationAirportId = _DestinationAirport.AirportId

  {
  @ObjectModel.foreignKey.association: '_Carrier'
  key connection.carrier_id as CarrierId,
  key connection.connection_id as ConnectionId,

    @EndUserText.label: 'Departure Airport'
    @ObjectModel.foreignKey.association: '_DepartureAirport'
    connection.airport_from_id as DepartureAirportId,

    @EndUserText.label: 'Departure City'
    _DepartureAirport.City as DepartureCity,

    @EndUserText.label: 'Departure Country'
    @ObjectModel.foreignKey.association: '_DepartureCountry'
    _DepartureAirport.Country as DepartureCountry,

    @EndUserText.label: 'Destination Airport'
    @ObjectModel.foreignKey.association: '_DestinationAirport'
    connection.airport_to_id as DestinationAirportId,

    @EndUserText.label: 'Destination City'
    _DestinationAirport.City as DestinationCity,

    @EndUserText.label: 'Destination Country'
    _DestinationAirport.Country as DestinationCountry,

    @EndUserText.label: 'Departure Time'
    connection.departure_time as DepartureTime,

    @EndUserText.label: 'Arrival Time'
    connection.arrival_time as ArrivalTime,

  /*Associations*/
    _Carrier,
    _DepartureAirport,
    _DepartureAirport._Country as _DepartureCountry,
    _DestinationAirport,
    _DestinationAirport._Country as _DestinationCountry

}Right click on the folder Data Definitions > New > Data Definition.
Enter the following values and press Next.
- Name:
ZRAP500_I_Customer_#### - Description:
Dimension for Customer - Referenced Object:
/dmo/customers
- Name:

CustomerId for the annotation @ObjectModel.representativeKey.
6. Remove all elements and insert them again with pressing CTRL + Space > Insert All Elements. Because you have used a select from /dmo/customer as Customer and your elements will be inserted with Customer.
7. Add an associations for _Country:
  <pre></pre>
    association [1] to I_Country as _Country on Customer.country_code = _Country.Country


  and expose it in the field list by adding `_Country`.
- Choose
CustomerNamefor the annotation @ObjectModel.text.element and defineCustomerNamewith first name and last name:

- Add annotation the following annotation to the
CountryCode:
@ObjectModel.foreignKey.association: ‘_Country’
- Remove all these elements because they are too much for your analytics case:
  Customer.title as Title,
  Customer.email_address as EmailAddress,
  Customer.createdby as Createdby,
  Customer.createdat as Createdat,
  Customer.lastchangedby as Lastchangedby,
  Customer.lastchangedat as Lastchangedat,
Change @AccessControl.authorizationCheck: from
#CHECKto#NOT_REQUIRED.Save and activate the dimension view.
Your final code should look like the following:
@AccessControl.authorizationCheck: #NOT_REQUIRED
@EndUserText.label: 'Dimension for Customer'
@Metadata.ignorePropagatedAnnotations: true

@Analytics.dataCategory: #DIMENSION
@Analytics.internalName: #LOCAL
@ObjectModel.representativeKey: 'CustomerId'

define view entity ZRAP500_I_Customer_#### as select from /dmo/customer as Customer
association [1] to I_Country as _Country on Customer.country_code = _Country.Country
{
    @ObjectModel.text.element: ['CustomerName']
    key Customer.customer_id as CustomerId,
    Customer.first_name as FirstName,
    Customer.last_name as LastName,

    @Semantics.text: true
    concat_with_space(first_name, last_name, 1) as CustomerName,
    Customer.street as Street,
    Customer.postal_code as PostalCode,
    Customer.city as City,

    @ObjectModel.foreignKey.association: '_Country'
    Customer.country_code as CountryCode,
    Customer.phone_number as PhoneNumber,

    /*Associations*/
    _Country

}Right click on the folder Data Definitions > New > Data Definition.
Enter the following values and press Next.
- Name:
ZRAP500_I_Supplement_#### - Description:
Dimension for Supplement - Referenced Object:
/dmo/supplement

supplement - Name:
Select a transport request and press Next.
Select again the template Define a View Entity for Dimension and press Finish.
Choose the property
SupplementIdfor the annotation @ObjectModel.representativeKey.Add an associations for
_SupplText:association [1..*] to ZRAP500_I_SUPPTEXT_#### as _SupplText on $projection.SupplementId = _SupplText.SupplementId
and expose it in the field list by adding
_SupplText.Choose
_SupplTextfor the annotation @ObjectModel.text.association.Remove price and currency elements.
Change @AccessControl.authorizationCheck: from
#CHECKto#NOT_REQUIRED.Remove all these elements because they are too much for your analytics case:
supplement_category as SupplementCategory,
local_created_by as LocalCreatedBy,
local_created_at as LocalCreatedAt,
local_last_changed_by as LocalLastChangedBy,
local_last_changed_at as LocalLastChangedAt,
last_changed_at as LastChangedAt,
Change @AccessControl.authorizationCheck: from
#CHECKto#NOT_REQUIRED.Save and activate the dimension view. You will have an error that
SupplementTextis not exist, you need to create it in the next step.Your final code should look like the following:
@AccessControl.authorizationCheck: #NOT_REQUIRED
@EndUserText.label: 'Dimension for Supplement'
@Metadata.ignorePropagatedAnnotations: true

@Analytics.dataCategory: #DIMENSION
@Analytics.internalName: #LOCAL
@ObjectModel.representativeKey: 'SupplementId'

define view entity ZRAP500_I_Supplement_#### as select from /dmo/supplement

association [1..*] to ZRAP500_I_SUPPTEXT_#### as _SupplText on $projection.SupplementId = _SupplText.SupplementId

 {
    @ObjectModel.text.association: '_SupplText'
    key supplement_id as SupplementId,

      /* Associations */
    _SupplText
}Right click on the folder Data Definitions > New > Data Definition.
Enter the following values and press Next.
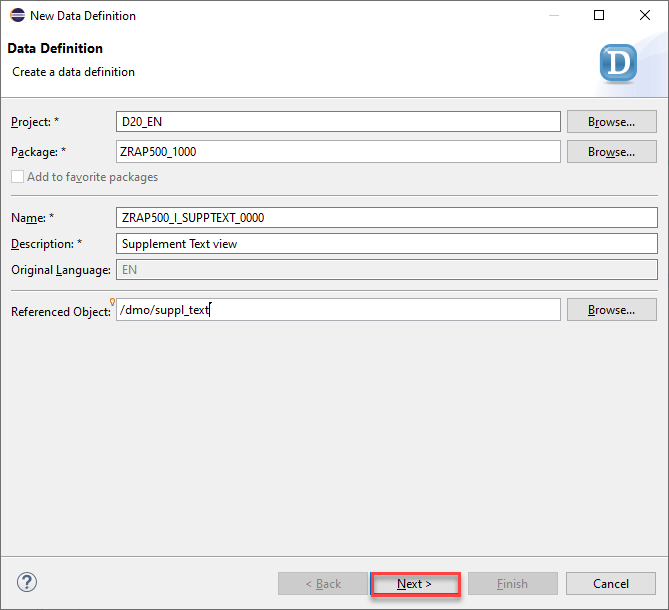
- Name:
ZRAP500_I_SuppText_#### - Description:
Supplement Text view - Referenced Object:
/dmo/suppl_text
supplement text - Name:
Select a transport request and press Next.
Select the template Define View Entity and press Finish.

- Add two annotations for data category and representative key:
  @ObjectModel.dataCategory: #TEXT
  @ObjectModel.representativeKey: 'SupplementId'
Add another two annotations to
@Semantics.language:true @Semantics.text:trueLanguageCodeand Description:Change @AccessControl.authorizationCheck: from
#CHECKto#NOT_REQUIREDSave and activate the dimension view.
Do not forget to activate your
ZRAP500_I_Supplement_####dimension to solve the error in the last step.Your final code should look like the following:
@AbapCatalog.viewEnhancementCategory: [#NONE]
@AccessControl.authorizationCheck: #NOT_REQUIRED
@EndUserText.label: 'Supplement Text view'
@Metadata.ignorePropagatedAnnotations: true
@ObjectModel.usageType:{
    serviceQuality: #X,
    sizeCategory: #S,
    dataClass: #MIXED
}

@ObjectModel.dataCategory: #TEXT
@ObjectModel.representativeKey: 'SupplementId'

define view entity ZRAP500_I_SUPPTEXT_#### as select from /dmo/suppl_text as SupplText {

    key supplement_id as SupplementId,

    @Semantics.language:true
    key language_code as LanguageCode,

    @Semantics.text:true
    description as Description
}You need to create a helper interface view to expose the necessary elements from /dmo/book_suppl as well as from associated Travel and Booking views. The cube is based on this view.
Right click on the folder Data Definitions > New > Data Definition.
Enter the following values and press Next.
- Name:
ZRAP500_I_BookingSupplmnt_#### - Description:
Booking Supplement - Referenced Object:
/dmo/book_suppl
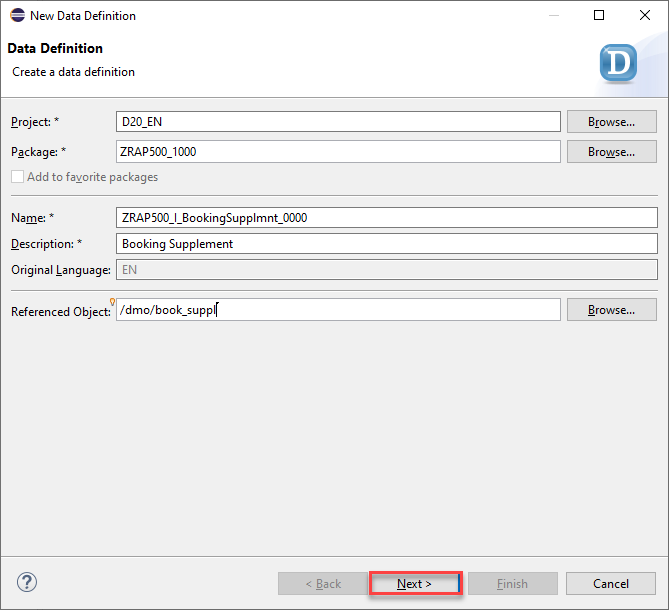
booking supplement - Name:
Select a transport request and press Next.
Select the template Define View Entity and press Finish.
Define associations to retrieve
CustomerId,AgencyId(Travel) andCarrierId,ConnectionId(Booking) information.
Add two annotations:
association [1..1] to /dmo/travel     as _Travel     on  $projection.TravelId     = _Travel.travel_id
association [1..1] to /dmo/booking    as _Booking    on  $projection.TravelId     = _Booking.travel_id
and $projection.BookingId = _Booking.booking_id - Define the sales per booked supplement based on the price of the supplement (with currency code annotation).
Add annotation @Semantics.amount.currencyCode: to the currencyCode field.
Currency conversion will be defined in the query.
Change @AccessControl.authorizationCheck: from
#CHECKto#NOT_REQUIREDSave and activate the dimension view.
Your final code should look like the following:
@AbapCatalog.viewEnhancementCategory: [#NONE]
@AccessControl.authorizationCheck: #NOT_REQUIRED
@EndUserText.label: 'Booking Supplement'
@Metadata.ignorePropagatedAnnotations: true
@ObjectModel.usageType:{
  serviceQuality: #X,
  sizeCategory: #S,
  dataClass: #MIXED
}

@ObjectModel.representativeKey: 'BookingSupplementId'

define view entity ZRAP500_I_BookingSupplmnt_####

  as select from /dmo/book_suppl as BSupplement

  association [1..1] to /dmo/travel     as _Travel     on  $projection.TravelId     = _Travel.travel_id
  association [1..1] to /dmo/booking    as _Booking    on  $projection.TravelId     = _Booking.travel_id
                                                       and $projection.BookingId    = _Booking.booking_id
{
key travel_id             as TravelId,
key booking_id            as BookingId,
key booking_supplement_id as BookingSupplementId,

    supplement_id as SupplementId,

    _Travel.customer_id    as CustomerId,
    _Travel.agency_id      as AgencyId,
    _Booking.carrier_id    as CarrierId,
    _Booking.connection_id as ConnectionId,

    @Semantics.amount.currencyCode: 'CurrencyCode'
    price as Sales,
    currency_code as CurrencyCode,

   /* Associations */
   _Travel,
   _Booking
}The Cube is the analytical interface view that is ultimately used in the query and holds the model together. In addition to the facts and the measurable key figures (if necessary also calculations), it contains references to the dimensions.
Right click on the folder Data Definitions > New > Data Definition.
Enter the following values and press Next.
- Name:
ZRAP500_I_SupplCube_#### - Description:
Booking Supplement Cube - Referenced Object:
ZRAP500_I_BookingSupplmnt_####(your booking supplement interface)

cube - Name:
Select a transport request and press Next.
Select the template Define a View Entity for cube and press Finish.

- Your created booking supplement interface is implemented in this cube, add as
BSupplementin this line:
define view entity ZRAP500_I_SuppCube_#### as select from ZRAP500_I_BookingSupplmnt_#### as BSupplenment
- You can separate keys, dimensions and measures.

- Add the following associations
    association [1..1] to ZRAP500_I_Supplement_#### as _Supplement on  $projection.SupplementId = _Supplement.SupplementId
    association [1..1] to ZRAP500_I_Customer_####   as _Customer   on  $projection.CustomerId   = _Customer.CustomerId
    association [1..1] to ZRAP500_I_Agency_####     as _Agency     on  $projection.AgencyId     = _Agency.AgencyId
    association [1..1] to ZRAP500_I_Booking_####    as _Booking    on  $projection.BookingId    = _Booking.BookingId
                                                      and $projection.TravelId     = _Booking.TravelId
    association [1..1] to ZRAP500_I_Connection_#### as _Connection on  $projection.CarrierId    = _Connection.CarrierId
                                                      and $projection.ConnectionId = _Connection.ConnectionId
    association [1..1] to ZRAP500_I_Carrier_####     as _Carrier    on  $projection.CarrierId    = _Carrier.CarrierId
you also need to add the following entries to the field list
_Agency, _Booking, _Supplement, _Customer, _Connection, _Carrier

In the created cube you define
foreignKey associationsvia_Supplement,_Customer,_Agency,_AgencyCountry,_Carrierand_Connectionto be able to fetch and expose information in the cube and in the query. And you need to provide an end user text label.- Add the annotation
@ObjectModel.foreignKey.association: '_Supplement'and@EndUserText.label: 'Product'to the fieldSupplementId - Add the annotation
@ObjectModel.foreignKey.association: '_Customer'and@EndUserText.label: 'Customer'to the fieldCustomerId - Add the annotation
@ObjectModel.foreignKey.association: '_Agency'and@EndUserText.label: 'Agency'to the fieldAgencyID - Add the annotation
@ObjectModel.foreignKey.association: '_Carrier'and@EndUserText.label: 'Carrier'to the fieldCarrierId - Add the annotation
@ObjectModel.foreignKey.association: '_Connection'to the fieldConnectionId
- Add the annotation

- Now you need to expose other attributes like booking date, flight date, departure and destination Country, departure and destination Airport, etc. Add these attributes with all needed annotations:
@EndUserText.label: 'AgencyCountry'
@ObjectModel.foreignKey.association: '_AgencyCountry'
_Agency.CountryCode as AgencyCountry,

@EndUserText.label: 'Booking Date'
_Booking.BookingDate as BookingDate,

@EndUserText.label: 'Flight Date'
_Booking.FlightDate  as FlightDate,

@EndUserText.label: 'Departure Airport'
@ObjectModel.foreignKey.association: '_DepartureAirport'
_Connection.DepartureAirportId as DepartureAirport,

@EndUserText.label: 'Departure Country'
@ObjectModel.foreignKey.association: '_DepartureCountry'
_Connection.DepartureCountry as DepartureCountry,

@EndUserText.label: 'Destination Airport'
@ObjectModel.foreignKey.association: '_DestinationAirport'
_Connection.DestinationAirportId as DestinationAirport,

@EndUserText.label: 'Destination Country'
@ObjectModel.foreignKey.association: '_DestinationCountry'
_Connection.DestinationCountry as DestinationCountry,
and expose them all in the field list by adding them in the field list:
_Agency._Country as _AgencyCountry, _Connection._DepartureAirport as _DepartureAirport, _Connection._DepartureCountry as _DepartureCountry, _Connection._DestinationAirport as _DestinationAirport, _Connection._DestinationCountry as _DestinationCountry,

- You need to add some annotations to your measures:
   @Semantics.amount.currencyCode: 'CurrencyCode'
   @Aggregation.default: #SUM
   Sales,
   CurrencyCode,

   @EndUserText.label: 'Quantity'
   @Aggregation.default: #SUM
   cast ( 1 as abap.int8 ) as Quantity,
Change @AccessControl.authorizationCheck: from
#CHECKto#NOT_REQUIREDSave and activate the dimension view.
Your final code should look like the following:
    @AccessControl.authorizationCheck: #NOT_REQUIRED
    @EndUserText.label: 'Booking Supplement cube'
    @Metadata.ignorePropagatedAnnotations: true

    @Analytics.dataCategory: #CUBE
    @Analytics.internalName: #LOCAL


    define view entity ZRAP500_I_SupplCube_0000 as select from ZRAP500_I_BookingSupplmnt_0000 as BSupplenment
    association [1..1] to ZRAP500_I_Supplement_0000 as _Supplement on  $projection.SupplementId = _Supplement.SupplementId
          association [1..1] to ZRAP500_I_Customer_0000   as _Customer   on  $projection.CustomerId   = _Customer.CustomerId
          association [1..1] to ZRAP500_I_Agency_0000     as _Agency     on  $projection.AgencyId     = _Agency.AgencyId
          association [1..1] to ZRAP500_I_Booking_0000    as _Booking    on  $projection.BookingId    = _Booking.BookingId
                                                            and $projection.TravelId     = _Booking.TravelId
          association [1..1] to ZRAP500_I_Connection_0000 as _Connection on  $projection.CarrierId    = _Connection.CarrierId
                                                            and $projection.ConnectionId = _Connection.ConnectionId
          association [1..1] to ZRAP500_I_Carrier_0000     as _Carrier    on  $projection.CarrierId    = _Carrier.CarrierId
    {

        /* keys */
        key TravelId,
        key BookingId,
        key BookingSupplementId,

        /* dimensions */

        @EndUserText.label: 'Product'
        @ObjectModel.foreignKey.association: '_Supplement'
        SupplementId,

        @EndUserText.label: 'Customer'
        @ObjectModel.foreignKey.association: '_Customer'
        CustomerId,

        @EndUserText.label: 'Agency'
        @ObjectModel.foreignKey.association: '_Agency'
        AgencyId,

        @EndUserText.label: 'AgencyCountry'
        @ObjectModel.foreignKey.association: '_AgencyCountry'
        _Agency.CountryCode as AgencyCountry,

        @EndUserText.label: 'Carrier'
        @ObjectModel.foreignKey.association: '_Carrier'
        CarrierId,

        @ObjectModel.foreignKey.association: '_Connection'
        ConnectionId,

        @EndUserText.label: 'Booking Date'
        _Booking.BookingDate as BookingDate,

        @EndUserText.label: 'Flight Date'
        _Booking.FlightDate  as FlightDate,

        @EndUserText.label: 'Departure Airport'
        @ObjectModel.foreignKey.association: '_DepartureAirport'
        _Connection.DepartureAirportId as DepartureAirport,

        @EndUserText.label: 'Departure Country'
        @ObjectModel.foreignKey.association: '_DepartureCountry'
        _Connection.DepartureCountry as DepartureCountry,

        @EndUserText.label: 'Destination Airport'
        @ObjectModel.foreignKey.association: '_DestinationAirport'
        _Connection.DestinationAirportId as DestinationAirport,

        @EndUserText.label: 'Destination Country'
        @ObjectModel.foreignKey.association: '_DestinationCountry'
        _Connection.DestinationCountry as DestinationCountry,

        /* Measures */
        @Semantics.amount.currencyCode: 'CurrencyCode'
        @Aggregation.default: #SUM
        Sales,
        CurrencyCode,

        @EndUserText.label: 'Quantity'
        @Aggregation.default: #SUM
        cast ( 1 as abap.int8 ) as Quantity,

        /* Associations */
         _Agency,
        _Agency._Country as _AgencyCountry,
        _Booking,
        _Supplement,
        _Customer,
        _Travel,
        _Connection,
        _Connection._DepartureAirport as _DepartureAirport,
        _Connection._DepartureCountry as _DepartureCountry,
        _Connection._DestinationAirport as _DestinationAirport,
        _Connection._DestinationCountry as _DestinationCountry,
        _Carrier

}Since a query belongs to the projection layer (formerly known as consumption layer) it must have a C in its name according to the naming convention used in the Virtual Data Model (VDM) used in SAP S/4HANA. To create a query, there is a mandatory header annotation: @Analytics.query: true
Again you can use a template that you have imported at the beginning of this tutorial.
Right click on the folder Data Definitions > New > Data Definition.
Enter the following values and press Next.
- Name:
ZRAP500_C_SuppQuery_#### - Description:
Booking Supplement Query - Referenced Object:
ZRAP500_I_SuppCube_####(your created cube)

query - Name:
Select a transport request and press Next.
Select the template Define a View Entity for Query and press Finish.

query view Change @AccessControl.authorizationCheck: from
#CHECKto#PRIVILEGED_ONLY. It only allows privileged access to this query to avoid that it is queried from regular ABAP programs. Remove all associations.
If using regular ABAP selects, the analytical processor to execute the query is not used, which might lead to unwanted / wrong results.
The DCL0 (see below) blocks all unprivileged access (SQL queries return 0 rows)
- Define a parameter to control the currency conversion

- Expose dimension attributes: - Annotate them to appear on COLUMNS in tabular views of the query with @AnalyticsDetails.query.axis: #COLUMNS - Annotate them to appear either as KEY (Supplement) or TEXT (all others) on views of the query with @AnalyticsDetails.query.display: #KEY or @AnalyticsDetails.query.display: #TEXT

- Define a currency conversion with a fixed reference date (‘20200101’) based on the Sales attribute.
 @EndUserText.label: 'Sales'
 @AnalyticsDetails.query.axis: #ROWS
 @Semantics.amount.currencyCode: 'DisplayCurrency'
 @Aggregation.default: #SUM // requires @Aggregation.default: #FORMULA on 2105 systems
 currency_conversion (
   amount => Sales,
   source_currency => CurrencyCode,
   target_currency => $parameters.P_DisplayCurrency,
   exchange_rate_date => cast ('20200101' as abap.dats),
   exchange_rate_type => 'M'
 ) as SalesInDispCrcy,
Currency conversion could also be defined on the cube level, however, then it would be applied to all selected rows instead of the final (aggregated) result, usually having lower performance.
- Use the view parameter to define the Display Currency attribute with a default value ‘USD’ (US Dollar)
  @Consumption.defaultValue: 'USD'
  @EndUserText.label: 'Display Currency'
$parameters.P_DisplayCurrency as DisplayCurrency,- expose the quantity measure.
  @AnalyticsDetails.query.axis: #ROWS
  @Aggregation.default: #SUM
Quantity,- define a calculated measure Average Sales using a formula
> The expression
1 as AverageSalesis required to create an attribute which carries the result of the formula (the number ‘1’ has no semantics).
  @EndUserText.label: 'Average Sales'
  @AnalyticsDetails.query.axis: #ROWS
  @Aggregation.default: #FORMULA
  @AnalyticsDetails.query.formula: '$projection.SalesInDispCrcy / $projection.Quantity'
  1 as AverageSales
Save and activate the dimension view.
Your final code should look like the following:
@AccessControl.authorizationCheck: #PRIVILEGED_ONLY
@EndUserText.label: 'Booking Supplement Query'


@Analytics.query: true

define view entity ZRAP500_C_SuppQuery_0000

    with parameters
    P_DisplayCurrency: abap.cuky

    as select from ZRAP500_I_SuppCube_0000

    {

    /* keys */
    key TravelId,
    key BookingId,
    key BookingSupplementId,


    @AnalyticsDetails.query.axis: #COLUMNS
    @AnalyticsDetails.query.display: #KEY
    SupplementId as Supplement,

    @AnalyticsDetails.query.axis: #COLUMNS
    @AnalyticsDetails.query.display: #TEXT
    CustomerId as Customer,

    @AnalyticsDetails.query.axis: #COLUMNS
    @AnalyticsDetails.query.sortDirection: #ASC
    @AnalyticsDetails.query.display: #TEXT
    AgencyId as Agency,

    @AnalyticsDetails.query.axis: #COLUMNS
    @AnalyticsDetails.query.display: #TEXT
    AgencyCountry,

    @AnalyticsDetails.query.axis: #COLUMNS
    @AnalyticsDetails.query.display: #TEXT
    CarrierId as Carrier,

    @AnalyticsDetails.query.axis: #COLUMNS
    BookingDate,

    @AnalyticsDetails.query.axis: #COLUMNS
    FlightDate,

    @AnalyticsDetails.query.axis: #COLUMNS
    @AnalyticsDetails.query.display: #TEXT
    DepartureAirport,

    @AnalyticsDetails.query.axis: #COLUMNS
    @AnalyticsDetails.query.display: #TEXT
    DepartureCountry,

    @AnalyticsDetails.query.axis: #COLUMNS
    @AnalyticsDetails.query.display: #TEXT
    DestinationAirport,

    @AnalyticsDetails.query.axis: #COLUMNS
    @AnalyticsDetails.query.display: #TEXT
    DestinationCountry,

    @EndUserText.label: 'Sales'
    @AnalyticsDetails.query.axis: #ROWS
    @Semantics.amount.currencyCode: 'DisplayCurrency'
    @Aggregation.default: #SUM // requires @Aggregation.default: #FORMULA on 2105 systems
    currency_conversion (
      amount => Sales,
      source_currency => CurrencyCode,
      target_currency => $parameters.P_DisplayCurrency,
      exchange_rate_date => cast ('20200101' as abap.dats),
      exchange_rate_type => 'M'
    ) as SalesInDispCrcy,

    @Consumption.defaultValue: 'USD'
    @EndUserText.label: 'Display Currency'
    $parameters.P_DisplayCurrency as DisplayCurrency,

    @AnalyticsDetails.query.axis: #ROWS
    @Aggregation.default: #SUM
    Quantity,

    @EndUserText.label: 'Average Sales'
    @AnalyticsDetails.query.axis: #ROWS
    @Aggregation.default: #FORMULA
    @AnalyticsDetails.query.formula: '$projection.SalesInDispCrcy / $projection.Quantity'
    1 as AverageSales
}Similar to the SAP Fiori Elements preview which is offered for OData V2 UI and OData V4 UI service bindings there is now an Analytical Data Preview available. This can be used by the ABAP developer to test the implementation of an Analytical Query since the preview uses the InA protocol.
Now that you have created the query it is possible to use a data preview to test our implementation.
Navigate to the folder Data Definition
Right click on the query
ZRAP500_C_SuppQuery_####and select Open with > Data Preview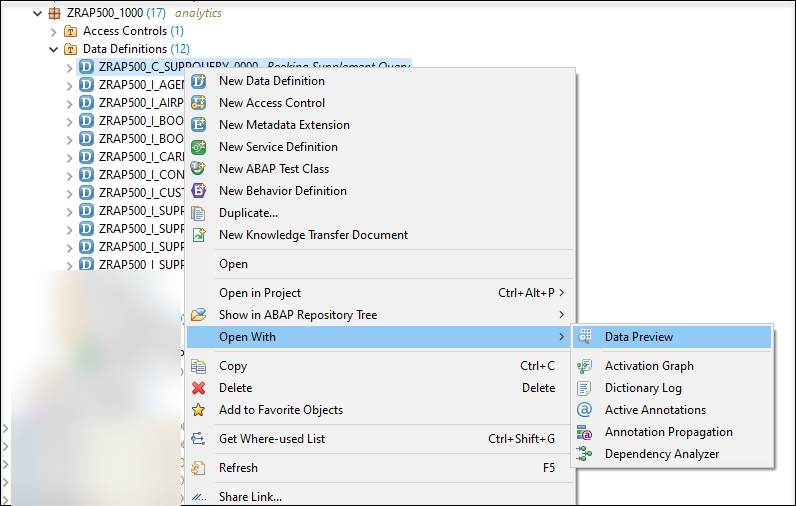
Right Click A new browser tab will open and you might have to authenticate using the credentials of your SAP BTP ABAP environment system.
Choose US Dollar as Display Currency with clicking OK.

- You can see the data that has been retrieved using the InA-Protocol.

You need to create an access control DCL0 for booking supplement query to block all unprivileged access (SQL queries return 0 rows). Use “Standard” DCL (aka DCL0) to make the protected CDS view return 0 results.
- Right click your package > New > Other ABAP Repository Object > search for Access control and click Next

Enter the following values and press Next.
- Name:
ZRAP500_C_BOOKINGQUERY_#### - Description:
access control for query - Referenced Object:
ZRAP500_C_SuppQuery_####(Your created query)
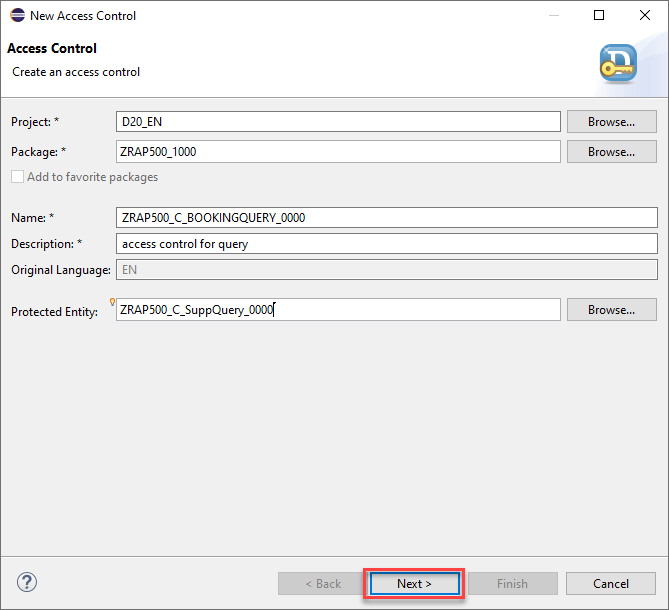
access - Name:
Select a transport request and press Finish.
Remove lines 9 and 10 and enter false.

access Save and activate your access control.
Your final code should look like the following:
@EndUserText.label: 'Disallow access to Booking Supplement Q'
@MappingRole: true
define role ZRAP500_C_BOOKINGQUERY_#### {
  grant
    select
      on
        ZRAP500_C_SuppQuery_####
          where
            false;
}You use a service definition to define which data is to be exposed as a business service, using one or more business service bindings.
Right-click your created query and choose New Service Definition.

new service definition Enter the following values and press Next.
Name:
ZRAP500_C_SupplmntService_####Description:
Booking Supplement Analysis Servicecheck if Exposed Entity is your created query
ZRAP500_I_SUPPQUERY_####
service definition
- Select transport request and press Next.
- Select the template Define Service and press Finish.
- After the query is exposed as a service it must be activated by pressing Ctrl+F3

The service binding is used to bind a service definition to a communication protocol and in our case, the protocol that enables web-based data access from ABAP systems is the Information Access (InA) protocol.
- Right click your newly created service definition and choose New Service Binding.

- Enter the following values and press Next
- Name:
ZRAP500_UI_SuppIna_#### - Description:
Booking Suplement Query Service Binding - Choose InA - UI as Binding Type
- Check if the service definition
ZRAP500_C_SUPPLMNTSERVICE_####which you created before, is listed in the field Service Definition.

- Choose a transport request and click Finish.
- Activate your service binding.
- After activation, the external service name for your query is displayed.

The analytical query will be displayed with the external service name in SAP Analytics Cloud as the data source.
Right-click your package, choose New > Other ABAP Repository Object.

New Search for IAM App under Cloud Identity and Access Management. Click Next.

New Enter the following values and press Next
Name:
ZRAP500_SUPPLEMENTIAM_####Description:
IAM App for Booking Supplement QueryChoose EXT-External App as Application Type and click Next

new IAM APP
- Choose a transport request and click Finish.
Your created IAM App name will get an EXT automatically in his name like: ZRAP500_SUPPLEMENT_####_EXT.

- Go to the Services tab and click on insert button.

- Select Service Type as
InA - UIand your Service Name which is your service binding nameZRAP500_UI_SUPPLEMENT_####. Click OK.

Save and activate your App.
You need to Publish Locally this IAM App.

Right-click your package, choose New > Other ABAP Repository Object and search for Business Catalog.

business catalog Enter the following values and press Next
Name:
ZRAP500_BUSINESS_CATALOG_####Description:
Business catalog
next
Choose a transport request and click Finish.
To create a Business Catalog App Assignment, in your created Business Catalog click Apps, click Add, assign your previously created external IAM app as IAM App and click Next.

IAM App Choose a transport request and click Finish. The Business Catalog App Assignment will be opened.

publish Back to the Business Catalog, choose your Assignment ID and click Publish Locally.

publish
Login to the Fiori launchpad and open Maintain Business Roles App under Identity and Access Management.
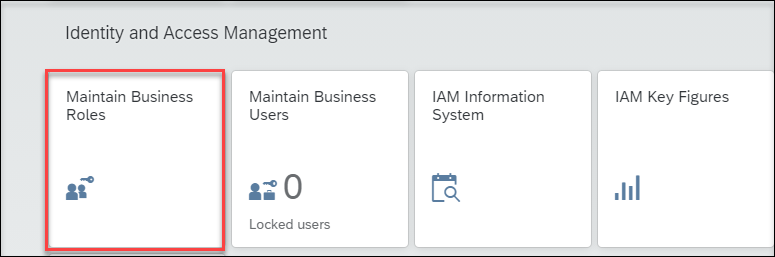
maintain business roles Navigate to the
SAP_BR_DeveloperRole, select Assign Business Catalogs and click Edit.
Assign Business Catalogs 
Add Business Catalog Click Add and find your business catalog in the popup and click OK to add the business catalog.
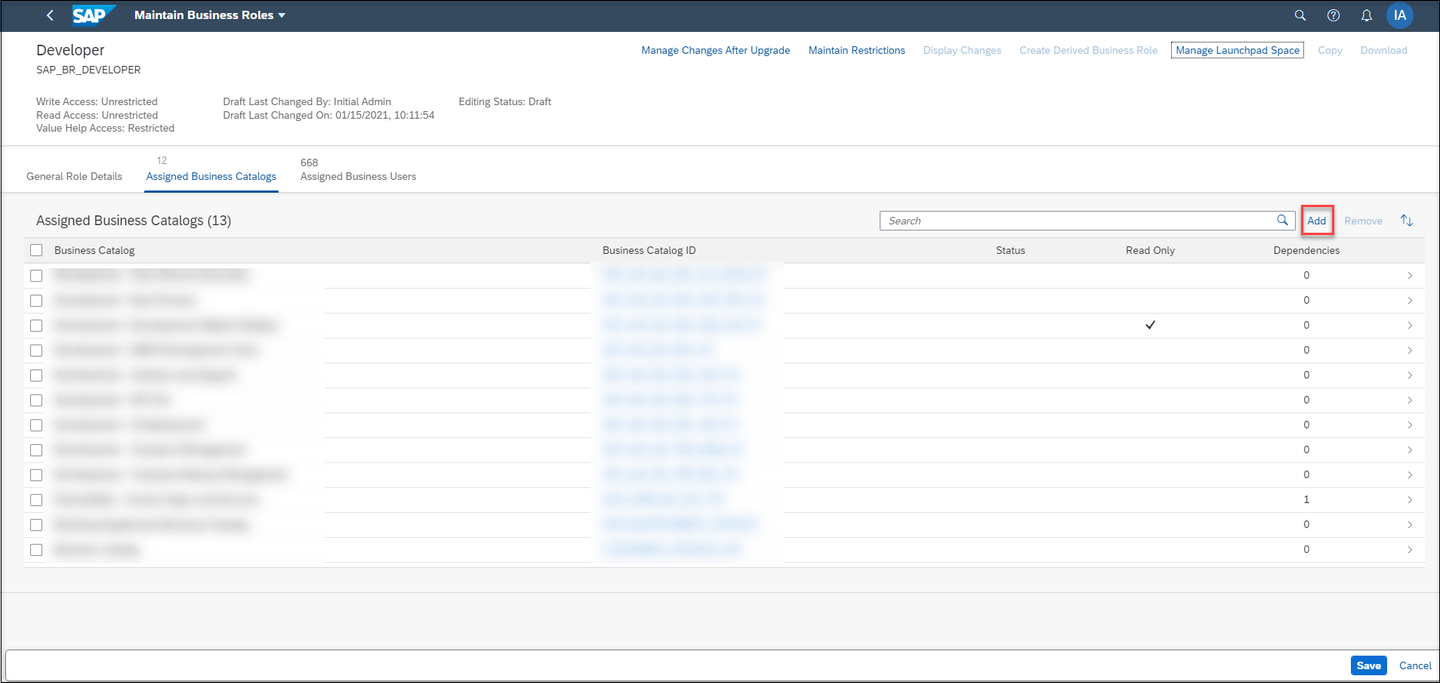
Add 
select Check in the Assigned Business Catalogs, if your business catalog is added in the list. Click Save.
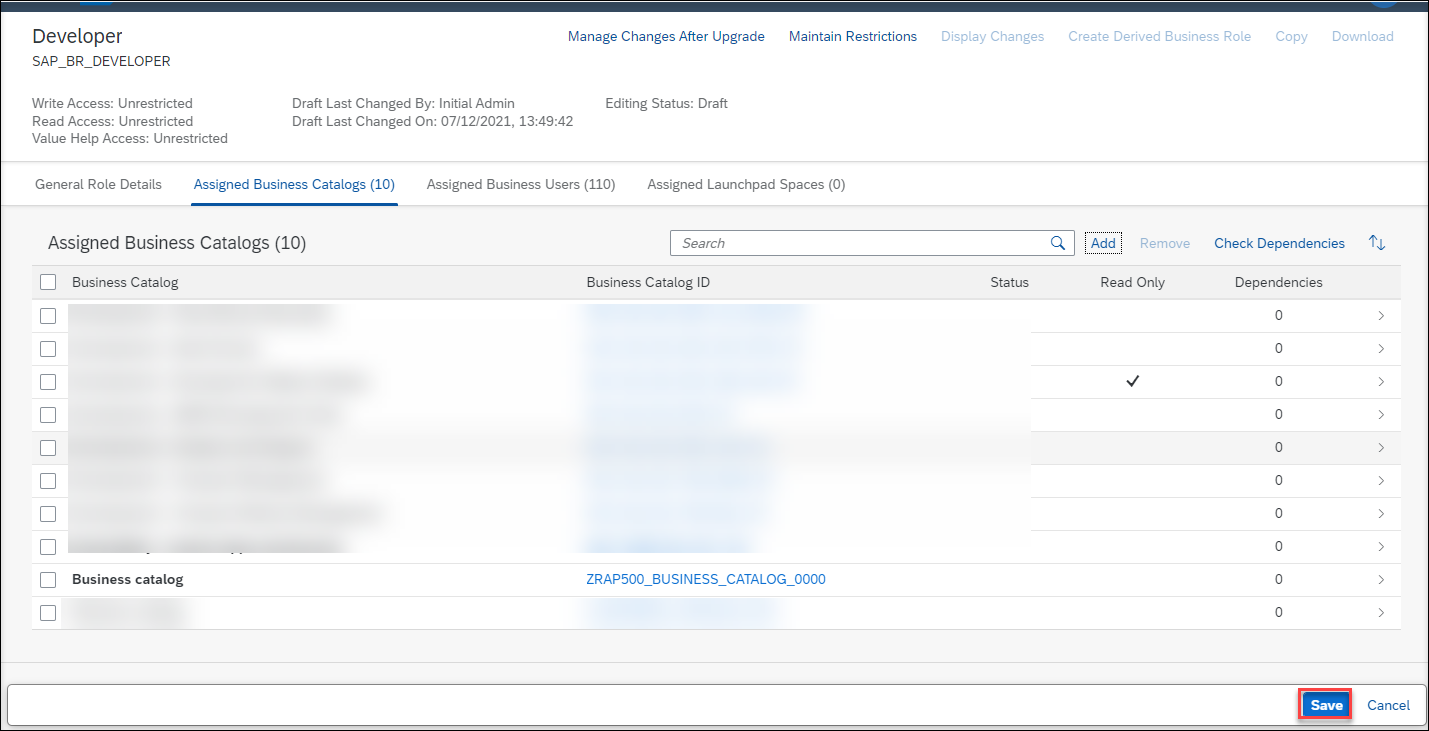
save
Back to the main page of Fiori launchpad and open Communication Systems App under Communication Management.
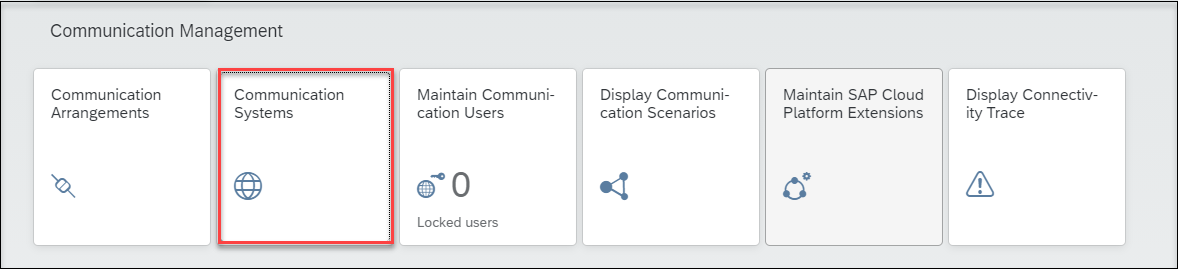
Communication Systems Click New to create a new communication system. Enter System ID and System Name, click Create.

new communication system 
edit communication system The new communication system will be opened. Switch Destination Service to OFF and now enter you SAP Analytics Cloud host name (ex:
###.cloud.sap) as Host Name and443as Port. Click Save.
edit communication system Back to the Communication Management and open Communication Arrangements to create a new one.

communication arrangement Click New and select
SAP_COM_0065as Scenario.Enter a name for your communication arrangement and click Create.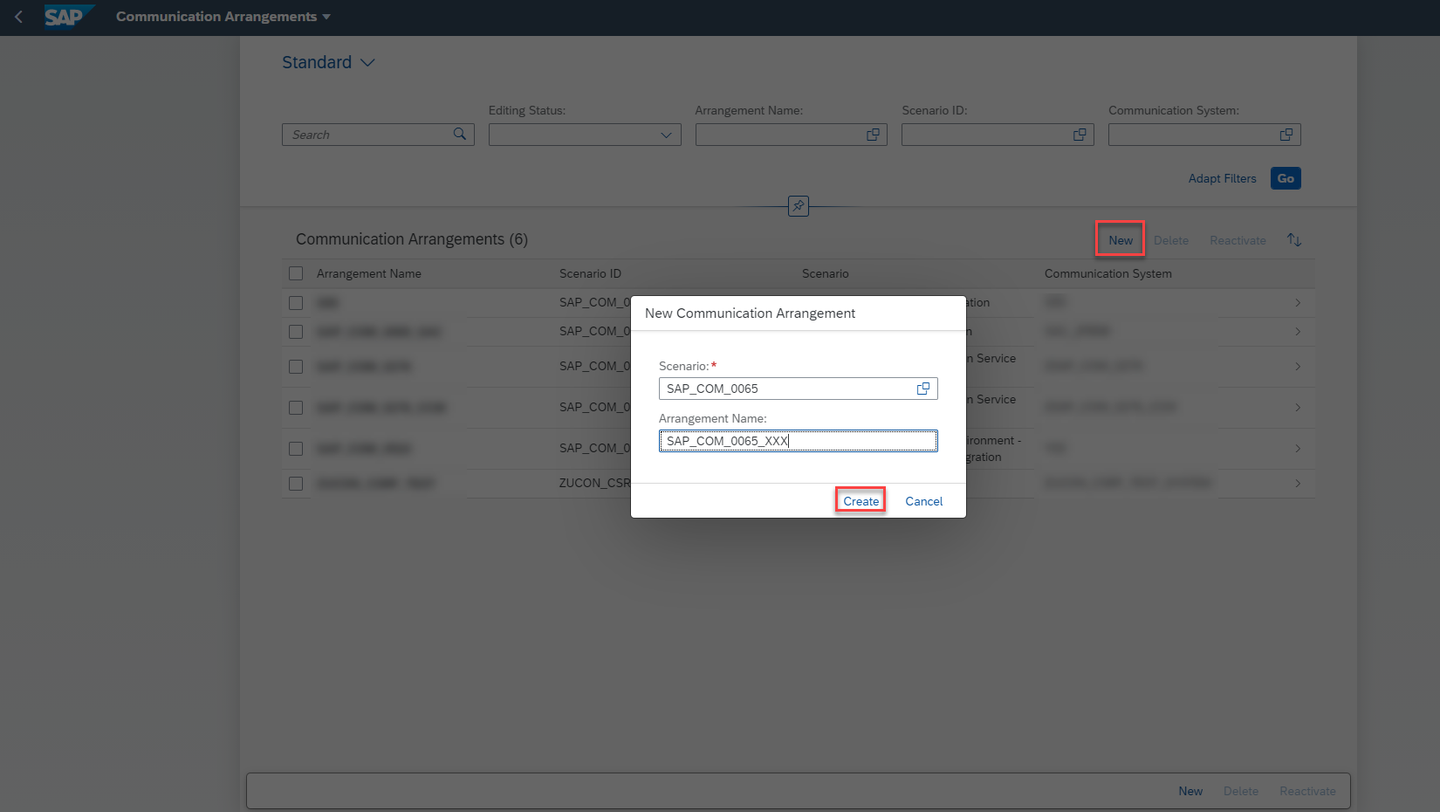
create The new communication arrangement will be opened. Choose the communication system which you created previously in the Communication System field. Provide the Tenant ID of your SAP Analytics Cloud tenant.

tenant
Tenant ID can be found under the main menu of the SAP Analytics Cloud tenant, click System > About > System Name.
Under the Outbound Services, the service status for UI Link Navigation should be checked as Active and Retrieve Stories should be unchecked, click Save.
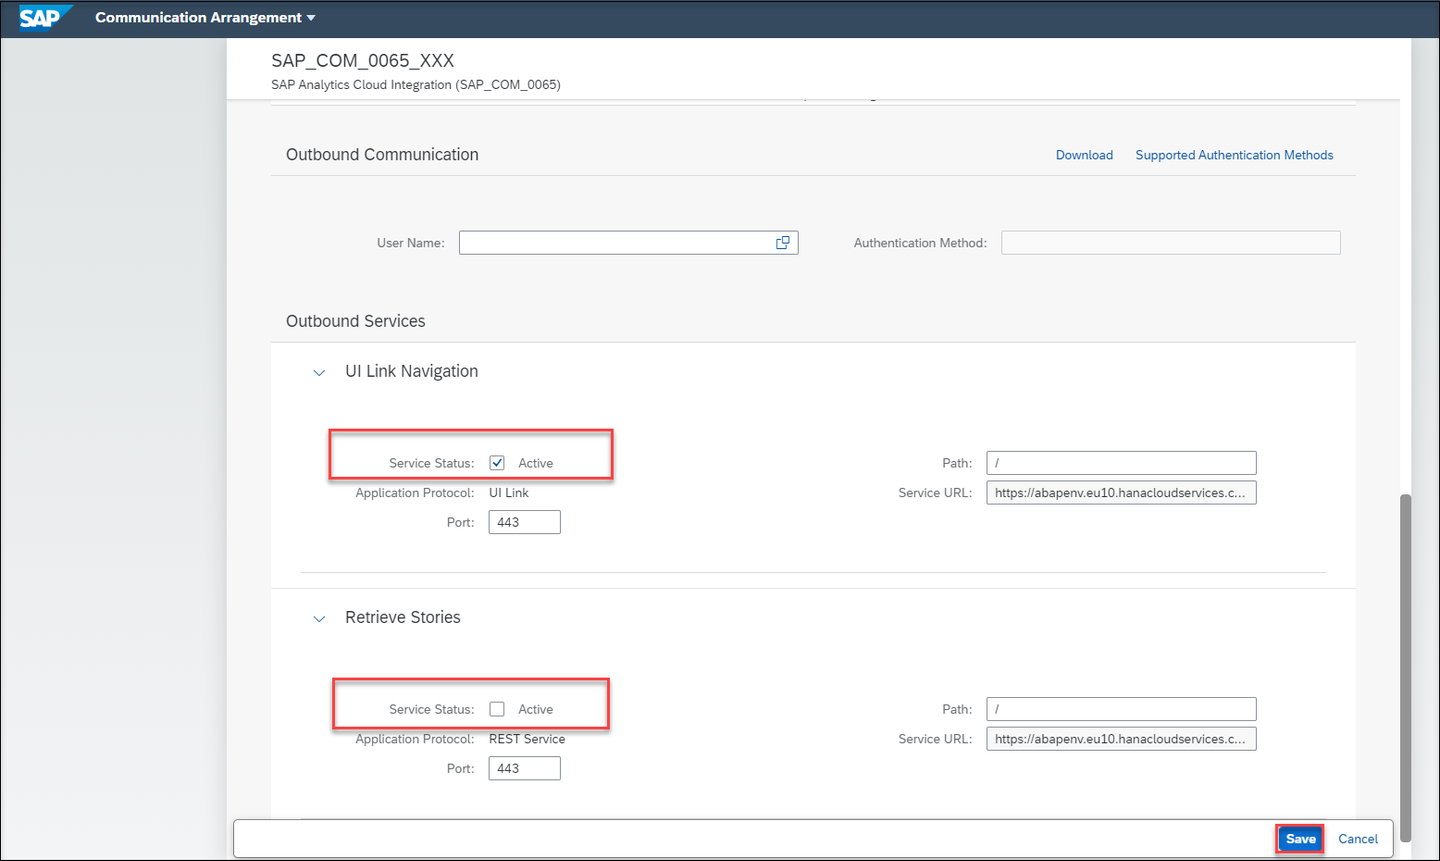
Outbound
Login to the SAP Analytics Cloud tenant.
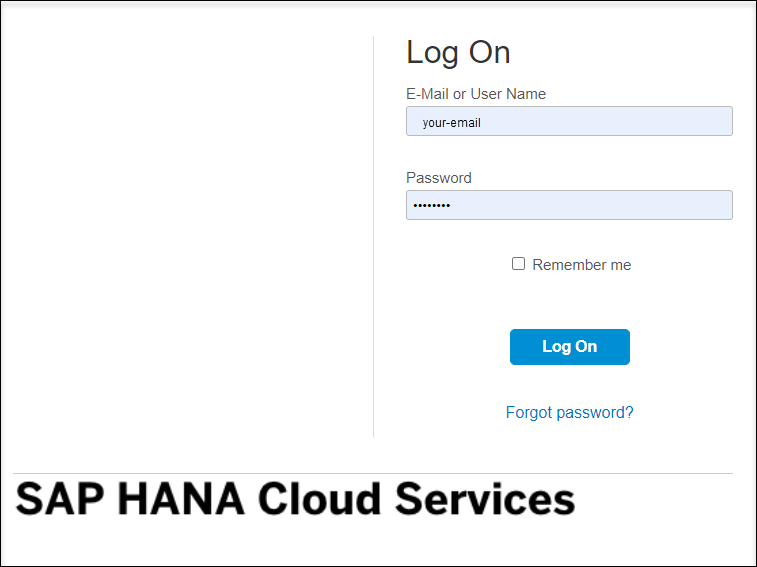
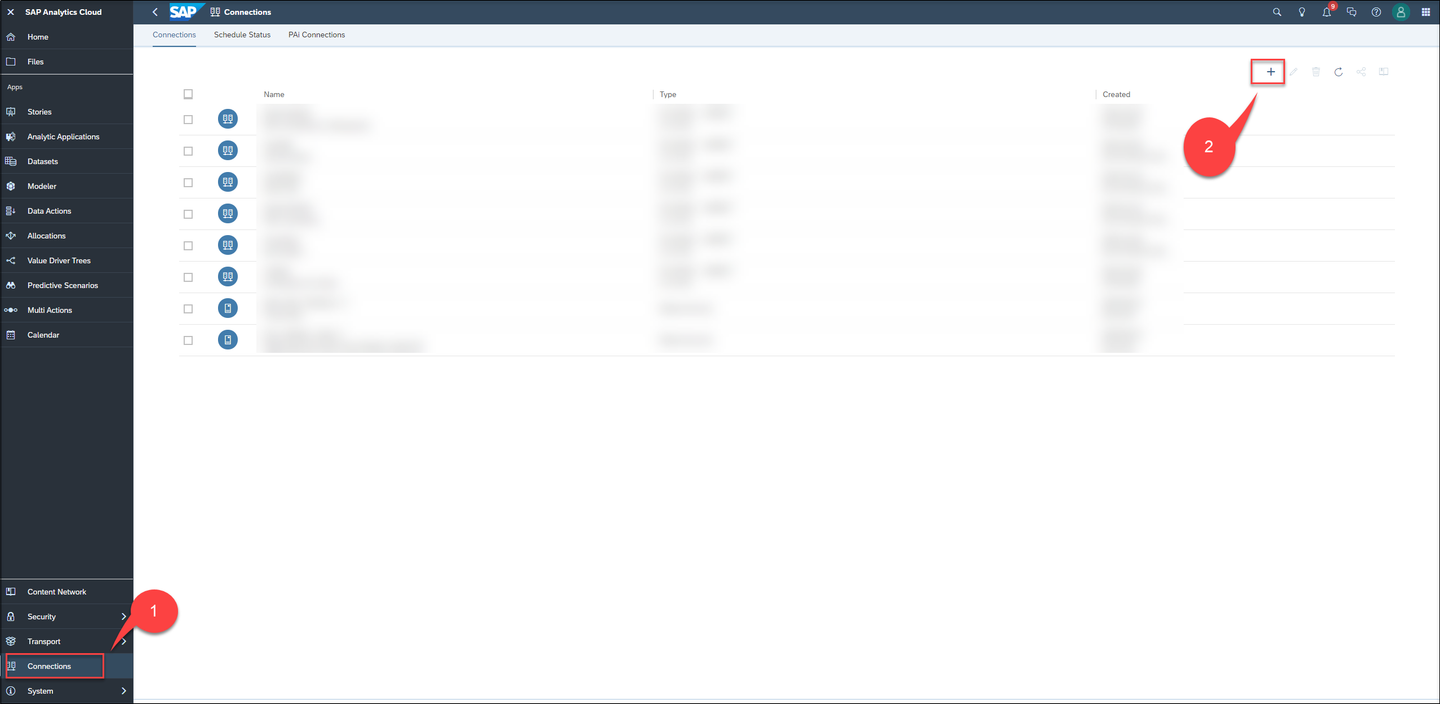
Login Open the main menu and click Connection and on the Connection Window click Add. In the popup under Connect to Live Data click SAP S/4 HANA.
add connection 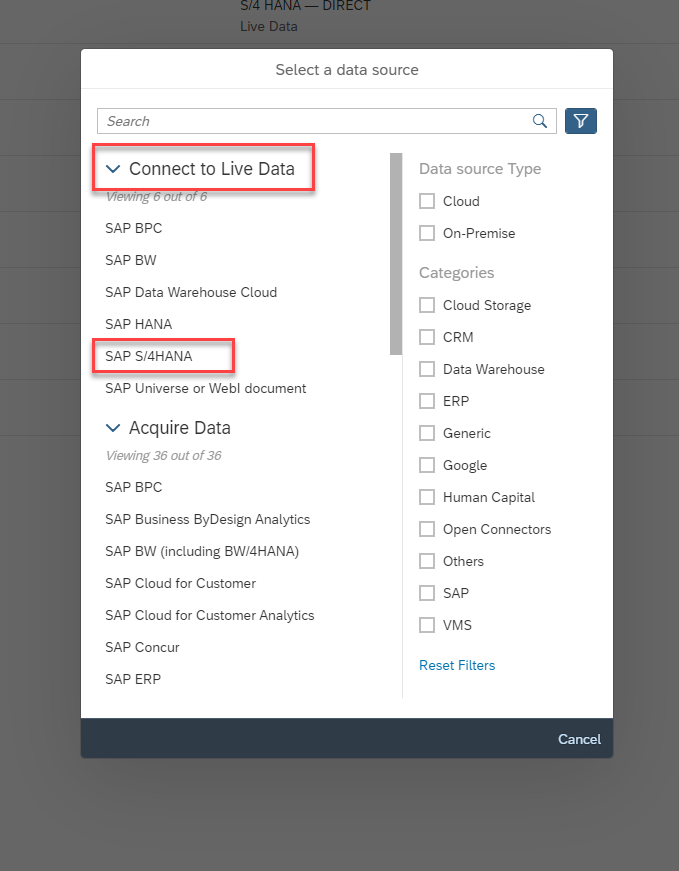
connection In the New S/4 HANA Live Connection dialog enter Name and Description, Connection Type has to be Direct, for Host copy your Fiori launchpad link like
###.abap-web.stagingaws.hanavlab.ondemand.com. Enter443in HTTPS Port field, and100for Client. As Authentication Method choose SAML Single Sign-on (Standard Compliant). Click OK.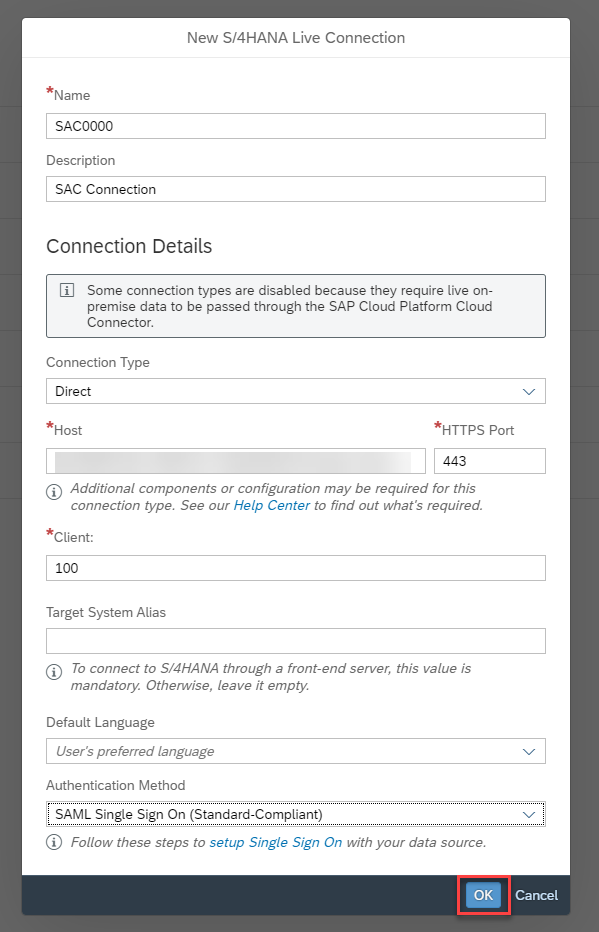
new connection check the result.
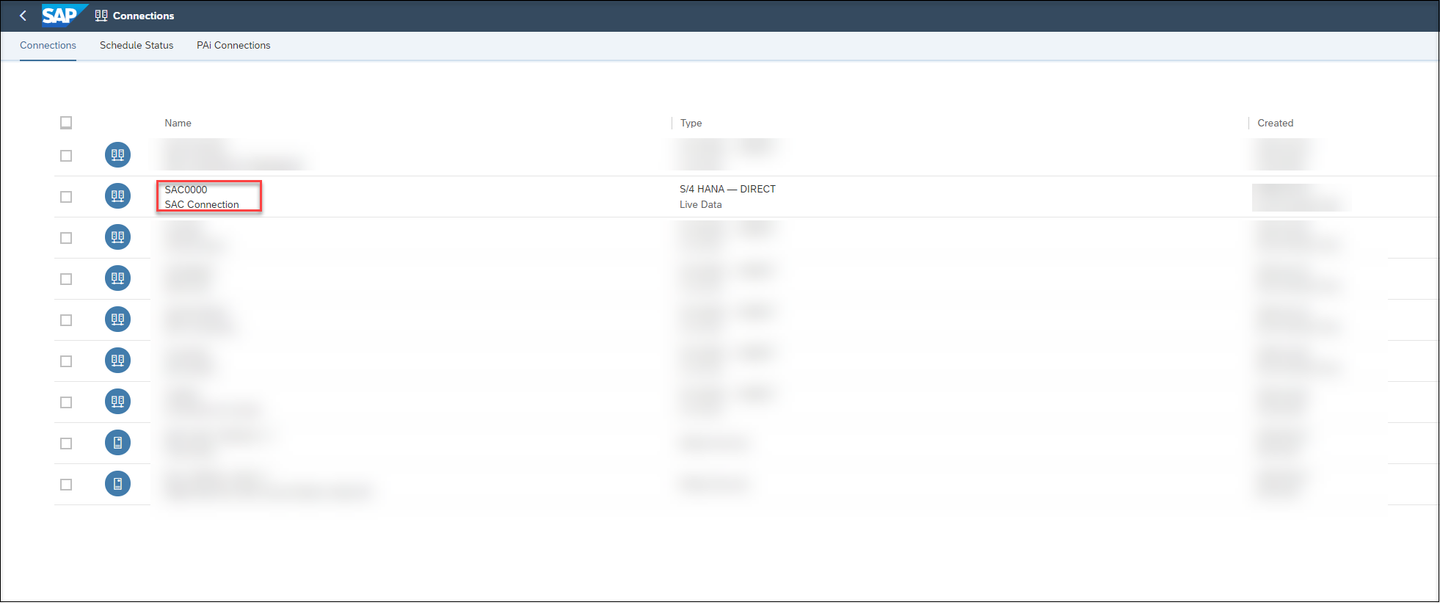
result
Models transform your raw data into useful information that can then be used to create dynamic visualizations. Since you will use the unique feature Live Data Connection SAP Analytics cloud will create the model based on the analytical query that you have created and published in the previous exercise. Based on such a model you can perform online analysis without the need of data replication.
- Expand navigation bar, choose Modeler and Click Live Data Model .


In the popup choose SAP BW for System Type. Choose your created connection in the last step as Connection.Choose your created connection in the last step as Connection and if needed login with your username and password in the second popup.
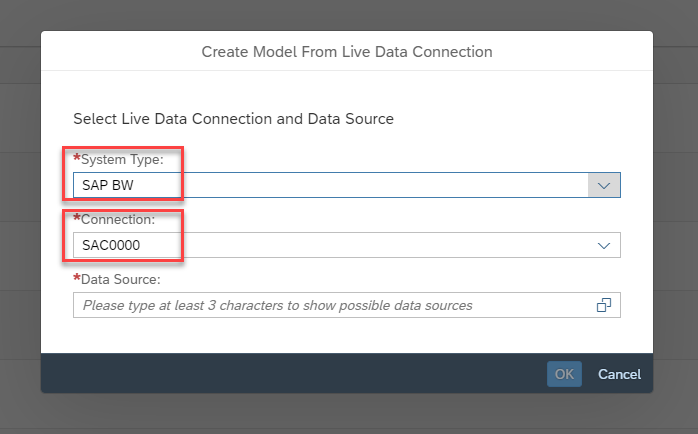
system type Expand Data source and select your created Query in the last exercise as Data Source.
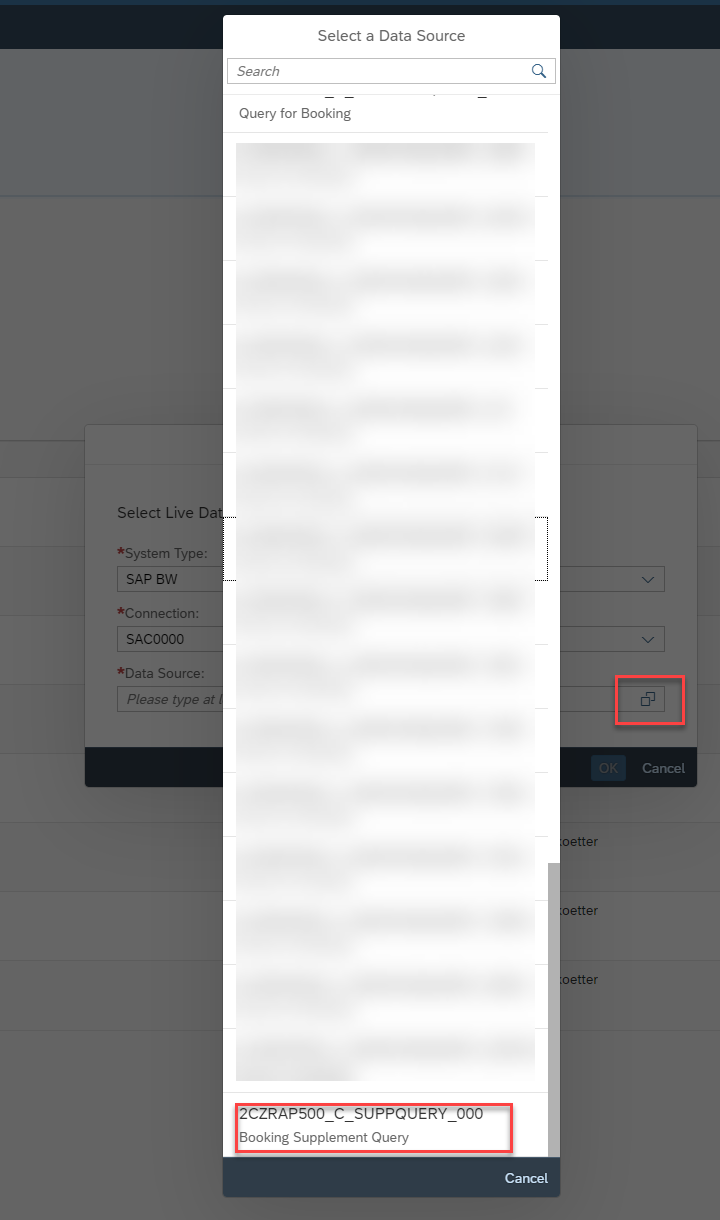
data source Click OK to continue.

ok button In the model you can check all Measures and dimensions which are from
@EndUserText.labelannotations.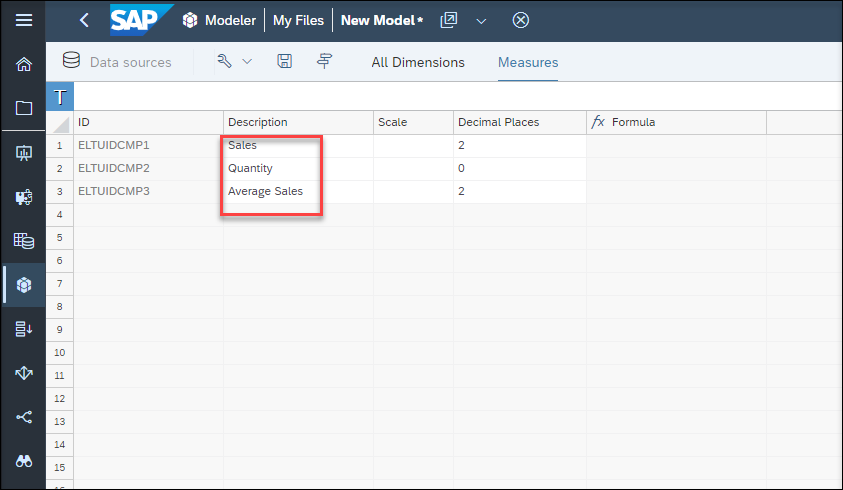
measures 
dimension Save the new model and enter the following values and click OK:
- Name:
ZRAP500_#### - Description:
Model ####
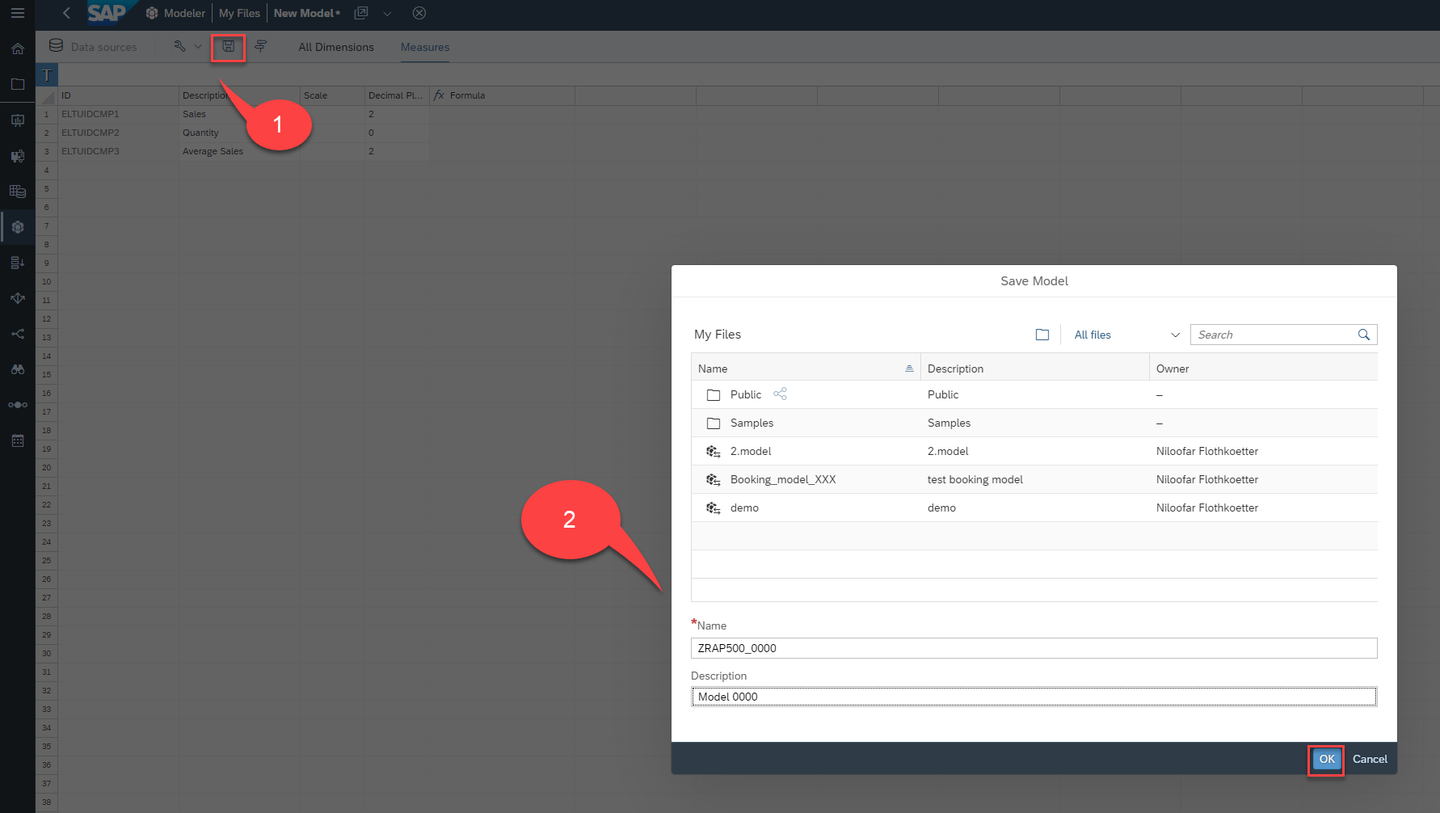
save - Name:
Check your model in the Modeler page.
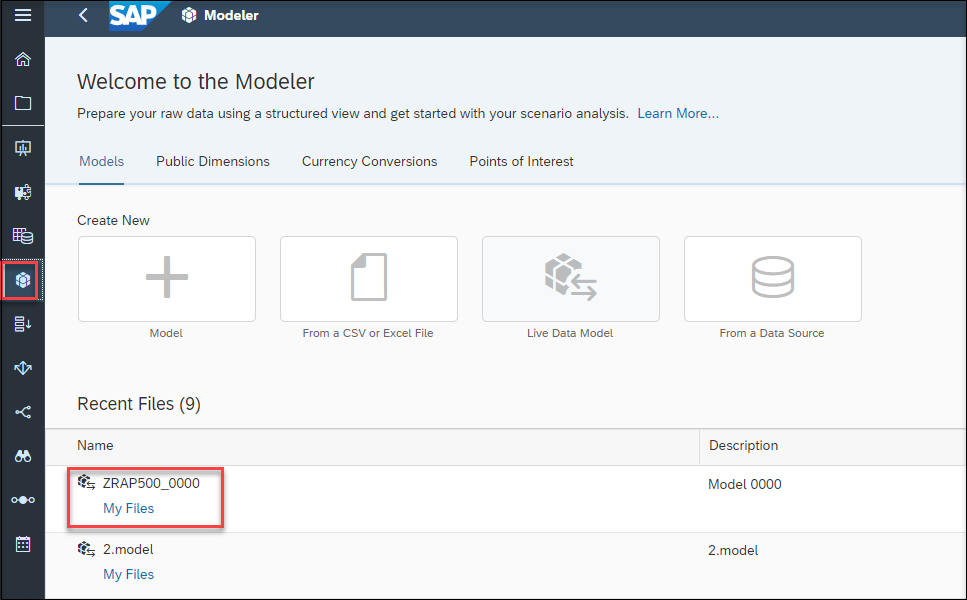
modeler
A story is a presentation-style document that uses various elements such as charts, images or tables to visualize your data. Adding a chart starts with picking a chart type. Then you select your model and add measures and dimension and start on working how the data is displayed. Here you will create a story including a chart, a table and a Donut chart.
Open a blank dashboard
Expand navigation bar and click Stories and choose Dashboard as your template.
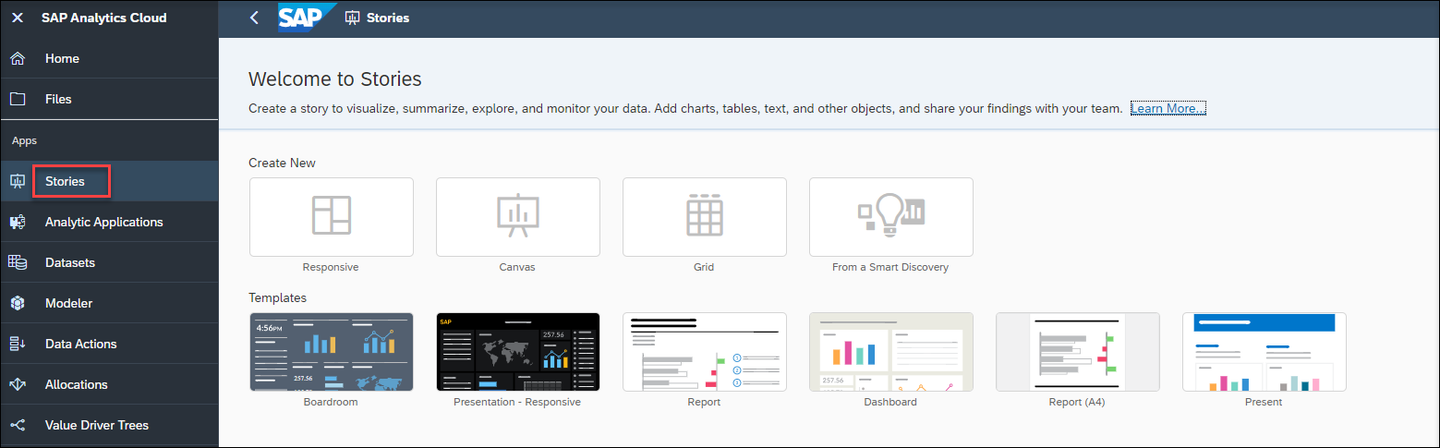
stories 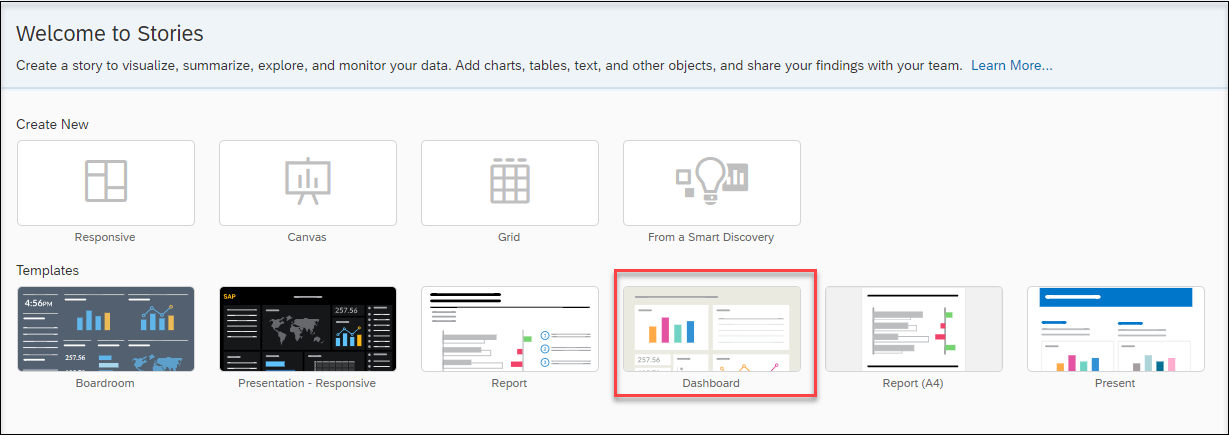
template A Blank Dashboard will be opened.
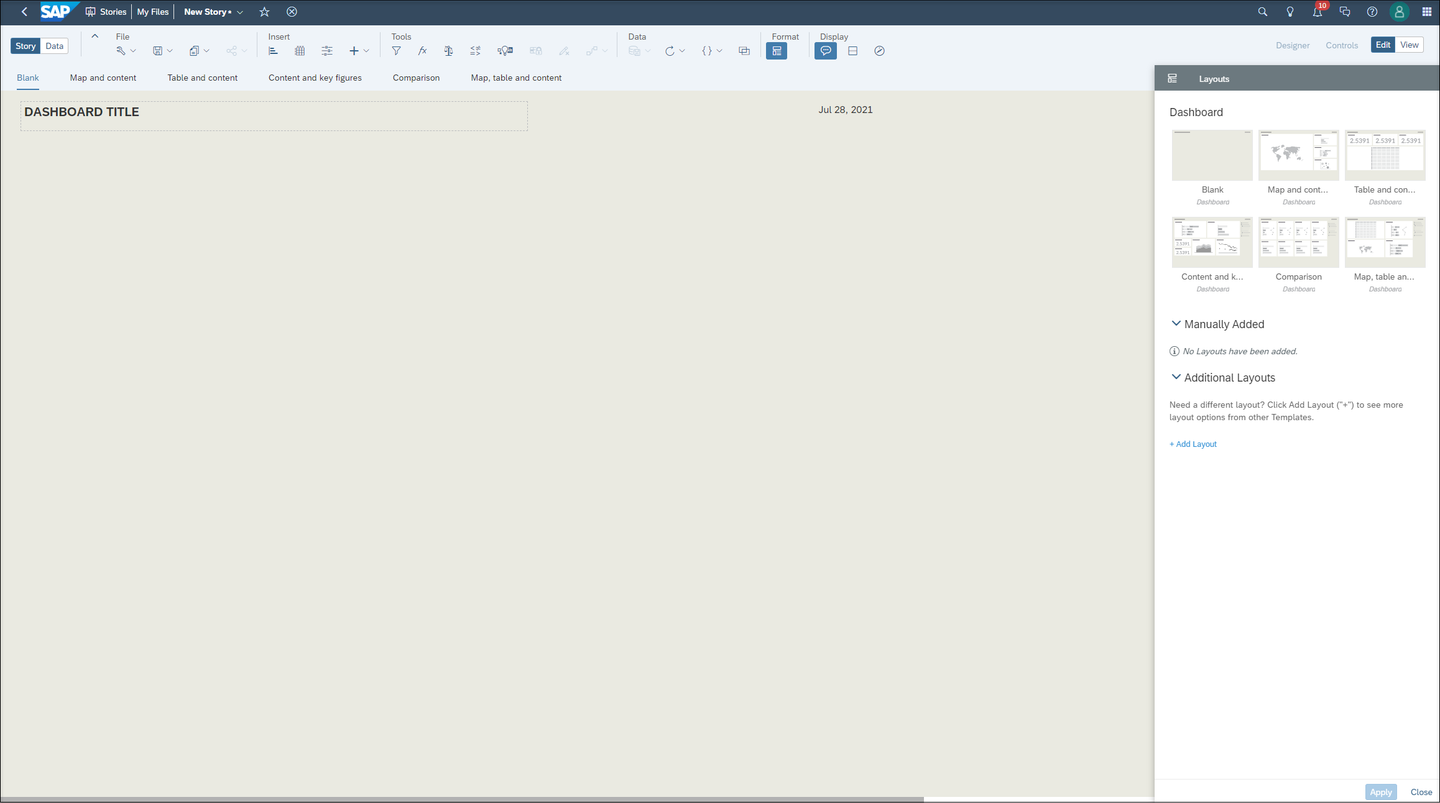
blank Enter a Dashboard Title like
RAP500_####.
title
Insert Charts
To insert a chart, click on the chart icon in the task menu and select your model with double clicking your model.
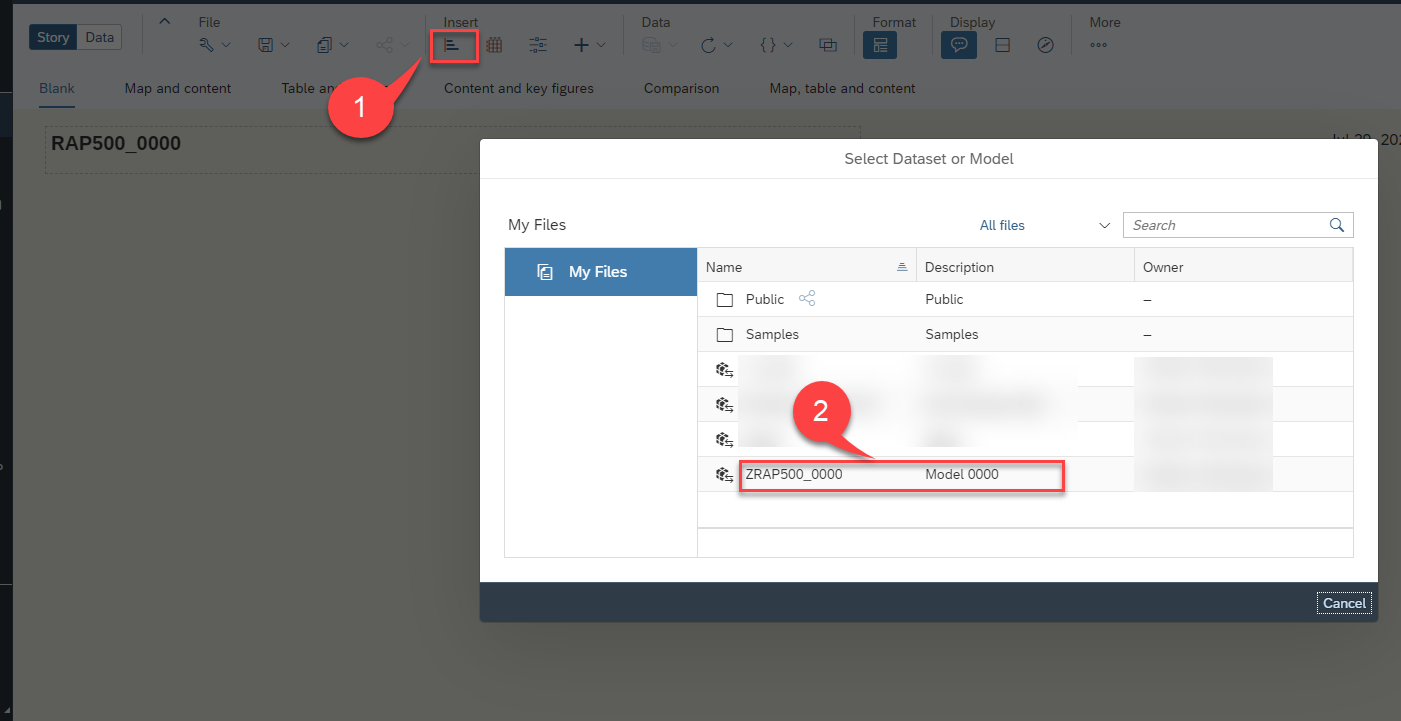
insert chart Set Currency as US Dollar with clicking Set.

set You can move the chart with click and drag around the page. After you found a place for your chart, you need to add some measures and dimensions, which should be shown on the chart. You will find all settings on the right hand side under Builder.

Builder Open + Add Measure and choose Sales.

measure Open + Add Dimension and choose Product. Now there is a chart which shows how the sales are distributed in different products.

dimension SAP Analytics Cloud can read the text fields defined in the supplement dimension with annotation
@ObjectModel.text.association: '_SupplText'and therefore the product names from supplement cube with the annotation @EndUserText.label: ‘Product’
text To insert another chart with a different structure, click on the chart icon in the task menu, click Comparison and choose Waterfall.

insert chart Choose a measure (Average Sales) and a dimension (Agency) for your chart.

chart SAP Analytics Cloud can read the text fields defined in the query with annotation @AnalyticsDetails.query.display: #TEXT.

text
Insert indicator
Click the chart icon in the task menu, click Indicator and choose Numeric Point.

numeric Choose Average Sales as Primary Values under Measures.

measure You will find the calculated measure in this chart.

measure Save the Story
You are almost done with your story, you need just to save the story. Click on save icon and choose Save.
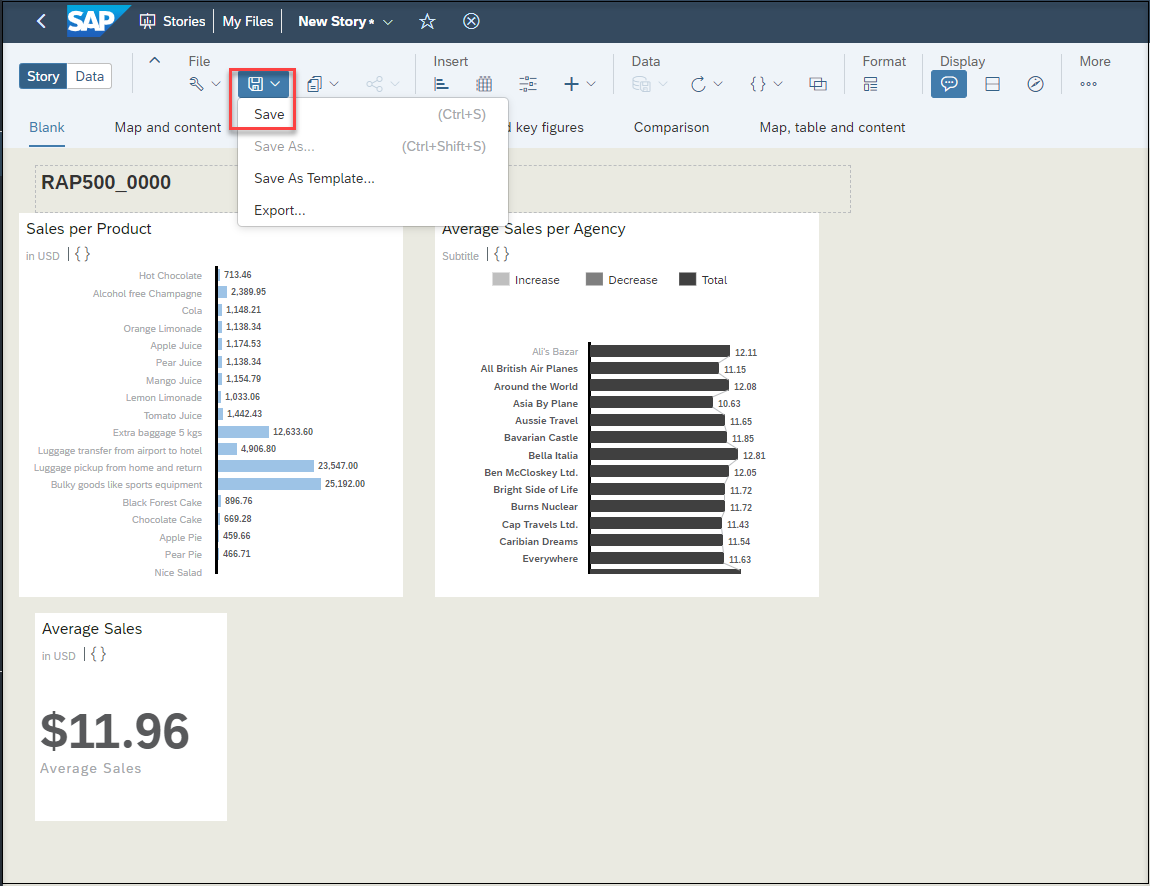Enter following values and click OK
- Name:
RAP500_####_Story - Description:
Story ###

story - Name:
You will find your new created story under Welcome to Stories.

welcome
You have used the preconfigured connection of the SAP Analytics Cloud instance to connect to the SAP BTP ABAP environment system where you have developed an Analytical Query. The data was retrieved using a Live Data Connection so that any change in the data was immediately reflected in the visualization of your query in SAP Analytics Cloud.
You can create more different and complicated analytics charts and tables with your query. Here there is some more examples.
Click the chart icon in the task menu, click Trend and choose Line.

line Choose Average Sales and Sales as left and right axis and Booking Date as dimension. You can change the color of axis and make the chart bigger or move it around your dashboard.

chart Click again chart icon in the task menu, click Correlation and choose Cluster Bubble
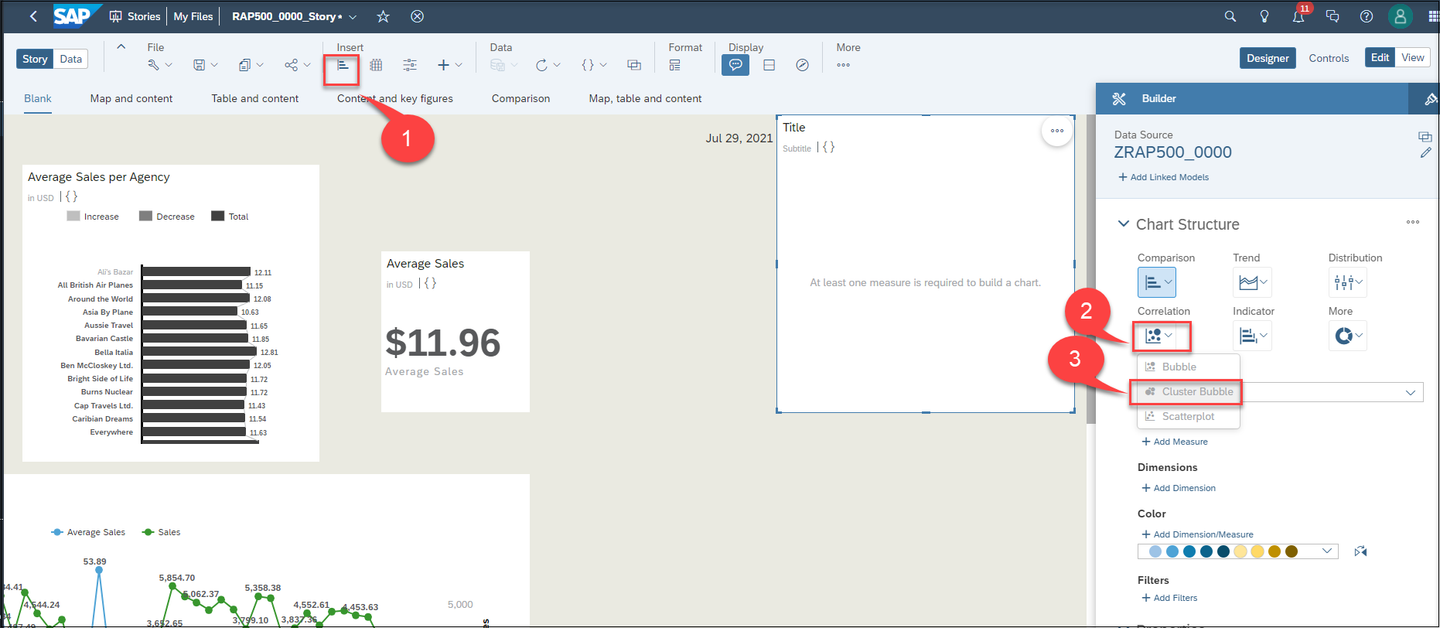
correlation Choose Sales as Measure, Product as Dimension and Agency Country as Color. You can make a filter on agency country and choose some of countries for your chart. You can change the color of your chart as well.
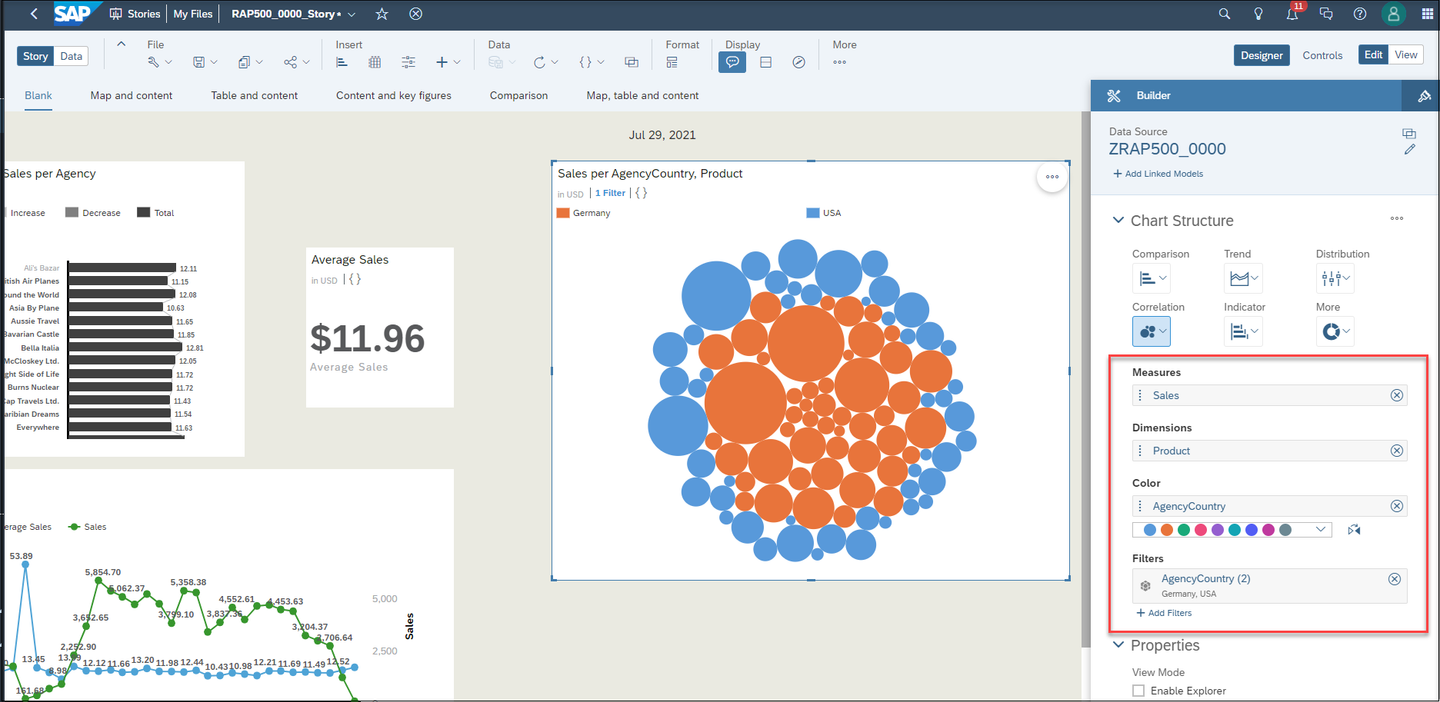
bubble
In this chart you can find out how much of a product has been sold in a country and you can find the more sold products in each country.
Do not forget to save your story.

bubble
Resources
Discussion
Share feedback on this tutorial or join the conversation in SAP Community.