Establish Trust Configuration between SAP S/4HANA On-premise and SAP BTP
Configure trust between SAP S/4HANA On-premise and the BTP subaccount. During the configuration, you download the identity providers generated in SAP S/4HANA On-premise. You import SAML identity provider metadata into your SAP BTP Cloud Foundry account.
✔How to configure trust between SAP S/4HANA On-premise and SAP BTP system.
✔How to manage trust configurations between SAP S/4HANA On-premise and SAP BTP. [ACCORDION-BEGIN [Step 1: ](Download SAML2.0 metadata from SAP S/4HANA onpremise)] 1. Log in to the SAP S/4HANA system and run the transaction OA2C_SAML20, to get the SAML metadata. 2. Copy the text into a *.xml'* file into your local system. !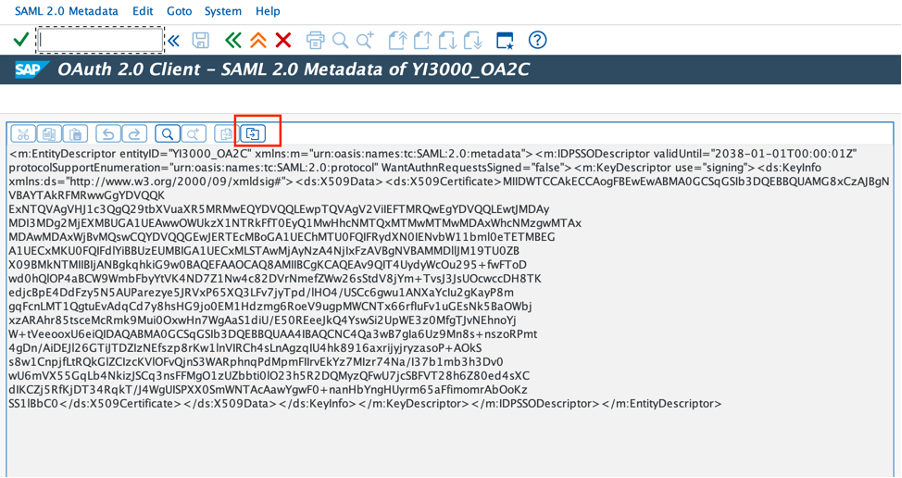 [DONE] [ACCORDION-END] [ACCORDION-BEGIN [Step 2: ](Create trust configuration)] 1. Log on to your BTP Subaccount and navigate to the **Trust Configuration** option in the left side menu and click **New Trust Configuration**. !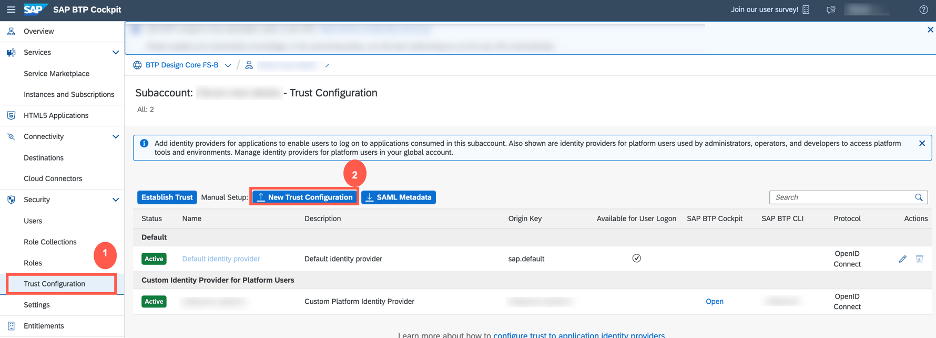 2. In the **New Trust Configuration** window that opens, upload the **SAML2.Metadata.xml** that you downloaded in the previous step (Reference: Step 1.1), and enter the name of your choice. Click on **Parse** and **Save**. !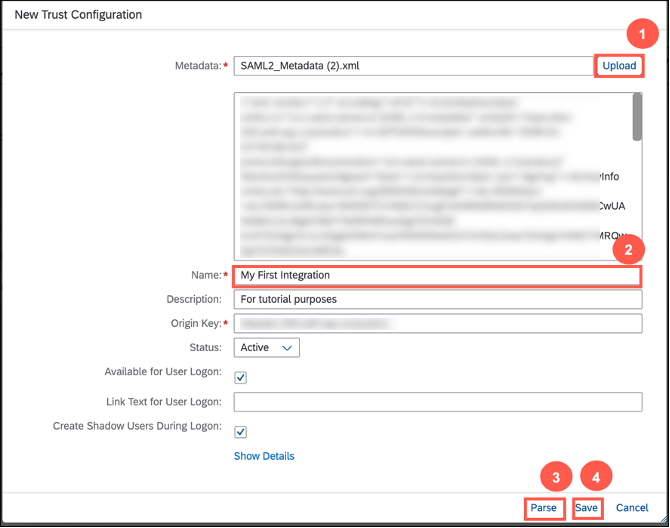 3. Verify the trust configuration by clicking on the recently created trust configuration in the above step (Reference: Step 2.2). >**Important**: Verify that the SAP backend system's host name is correctly specified in the trust configuration. Double-check the selected **Origin Key** for accuracy and ensure that the protocol is set to **SAML**. !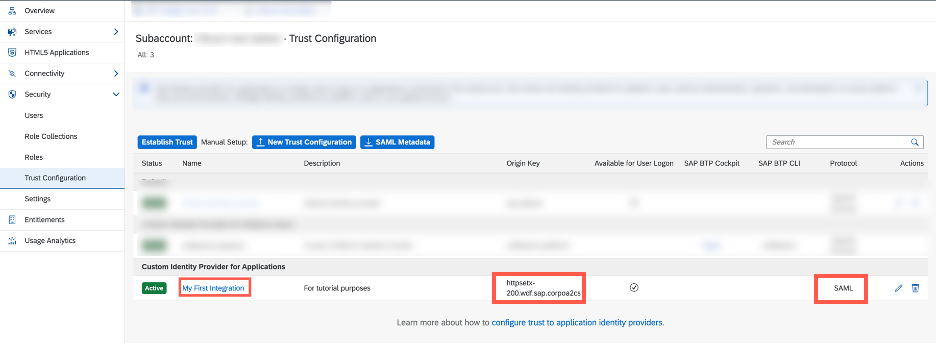 4. Click on **Show Details** and ensure that the *Subject* and *Issuer* provided are correct. !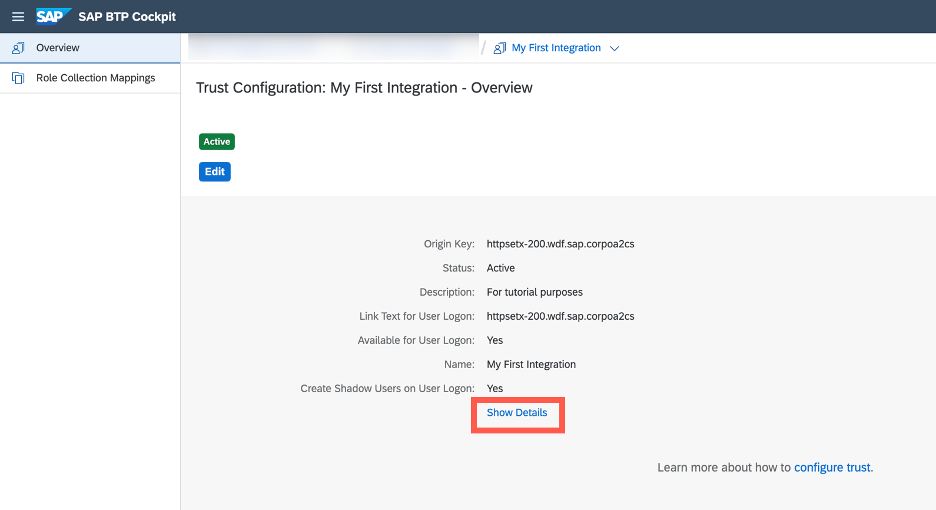 !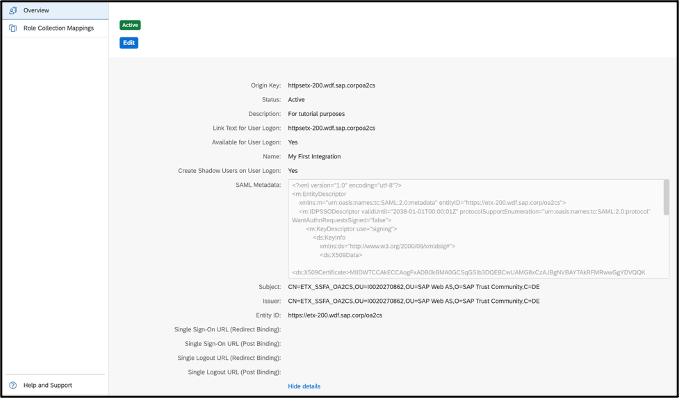 [DONE] [ACCORDION-END] [ACCORDION-BEGIN [Step 3: ](Add users in SAP BTP)] 1. Navigate back to the SAP BTP Cockpit home screen and go to the **Security** > **Users** tab. Click **Create**. In the **Create User** dialog, enter the **Username**, select the newly created **Identity Provider**, add the email address of the user, and click **Create**. !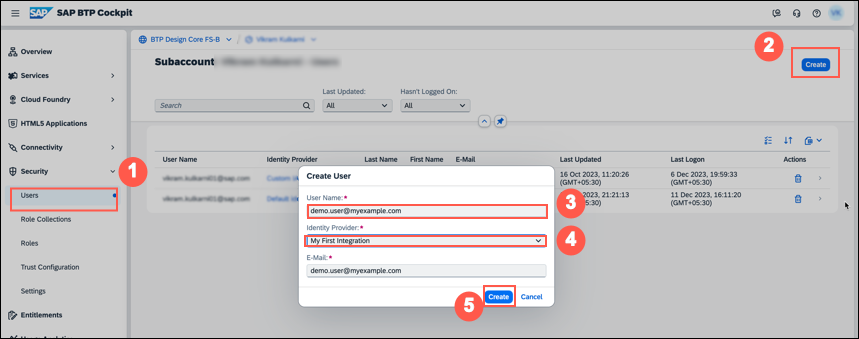 >**IMPORTANT**: The e-mail address of the user must be identical to the one used in the SAP S/4HANA system. The email address can be identified using the *Maintain Business User* or *Manage Workforce* option. It's important to note that the email IDs are identical. For example, if your SAP system user email ID is **demo.user@myexample.com** then the SAP BTP Cockpit user email ID is the as same your SAP system user email ID, and it should also be maintained as : **demo.user@myexample.com**. 2. Select the newly created user from the list and click on **Assign Role Collection**. !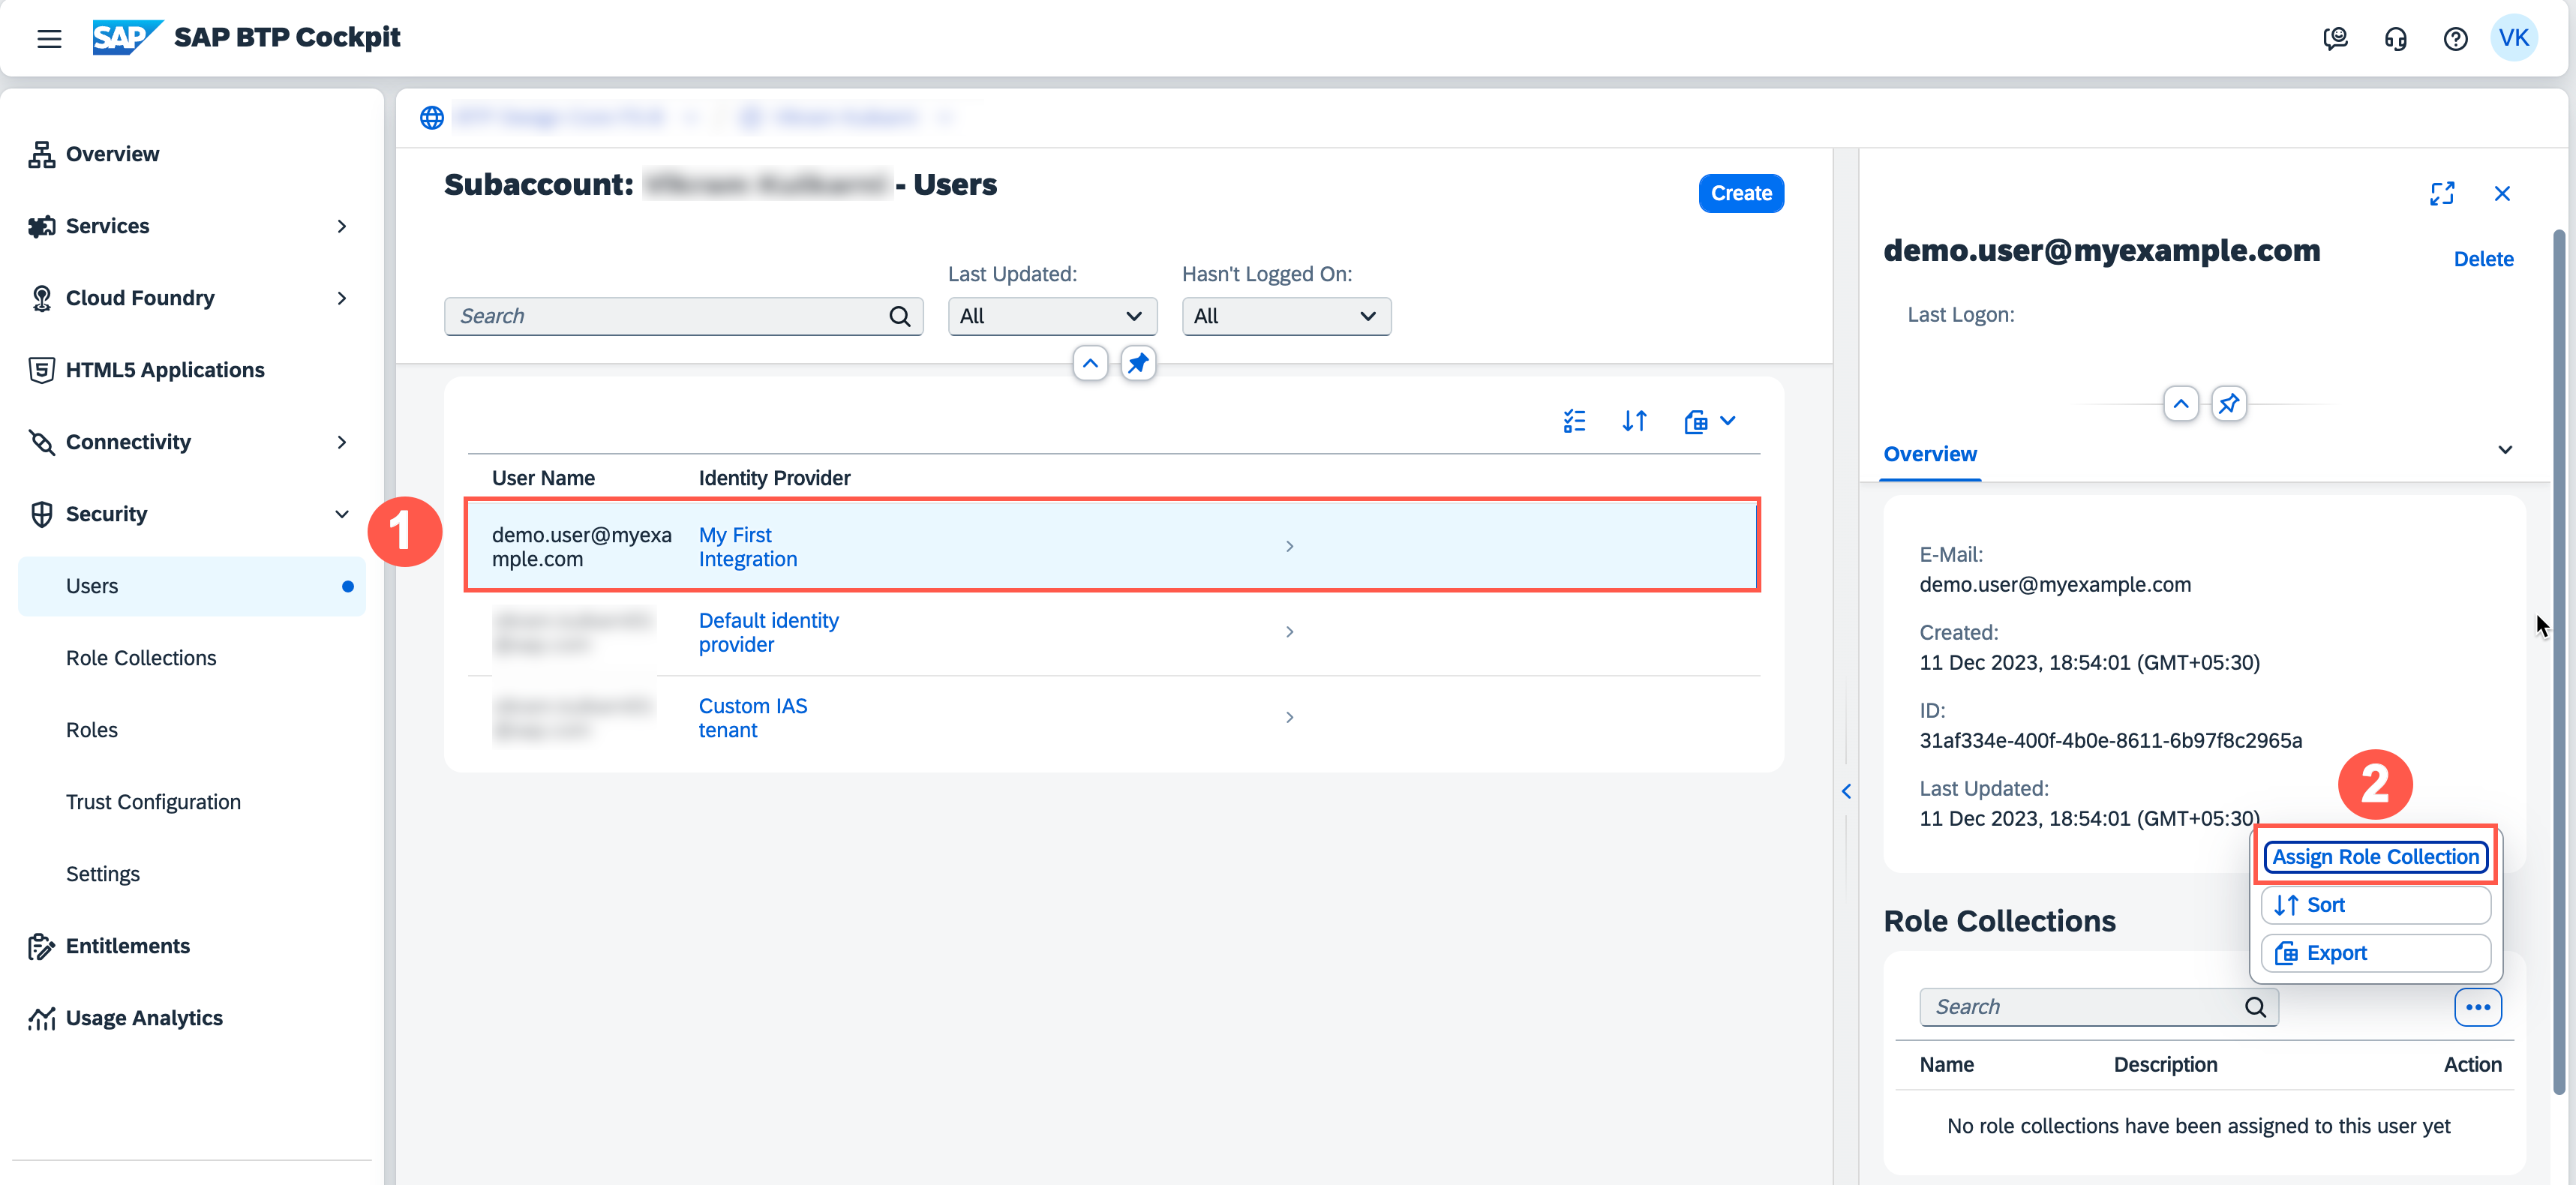 3. Assign the user role collection of the **SAP Document Management Service, Integration Option** (For example, SDM_roles` or the role collection that you created) which is defined in the subaccount. For more information, see the 3rd step in this tutorial Create a Service Instance and then a Service Key of SAP Document Management Service, Integration Option. !SDM_RoleCollections[DONE] [ACCORDION-END] [ACCORDION-BEGIN [Step 4: ](Download SAML metadata from SAP BTP cockpit)] 1. In the same subaccount, navigate to the Trust Configuration and click SAML Metadata. A metadata file gets downloaded to your local system. !SAML_Metadata_download2. Go to the file in your explorer and right-click on the downloaded file in your local system from the previous step. Open it with any editor (like Notepad, Notepad++, Code, Sublime Text, etc.) scroll down to the bottom of the file to get the token endpoint and copy the URL that is located at the string: JSON <md:AssertionConsumerService Binding="urn:oasis:names:tc:SAML:2.0:bindings:URI" Location="https://example.com"index="1"/> !AssertionConsumerService[DONE] [ACCORDION-END] [ACCORDION-BEGIN [Step 5: ](Test yourself)] [VALIDATE_2] [DONE] [ACCORDION-END]
Step 1Download SAML2.0 metadata from SAP S/4HANA onpremise
—
Log in to the SAP S/4HANA system and run the transaction OA2C_SAML20, to get the SAML metadata.
Copy the text into a `.xml’ file into your local system.
!SAML Metadata
Step 2Create trust configuration
+
Log on to your BTP Subaccount and navigate to the Trust Configuration option in the left side menu and click New Trust Configuration.
!NewTrustConfiguration
In the New Trust Configuration window that opens, upload the SAML2.Metadata.xml that you downloaded in the previous step (Reference: Step 1.1), and enter the name of your choice. Click on Parse and Save.
!SAML_Metadata
Verify the trust configuration by clicking on the recently created trust configuration in the above step (Reference: Step 2.2).
Important: Verify that the SAP backend system’s host name is correctly specified in the trust configuration. Double-check the selected Origin Key for accuracy and ensure that the protocol is set to SAML.
!ShowDetailsIssuer
Click on Show Details and ensure that the Subject and Issuer provided are correct.
!ShowDetailsIssuer2
!ShowDetailsIssuer3
Step 3Add users in SAP BTP
+
Navigate back to the SAP BTP Cockpit home screen and go to the Security > Users tab. Click Create.
In the Create User dialog, enter the Username, select the newly created Identity Provider, add the email address of the user, and click Create.
!NewUser
IMPORTANT: The e-mail address of the user must be identical to the one used in the SAP S/4HANA system. The email address can be identified using the Maintain Business User or Manage Workforce option. It’s important to note that the email IDs are identical. For example, if your SAP system user email ID is demo.user@myexample.com then the SAP BTP Cockpit user email ID is the as same your SAP system user email ID, and it should also be maintained as : demo.user@myexample.com.
Select the newly created user from the list and click on Assign Role Collection.
In the same subaccount, navigate to the Trust Configuration and click SAML Metadata. A metadata file gets downloaded to your local system.
!SAML_Metadata_download
Go to the file in your explorer and right-click on the downloaded file in your local system from the previous step. Open it with any editor (like Notepad, Notepad++, Code, Sublime Text, etc.) scroll down to the bottom of the file to get the token endpoint and copy the URL that is located at the string:
Share feedback on this tutorial or join the conversation in SAP Community.
Submit detailed feedbackDiscuss in Community
Steps
Step 1 of 5
1. Download SAML2.0 metadata from SAP S/4HANA onpremise2. Create trust configuration3. Add users in SAP BTP4. Download SAML metadata from SAP BTP cockpit5. Test yourself
Joule
AI Notice
Joule is an AI assistant. Generative AI may produce inaccurate, incomplete, or biased information. Always verify important details before acting on them.
Conversations are sent to SAP-hosted large language models for processing. Do not include personal data, credentials, or confidential information in your messages.
Joule's responses are based on the SAP tutorial catalog and may not reflect the latest product changes. For authoritative guidance, consult the linked tutorials and official SAP documentation.



