
Overview
You will learn
- How to access Error Archive entity set to display local upload failure
- How to handle a logic failure errors
- How to fix these errors


Prerequisites
Prerequisites
- Tutorial group: Set Up for the Mobile Development Kit (MDK)
- Install SAP Mobile Services Client on your Android device or iOS
 Android |  iOS |
(If you are connecting to AliCloud accounts, you will need to brand your custom MDK client by allowing custom domains.)
Steps
Intro
You may clone an existing metadata project from the MDK Tutorial GitHub repository and start directly with step 6 in this tutorial.
You have built an MDK app with offline functionality. In offline store, you make a change to a local record and upload this change (from request queue) to backend but backend prevents this change to accept due to some business logic failure. This error is recorded in an Offline OData specific entity set named as ErrorArchive. This entity set has detailed information about the errors. It’s now up to developers how they handle such errors and then let users to fix it from the app by providing the correct values. ErrorArchive is exposed to the application as an OData entity set and is accessible through the OData API in the same way that the application accesses any other entity sets from the offline store. You can find more details about the ErrorArchive Entity Properties in this documentation.

In this tutorial, you need to carry out the following tasks in order to understand how to display and handle such errors:
- Create a new project in SAP Business Application Studio using MDK CRUD Project template
- Access Error pages displaying records rejected by backend
- Create a business logic to find the affected entity
- Navigate to the affected record to handle the error
For this tutorial, you will use Mobile Services sample backend destination. You will modify a
SalesOrderHeadersrecord by changingCurrencyCodefield. Offline store saves this record in request queue database and when you sync it with backend, backend prevents updating this record due to business logic failure. This failure record will be listed in Error list page, from here, you can navigate to details page for more information. You will implement a logic to navigate from details page to the affected record.
This step includes creating a mobile project in SAP Build Lobby.
In the SAP Build Lobby, click Create > Create to start the creation process.

SAP Build Lobby Create Button Click the Application tile and choose Next.

Application Tile Selection Select the Mobile category and choose Next.

Mobile Category Selection Select the Mobile Application to develop your mobile project in SAP Business Application Studio and choose Next.

Mobile Application Option Selected Enter the project name
mdk_errorarchive(used for this tutorial) , add a description (optional), and click Review.
Project Name And Description Entry SAP Build recommends the dev space it deems most suitable, and it will automatically create a new one for you if you don’t already have one. If you have other dev spaces of the Mobile Application type, you can select between them. If you want to create a different dev space, go to the Dev Space Manager. See Working in the Dev Space Manager.
Review the inputs under the Summary tab. If everything looks correct, click Create to proceed with creating your project.
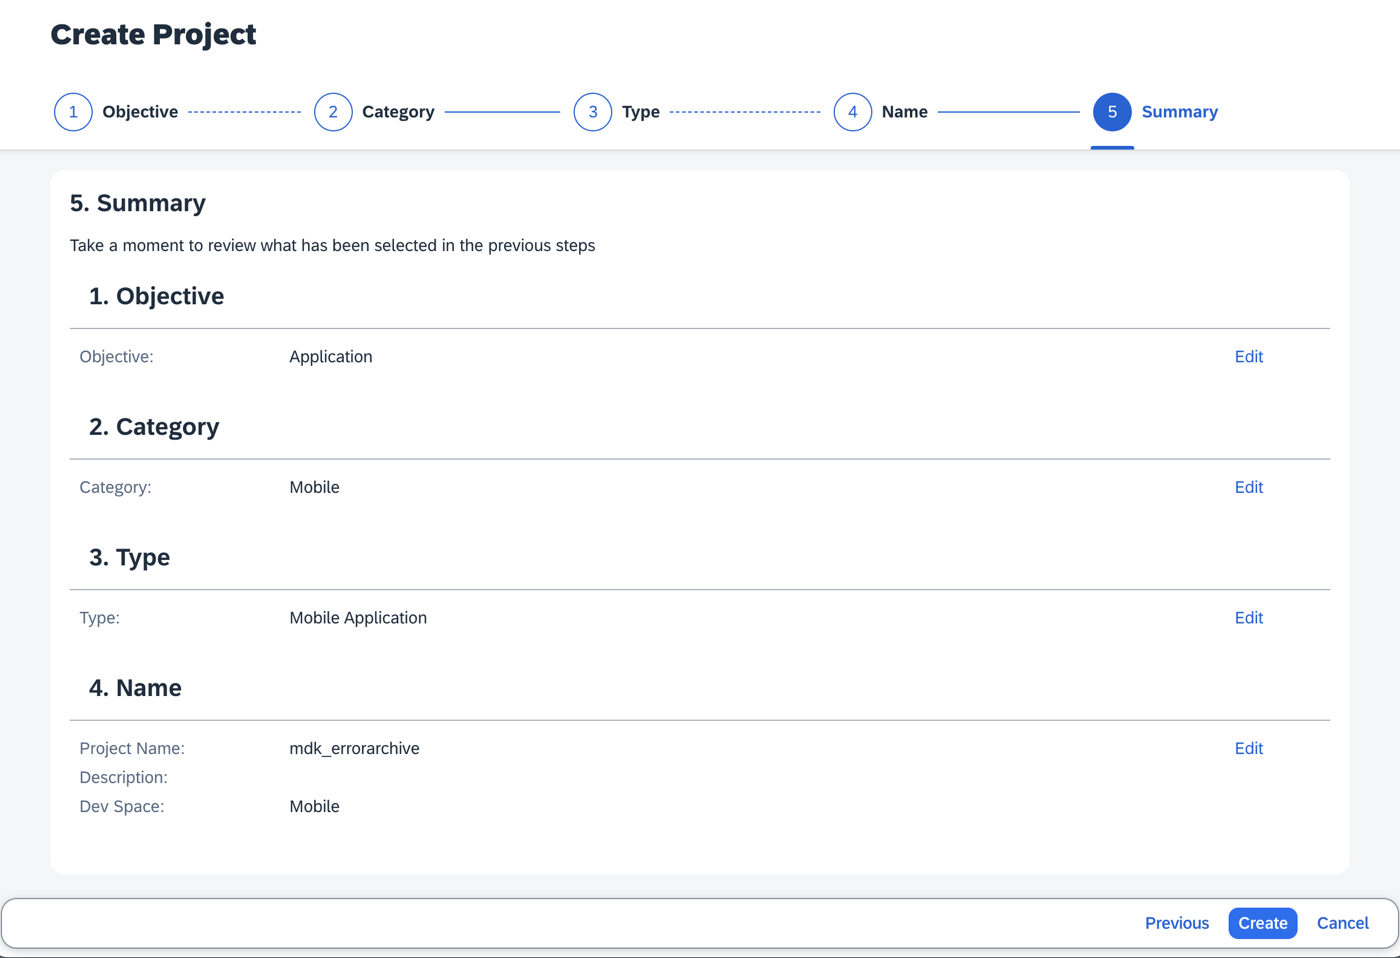
Project Summary Review Screen Your project is being created in the Project table of the lobby. The creation of the project may take a few moments. After the project has been created successfully, click the project to open it.

Project Created In Lobby Table The project opens in SAP Business Application Studio.

Project Opened In SAP BAS When you open the SAP Business Application Studio for the first time, a consent window may appear asking for permission to track your usage. Please review and provide your consent accordingly before proceeding.

SAP BAS Usage Consent Dialog
The Storyboard provides a graphical view of the application’s runtime resources, external resources, UI of the application, and the connections between them. This allows for a quick understanding of the application’s structure and components.
- Runtime Resources: In the Runtime Resources section, you can see the mobile services application and mobile destination used in the project, with a dotted-line connected to the External Resources.
- External Resources: In the External Resources section, you can see the external services used in the project, with a dotted-line connection to the Runtime Resource or the UI app.
- UI Application: In the UI Applications section, you can see the mobile applications.
Click on + button in the Runtime Resources column to add a mobile services app to your project.

Runtime Resources Add Button In Storyboard This screen will only show up when your CF login session has expired. Use either
CredentialsORSSO Passcodeoption for authentication. After successful signed in to Cloud Foundry, select your Cloud Foundry Organization and Space where you have set up the initial configuration for your MDK app and click Apply.
CF Login Credentials Dialog Choose
myapp.mdk.demofrom the applications list in the Mobile Application Services editor.
Mobile Application Services App List Select
com.sap.edm.sampleservice.v4from the destinations list and click Add App to Project.
Destination Selected Add App To Project You can access the mobile services admin UI by clicking on the Mobile Services option on the right hand side.
In the storyboard window, the app and mobile destination will be added under the Runtime Resources column. The mobile destination will also be added under the External Resources with a dotted-line connection to the Runtime Resource. The External Resource will be used to create the UI application.

Storyboard With App And Destination Added Click the + button in the UI application column header to add mobile UI for your project.

UI Application Column Add Button In the Basic Information step, select the MDK Template Type as CRUD, leave the other options as they are. Since the option to Enable Auto-Deployment to Mobile Services After Project Creation is set to Yes, the MDK project will automatically be deployed to the Mobile Services after it is generated. Click Next to continue.

MDK CRUD Template Basic Information Step The
CRUDtemplate generates the offline or online actions, rules, messages and pages to view, update, and manage records. More details on MDK template is available in help documentation.In the Data Collections step, provide the below information and click Finish. Data Collections step retrieves the entity sets information for the selected destination.
Field Value Enter a path to service (e.g. /sap/opu/odata/sap/SERVICE_NAME)Leave it as it is Select the Service TypeLeave the default value as ODataEnable OfflineIt’s enabled by default Select all data collectionsLeave it as it is What types of data will your application contain?Select Customers,Products,SalesOrderHeadersandSalesOrderItems
Data Collections Entity Sets Selection Regardless of whether you are creating an online or offline application, this step is needed for app to connect to an OData service. When building an MDK Mobile application, it assumes the OData service created and the destination that points to this service is set up in Mobile Services.
Since you have Enable Offline set to Yes, the generated application will be offline enabled in the MDK Mobile client.
Data Collections step retrieves the entity sets information for the selected destination.
After clicking Finish, the storyboard is updated displaying the UI component. The MDK project is generated in the project explorer and automatically deployed to the Mobile Services based on your selections. You will now see a QR code for onboarding the mobile app. Leave the Onboarding dialog box open for the next step.

Storyboard Updated With UI Component 
QR Code For Mobile App Onboarding
Make sure you are choosing the right device platform tab above. Once you have scanned and on-boarded using the onboarding URL, it will be remembered. When you Log out and on-board again, you will be asked either to continue to use current application or to scan new QR code.
Follow these steps to successfully on-board the MDK client on your Android device.
After you accept app update, you will see Main page with some entity sets being displayed and Offline store will be initialized.

Main Page With Entity Sets Android You will modify a Sales Order record, save it locally, sync it to the backend and if backend doesn’t accept this change due to some business logic failure, you will view them in Error Archive list.
Navigate to
SalesOrderHeaderslist, tap either one of the records.
SalesOrderHeaders List Android Tap edit icon. Make some changes to
CurrencyCodevalue (update it toEUROOO) and tap the save icon.
CurrencyCode Edit With Incorrect Value Android 
Entity Updated Toast Message Android You will see Entity Updated toast message. You can always see this updated record reflecting in
SalesOrderHeaderslist which means offline store has accepted this change.Navigate to
Main.page, tap on the Sync Changes option in the user menu to upload local changes from device to the backend and to download the latest changes from backend to the device.
Sync Changes Option User Menu Android You will see Upload failed message, tap on View Errors to navigate to the Error Archive list.

Upload Failed Message View Errors Android 
Error Archive List Android Tapping any record navigates to Error Details page with more information about error.

Error Details Page Android Here in Error, you will see
SQLDatabaseExceptionand in Request Body, it shows the record that caused this failure.In next step, you will implement how to handle such errors and let users to modify record with correct values.
Follow these steps to successfully on-board the MDK client on your iOS device.
After you accept app update, you will see Main page with some entity sets being displayed and Offline store will be initialized.
Main Page With Entity Sets iOS You will modify a Sales Order record, save it locally, sync it to the backend and if backend doesn’t accept this change due to some business logic failure, this record will appear in Error Archive list.
Navigate to
SalesOrderHeaderslist, tap either one of the record.
SalesOrderHeaders List iOS Tap Edit. Make some changes to
CurrencyCodevalue (update it toEUROOO) and Save it.
CurrencyCode Edit With Incorrect Value iOS 
Entity Saved Toast Message iOS You will see Entity Updated toast message. You can always see this updated record reflecting in
SalesOrderHeaderslist which means offline store has accepted this change.Navigate to
Main.page, click on the Sync Changes option in the user menu to upload local changes from device to the backend and to download the latest changes from backend to the device.
Sync Changes Option User Menu iOS You will see Upload failed message, tap on View Errors to navigate to the Error Archive list.

Upload Failed Message View Errors iOS 
Error Archive List iOS Tapping any record navigates to Error Details page with more information about error.

Error Details Page iOS Here in Error, you will see
SQLDatabaseExceptionand in Request Body, it shows the record that caused this failure.In next step, you will implement how to handle such errors and let users to modify record with correct values.
On the Error Details page, you will implement how to navigate to respective record to let users to modify the affected record with correct values and will also display the Affected Entity Object. Once the record is modified with the correct values, user can again sync it with backend.
Add an Object Table control in
ErrorArchive_Detail.pageto display some information like affected entity and id for the affected record.Open
Pages|ErrorArchive|ErrorArchive_Detail.page, in the Layout Editor, expand the Controls | Data Bound Container group, drag and drop the Object Table control onto the page area.
Object Table Drag And Drop Onto Page In the Properties | Target pane, choose String Target from the dropdown and provide
{AffectedEntity}value.
AffectedEntity String Target Property Set AffectedEntity: A navigation property that allows applications to navigate from anErrorArchiveentity to an entity in the offline store that is affected by the error.In Appearance section, provide below properties:
Property Value Descriptionleave it empty Footnoteleave it empty PreserveIconStackSpacingSelect falsefrom the dropdownProgessIndicatorleave it empty StatusTextleave it empty Subhead{@odata.id}SubstatusTextleave it empty TagsClick the item0and click the trash icon to delete the default itemTitleEdit Affected Entity
Object Table Appearance Properties Configured @odata.id: an annotation that contains the entity-id. More details can be found here.In Behavior section, update below properties:
Property Value AccessoryTypeDisclosureIndicator
Object Table Behavior AccessoryType Set In the Avatar Grid section of the Properties pane, remove the default Avatar. First, click on the
item0, a trash icon appears. Click on the trash icon to delete the default item.
Avatar Grid Default Item Removed In the Avatar Stack section of the Property pane, remove the default Avatar. First, click on the
item0, a trash icon appears. Click on the trash icon to delete the default item.
Avatar Stack Default Item Removed When tapping on this Object Table control, you want to bring the affected record so that you can fix business failure by modifying previous changes right there. For this, you will write a business logic to decide which action to call depends on which
@odata.typeis theaffectedEntityand if there is no handler for an affected entity, app will display a toast message saying this affected entity doesn’t have a handle yet.In the
ErrorArchive_Detail.page, select the Object Table control, navigate to the Events tab. Click the dotted icon for theOnPressproperty and select theCreate a rule/action.
OnPress Event Create Rule Action Selected Select Rule for the Object Type and select the
/mdk_errorarchive/Rules/com_sap_edm_sampleservice_v4folder path to create a new rule that will be generated in the chosen path.
Rule Object Type And Folder Path Selected You may choose a path of your choice. Since the template generates an
ErrorArchivefolder under Rules, it is good to keep related files under the respective folder.Enter the MDK Rule Name
ErrorArchive_DecideWhichEditPageand click Finish.
Rule Name ErrorArchive_DecideWhichEditPage Entry Replace the generated snippet with below code.
JavaScript/** * Describe this function... * @param {IClientAPI} context */ export default function ErrorArchive_DecideWhichEditPage(context) { //Current binding's root is the errorArchiveEntity: let errorArchiveEntity = context.currentPage.context.binding; //Get the affectedEntity object out of it let affectedEntity = errorArchiveEntity.AffectedEntity; console.log("Affected Entity Is:"); console.log(affectedEntity); let targetAction = null; let id = affectedEntity["@odata.id"]; //e.g. SalesOrderHeaders(12345) let affectedEntityType = "Unknown Entity Set"; //By default it's unknown type if (id.indexOf("(") > 0) { //Extracting the entity set type from @odata.id e.g. SalesOrderHeaders var patt = /\/?(.+)\(/i; var result = id.match(patt); affectedEntityType = result[1]; } console.log("Affected Entity Type Is:"); console.log(affectedEntityType); //Here we decide which action to call depends on which affectedEntityType is the affectedEntity // You can add more complex decision logic if needed switch (affectedEntityType) { case "SalesOrderHeaders": targetAction = "/mdk_errorarchive/Actions/com_sap_edm_sampleservice_v4/SalesOrderHeaders/NavToSalesOrderHeaders_Edit.action"; break; default: //Save the affected Entity's type in client data so that it can be displayed by the toast context.getPageProxy().getClientData().AffectedEntityType = affectedEntityType; // Show a toast for affectedEntityType that we do not handle yet return context.executeAction("/mdk_errorarchive/Actions/ErrorArchive/ErrorArchive_UnknownAffectedEntity.action"); } if (targetAction) { let pageProxy = context.getPageProxy(); //Set the affectedEntity object to root the binding context. pageProxy.setActionBinding(affectedEntity); //Note: doing 'return' here is important to chain the current context to the action. // Without the return the ActionBinding will not be passed to the action because it will consider // you are executing this action independent of the current context. return context.executeAction(targetAction); } }In above code there is a reference to
ErrorArchive_UnknownAffectedEntity.action, which doesn’t exist in your metadata project yet. You will create this action in next step.In the generated
ErrorArchive_DecideWhichEditPage.jsrule, click on the red line. You will notice a yellow bulb icon suggesting some fixes, click on it and then selectMDK: Create action for this reference, and clickToast Message Action.
Create Toast Message Action From Rule Reference Provide the below information:
Property Value MessageAffected Entity {AffectedEntity/@odata.id} doesn't have handler yet.Duration4 AnimatedSelect truefrom the dropdown
Toast Message Action Properties Configured If there is no handler for an affected entity, app will display a toast message.
Next, add a Header section bar to display affected entity information.
In the Layout Editor, expand the Controls | Section Bar section, drag and drop the Header control onto the Object Table control.

Header Section Bar Dragged Onto Object Table Now, bind its Caption property to
Affected Entity: {#Page:-Current/AffectedEntity/@odata.type}target path.
Header Caption Binding Set To AffectedEntity @odata.type: an annotation that specifies the type of a JSON object or name/value pair. Its value is a URI that identifies the type of the property or object. More details can be found here.
You will now deploy the updated project to your MDK client.
Click the Deploy option in the editor’s header area, and then choose the deployment target as Mobile Services

Tap Check for Updates in the user menu on the Main page, you will see a New Version Available pop-up, tap Now.

Check For Updates New Version Pop-up Android In order to access the Error List Detail pages, tap again on Sync Changes option in the user menu and once you see Upload failed message, tap on View Errors to navigate to the Error Archive list.
There you will find affected entity which couldn’t get accepted by backend due to some business logic failure.
Upload Failed Message View Errors Android Error Archive List Android You could add a button on the Main page navigating to the Error Archive List page directly.
Tapping any record navigates to Error Details page with more information about error. You have added a business logic to find out which is affected entity and how to navigate to respective record to let users to modify this record with correct values. Once done, user can again sync it with backend. Tap Edit Affected Entity.

Error Details Edit Affected Entity Android Modify record with correct values.

Record Modified With Correct Values Android Navigate to the Main page and tap on the Sync Changes option in the user menu. Record gets upload to the backend successfully.

Sync Changes Successful Upload Android
Tap Check for Updates in the user menu on the Main page, you will see a New Version Available pop-up, tap Now.

Check For Updates New Version Pop-up iOS In order to access the Error List Detail pages, tap again on Sync Changes option in the user menu and once you see Upload failed message, tap on View Errors to navigate to the Error Archive list.
There you will find affected entity which couldn’t get accepted by backend due to some business logic failure.
Upload Failed Message View Errors iOS Error Archive List iOS You could add a button on the Main page navigating to the Error Archive List page directly.
Tapping any record navigates to Error Details page with more information about error. You have added a business logic to find out which is affected entity and how to navigate to respective record to let users to modify this record with correct values. Once done, user can again sync it with backend. Tap Edit Affected Entity.

Error Details Edit Affected Entity iOS Modify record with correct values.

Record Modified With Correct Values iOS Navigate to the Main page and tap on the Sync Changes option in the user menu. Record gets upload to the backend successfully.

Sync Changes Successful Upload iOS
Resources
Discussion
Share feedback on this tutorial or join the conversation in SAP Community.