✔How to retrieve data and display it on the screen
✔How to follow the SAP Fiori for iOS guidelines. [ACCORDION-BEGIN [Step 1: ](Replace generated UI with your own)] The Human Interface Guidelines for SAP Fiori for iOS has certain screens defined that you can use as guidance on how you could structure a business app. Usually a business application has some sort of overview screen giving the user a entry point to key information he or she might need to do their daily work. From there, the user can navigate into more detailed information or more concrete workflows. > If you’re interested in the HIG of SAP for SAP Fiori for iOS, visit: SAP Fiori for iOS Design Guidelines For this tutorial, you will implement an overview screen displaying a KPI Table View Header, products and customers.Overview ScreenIn the Set Up the SAP BTP SDK for iOS, you’ve learned how to create an Xcode project using the SAP BTP SDK Assistant for iOS. The result of the generation process of the Assistant can be a split view screen if chosen. In this tutorial you will change the generated UI to match the screen shown above, the overview screen of your app. 1. First, open you Xcode project if not opened already and select the Main.storyboard, this will open the Main.storyboard in the Interface Builder of Xcode. > The Interface Builder allows you to create complete app flows including the UI for each screen of those flows. !Xcode Main StoryboardFor now go ahead and select all displayed View Controllers in the Main.storyboard and simply delete them. !Xcode Main Storyboard2. Next, click the Object Library and search for Table View Controller. Drag and drop the object on the canvas of the Interface Builder. !Xcode Main Storyboard3. Thinking ahead, you know that you want to have navigation to various screens from the overview screen. Using a Navigation Controller and embedding the just-created View Controller in it allows us to use the power of the Navigation Controller for navigation. The Navigation Controller handles the navigation stack for you, which is exactly what you want. Select the added View Controller and click Editor > Embed In > Navigation Controller. This will embed your View Controller in a Navigation Controller. You should see the Navigation Bar appear in the View Controller. !Xcode Main Storyboard!Xcode Main Storyboard4. Almost every View Controller you’re adding to the storyboard needs a Cocoa Touch Class representing the logic implementation of that View Controller. Control + click your project source in the Project Navigator on the left-hand side and select New File. !Xcode Overview Class5. Select the Cocoa Touch Class in the upcoming modal sheet, and click Next. !Xcode Overview ClassMake sure that your class is going to subclass of UITableViewController and change the name to OverviewTableViewController. Click Next and then Create. !Xcode Overview ClassGreat! You’ve created your first Table View Controller Swift class, now you have to set this class as Custom Class in the Main.storyboard View Controller. 6. Open the storyboard and select the created View Controller. On the right side, you can see the side bar. Click the Identity Inspector to set the custom class to OverviewTableViewController and hit return on your keyboard. !Xcode Overview ClassNotice the title of the Table View Controller on the left side changes accordingly to the entered custom class. 7. Lastly you have to make the Navigation Controller an initial View Controller. Doing this will allow us to instantiate an initial View Controller from Storyboard and tells the system the main entry point for that specific Storyboard. Select the Navigation Controller and open the Attributes Inspector to check the box next to Is Initial View Controller. !Xcode Overview Class[DONE] [ACCORDION-END] [ACCORDION-BEGIN [Step 2: ](Change the Application UI Manager code to display the overview)] In order to display the newly added overview screen right after the onboarding process is finished, you have to make some manual changes in the ApplicationUIManager.swift class. This class is mainly responsible for coordinating the UI flow for user onboarding all the way to the first screen after the onboarding process. 1. Open the ApplicationUIManager.swift class using the Project Navigator and look for the showApplicationScreen(completionHandler:) method. > Hint: You can use the Open Quickly feature of Xcode to search for the ApplicationUIManager class with Command + Shift + O. Once you’ve opened the file, you can quickly jump to the showApplicationScreen(completionHandler:) function by using the jump bar at the top of the editor area pane. !Application UI ManagerIn the method you see an if-else statement initializing a Split View Controller, which is non-existing anymore because you have your Overview Table View Controller. > For all upcoming tutorials and code snippets, you will find inline comments used to help you understand what the code is actually doing. Read the inline comments carefully! 2. Change the method code to the following: Swift[12-15] func showApplicationScreen(completionHandler: @escaping (Error?) -> Void) { // Check if an application screen has already been presented guard isSplashPresented else { completionHandler(nil) return } // set rootViewController only once ie after onboarding when app screen is about to be shown // for restore, remove covering views previously added let appViewController: UIViewController if isOnboarding { let overviewTVC = UIStoryboard(name: "Main", bundle: Bundle.main).instantiateInitialViewController() as! UINavigationController appViewController = overviewTVC isOnboarding = false coveringViews.removeAll() // maintain this boolean since no splash screen is present now isSplashPresented = false window.rootViewController = appViewController } else { removeCoveringViews() } completionHandler(nil) } Great you did complete all necessary steps to replace the generated UI with your own. Go ahead and run the app on iPhone 12 Pro or any other simulator to see the result. > In case you haven’t onboarded yet, go through the onboarding process before seeing your Overview Screen appear.Overview Screen Basic[DONE] [ACCORDION-END] [ACCORDION-BEGIN [Step 3: ](Implement basic functionality of overview screen)] As you can see, the overview screen is a little bit more complicated then just simply displaying a Table View with some data. The overview screen contains the following UI controls:
✔UITableView: A table dequeuing and displaying registered Table View Cells.
✔FUIObjectTableViewCell: A SAP Fiori control used to display business entity objects. FUIObjectTableViewCell
✔FUICollectionViewTableViewCell: A SAP Fiori control allowing you to display a UICollectionView in a Table View Cell. The cell handles the resizing for you. FUICollectionViewTableViewCell
✔UITableViewCell: The mother of all cells!
✔FUITableViewHeaderFooterView: A SAP Fiori control used to display Header Footer Views for a Table View section. FUITableViewHeaderFooterView
✔FUIKPIHeader: A SAP Fiori control used for displaying KPIs as a Table View Header. FUIKPIHeader
✔FUILoadingIndicatorView: A SAP Fiori control used to display a loading indicator on screen. FUILoadingIndicatorView
✔Case 1: return 3 if the count of available products is equal or higher then 3
✔Case 3: return 1 if the count of available customers is equal or higher then 1. That is because you only display the FUICollectionViewTableViewCell here.
✔Default: return 0 because those are the dividers which are not going to display any rows. / override func tableView(_ tableView: UITableView, numberOfRowsInSection section: Int) -> Int { switch section { case 1: if products.count >= 3 { return 3 } case 3: if customers.count >= 1 { return 1 } default: return 0 } return 0 } /* At the moment return a UITableViewHeaderFooterView. / override func tableView(_ tableView: UITableView, viewForHeaderInSection section: Int) -> UIView? { return UITableViewHeaderFooterView() } /* At the moment return a UITableViewHeaderFooterView. / override func tableView(_ tableView: UITableView, viewForFooterInSection section: Int) -> UIView? { return UITableViewHeaderFooterView() } /* At the moment return a UITableViewCell. / override func tableView(_ tableView: UITableView, cellForRowAt indexPath: IndexPath) -> UITableViewCell { return UITableViewCell() } // MARK: - Navigation // In a storyboard-based application, you will often want to do a little preparation before navigation override func prepare(for segue: UIStoryboardSegue, sender: Any?) { // Prepare segue for navigation } } [DONE] [ACCORDION-END] [ACCORDION-BEGIN [Step 4: ](Implement FUITableViewHeaderFooterView)] To finish building the screen's layout you are going to implement the dividers and the Header/Footer for the products and customers. 1. First, register the `FUITableViewHeaderFooterView` in the `viewDidLoad()` method:Swift[4] override func viewDidLoad() { super.viewDidLoad() tableView.register(FUITableViewHeaderFooterView.self, forHeaderFooterViewReuseIdentifier: FUITableViewHeaderFooterView.reuseIdentifier) } 2. Next, replace the `tableView(_:viewForHeaderInSection)` method with the implementation code:Swift /* Dequeue the registered FUITableViewHeaderFooterView and force cast it to the respective class. Again use a Switch-statement to distinguish between the different sections.
✔Case 1: You want to see just the title for the Product section header
✔Case 3: You want to see title and an attribute for the Customer section header.
✔Default: Return the divider view. / override func tableView(_ tableView: UITableView, viewForHeaderInSection section: Int) -> UIView? { let headerFooterView = tableView.dequeueReusableHeaderFooterView(withIdentifier: FUITableViewHeaderFooterView.reuseIdentifier) as! FUITableViewHeaderFooterView switch section { case 1: headerFooterView.style = .title headerFooterView.titleLabel.text = NSLocalizedString(“Products”, comment: “”) return headerFooterView case 3: headerFooterView.style = .attribute headerFooterView.titleLabel.text = NSLocalizedString(“Customers”, comment: “”) headerFooterView.attributeLabel.text = NSLocalizedString(“See All((customers.count))”, comment: “”) headerFooterView.didSelectHandler = { // TODO: Implement later } return headerFooterView default: let divider = UIView() divider.backgroundColor = .preferredFioriColor(forStyle: .separatorOpaque) return divider } } 3. Replace the `tableView(_:viewForFooterInSection)` method with the following code:Swift /* For the Footer you display a FUITableViewHeaderFooterView set to style attribute like the customer section header. If it is not the product section then show an empty UIView. / override func tableView(_ tableView: UITableView, viewForFooterInSection section: Int) -> UIView? { if section == 1 { let headerFooterView = tableView.dequeueReusableHeaderFooterView(withIdentifier: FUITableViewHeaderFooterView.reuseIdentifier) as! FUITableViewHeaderFooterView headerFooterView.didSelectHandler = { // TODO: Implement later } headerFooterView.style = .attribute headerFooterView.titleLabel.text = NSLocalizedString(“See All”, comment: “”) headerFooterView.attributeLabel.text = “(products.count)” return headerFooterView } else { return UIView(frame: CGRect(x: 0, y: 0, width: 0, height: 0)) } } 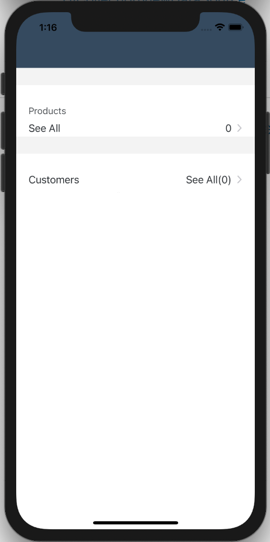 [DONE] [ACCORDION-END] [ACCORDION-BEGIN [Step 5: ](Load customer and product data)] Before you continue implementing the Table View's data source and delegate methods, you go and implement the data loading methods. Thanks to the generated data service and proxy classes, you don't have to implement much to load data from the sample OData service. 1. You need to retrieve an instance of the `ESPMContainer` to be able to have access to the generated data layer. The data service is globally accessible through the onboarding session. Depending on how you generated your Xcode project you might support Online or Offline OData. This has an effect on what OData controller you use to retrieve the data service. Also importing the `SharedFmwk` is necessary to retrieve the data service as it holds information over the OData container which describes the model, and other central information of the OData service. **For Online OData** Add the following import statement to your class, if not already done:Swift import SAPOData import SharedFmwk Implement the following lines of code directly below the logger instance as class properties:Swift /// First retrieve the destinations your app can talk to from the AppParameters. let destinations = FileConfigurationProvider(“AppParameters”).provideConfiguration().configuration[“Destinations”] as! NSDictionary /// Create a computed property that uses the OnboardingSessionManager to retrieve the onboarding session and uses the destinations dictionary to pull the correct destination. Of course you only have one destination here. Handle the errors in case the OData controller is nil. You are using the AlertHelper to display an AlertDialogue to the user in case of an error. The AlertHelper is a utils class provided through the Assistant. var dataService: ESPMContainer? { guard let odataController = OnboardingSessionManager .shared .onboardingSession? .odataControllers[ODataContainerType.eSPMContainer.description] as? ESPMContainerOnlineODataController else { AlertHelper.displayAlert(with: “OData service is not reachable, please onboard again.”, error: nil, viewController: self) return nil } return odataController.dataService } **For Offline OData** Add the following import statement to your class:Swift import SAPOfflineOData import SAPOData import SharedFmwk Implement the following lines of code directly below the logger instance as class properties:Swift /// First retrieve the destinations your app can talk to from the AppParameters. let destinations = FileConfigurationProvider(“AppParameters”).provideConfiguration().configuration[“Destinations”] as! NSDictionary var dataService: ESPMContainer? { guard let odataController = OnboardingSessionManager .shared .onboardingSession? .odataControllers[ODataContainerType.eSPMContainer.description] as? ESPMContainerOfflineODataController else { AlertHelper.displayAlert(with: “OData service is not reachable, please onboard again.”, error: nil, viewController: self) return nil } return odataController.dataService } 2. To fetch available customers, implement the following method below the closing bracket of the `viewDidLoad()` method:Swift /* First you define a DataQuery to perform an expand for the customer’s sales orders. This data query object you can simply pass into the fetchCustomers(:) method call. Handle the errors and display an Alert Dialogue to the user. Using a DispatchGroup allows us to sequentially run background tasks and perform a certain action as soon as all tasks are completed. First you enter the group and you have to leave the group in any place where you return out of the block. In case you retrieve data from the backend sort the customers by the amount of sales orders they have and set them to the array. / private func fetchCustomers(_ group: DispatchGroup) { group.enter() let query = DataQuery().expand(Customer.salesOrders) dataService?.fetchCustomers(matching: query) { [weak self] result, error in if let error = error { AlertHelper.displayAlert(with: NSLocalizedString(“Failed to load list of customers!”, comment: “”), error: error, viewController: self!) self?.logger.error(“Failed to load list of customers!”, error: error) group.leave() return } // sort the customer result set by the number of available sales orders by customer. self?.customers.append(contentsOf: result!.sorted(by: { $0.salesOrders.count > $1.salesOrders.count })) group.leave() } } 3. Next implement the method responsible for fetching all products. Add the following lines of code below the closing bracket of the `fetchCustomers(_:)` method:Swift /* Handle the errors and display an Alert Dialogue to the user. In case you retrieve data from the backend sort the customers by the amount of sales orders they have and set them to the array. / private func fetchProducts(_ group: DispatchGroup) { group.enter() dataService?.fetchProducts() { [weak self] result, error in if let error = error { AlertHelper.displayAlert(with: NSLocalizedString(“Failed to load list of products!”, comment: “”), error: error, viewController: self!) self?.logger.error(“Failed to load list of products!”, error: error) group.leave() return } self?.products.append(contentsOf: result!) group.leave() } } 4. Now let's bring both of those methods together by implementing a `loadData()` method right above the `fetchCustomers(_:)` method.Swift /* Show a loading indicator as soon as the method gets called. Create a DispatchGroup and call both fetch methods and pass in the created group. group.notify will be called as soon as both methods called group.leave(). If notify gets called execute the block which will hide the loading indicator, reload the data of the table view. */ private func loadData() { showFioriLoadingIndicator() let group = DispatchGroup() fetchCustomers(group) fetchProducts(group) group.notify(queue: DispatchQueue.main) { self.hideFioriLoadingIndicator() self.tableView.reloadData() } } > The code won't compile as you haven't conformed to the **`SAPFioriLoadingIndicator`** protocol yet. 5. Let the `OverviewTableViewController` class conform to the **`SAPFioriLoadingIndicator`** protocol and implement the needed property:Swift class OverviewTableViewController: UITableViewController, SAPFioriLoadingIndicator { var loadingIndicator: FUILoadingIndicatorView? //… } 6. Call the `loadData()` method as last statement in the `viewDidLoad()`. [DONE] [ACCORDION-END] [ACCORDION-BEGIN [Step 6: ](Implement cellForRowAt method)] Now that you can fetch the needed data sets, you can go ahead and finish implementing the `tableView(_:cellForRowAt:)` method. Before you do this you have to take care of the product image lazy loading. You're going to use a simple image cache in the form of a Dictionary; also you need a property which holds the product image URLs. 1. Add the following lines of code directly above the product array class property:Swift private var imageCache = String: UIImage private var productImageURLs = String2. To get the product image URLs, you need to add the following line of code to the `fetchProducts(_:)` method directly above the `self?.products.append(contentsOf: result!)` line:Swift self?.productImageURLs = result!.map { $0.pictureUrl ?? "" } ``` 3. Now you only have to implement the method responsible for loading the product images. Implement the following method directly below the closing bracket of the `fetchProducts(_:)` method: ```Swift /** Retrieve an instance of the AppDelegate to get access to the SAPURLSession. Safe unwrap the SAPURLSession with the help of a guard-statement. Start a data task to download the image using the passed in URL. If the download task is completed check for errors. and safe the loaded image in the image cache. Dispatch back to the main thread and pass the loaded image. */ private func loadImageFrom(_ url: URL, completionHandler: @escaping (_ image: UIImage) -> Void) { let appDelegate = UIApplication.shared.delegate as! AppDelegate if let sapURLSession = appDelegate.sessionManager.onboardingSession?.sapURLSession { sapURLSession.dataTask(with: url, completionHandler: { data, _, error in if let error = error { self.logger.error("Failed to load image!", error: error) return } if let image = UIImage(data: data!) { // safe image in image cache self.imageCache[url.absoluteString] = image DispatchQueue.main.async { completionHandler(image) } } }).resume() } } ``` 4. Before you can start dequeuing the needed cells, complete the `viewDidLoad()` method: ```Swift[4-15] override func viewDidLoad() { super.viewDidLoad() // Set the navigation item's title to "Overview". navigationItem.title = NSLocalizedString("Overview", comment: "") tableView.register(FUIObjectTableViewCell.self, forCellReuseIdentifier: FUIObjectTableViewCell.reuseIdentifier) tableView.register(FUICollectionViewTableViewCell.self, forCellReuseIdentifier: FUICollectionViewTableViewCell.reuseIdentifier) tableView.register(FUITableViewHeaderFooterView.self, forHeaderFooterViewReuseIdentifier: FUITableViewHeaderFooterView.reuseIdentifier) // To make sure the FUICollectionViewTableViewCell gets displayed correctly you set the estimated row height to 180 and the row height to automatic dimension which will allow the table view to resize the cell. tableView.estimatedRowHeight = 180 tableView.rowHeight = UITableView.automaticDimension loadData() } ``` 5. Before you go ahead and implement the `tableView(_:viewDidLoad:)`, you need to retrieve the URL of your service. The data task you're going to use will use the URL to download the needed product images. Open your Mobile Services instance and select your app configuration in the `Native/Hybrid` screen. There you click **Mobile Sample OData ESPM** in the **Assigned Features** section. !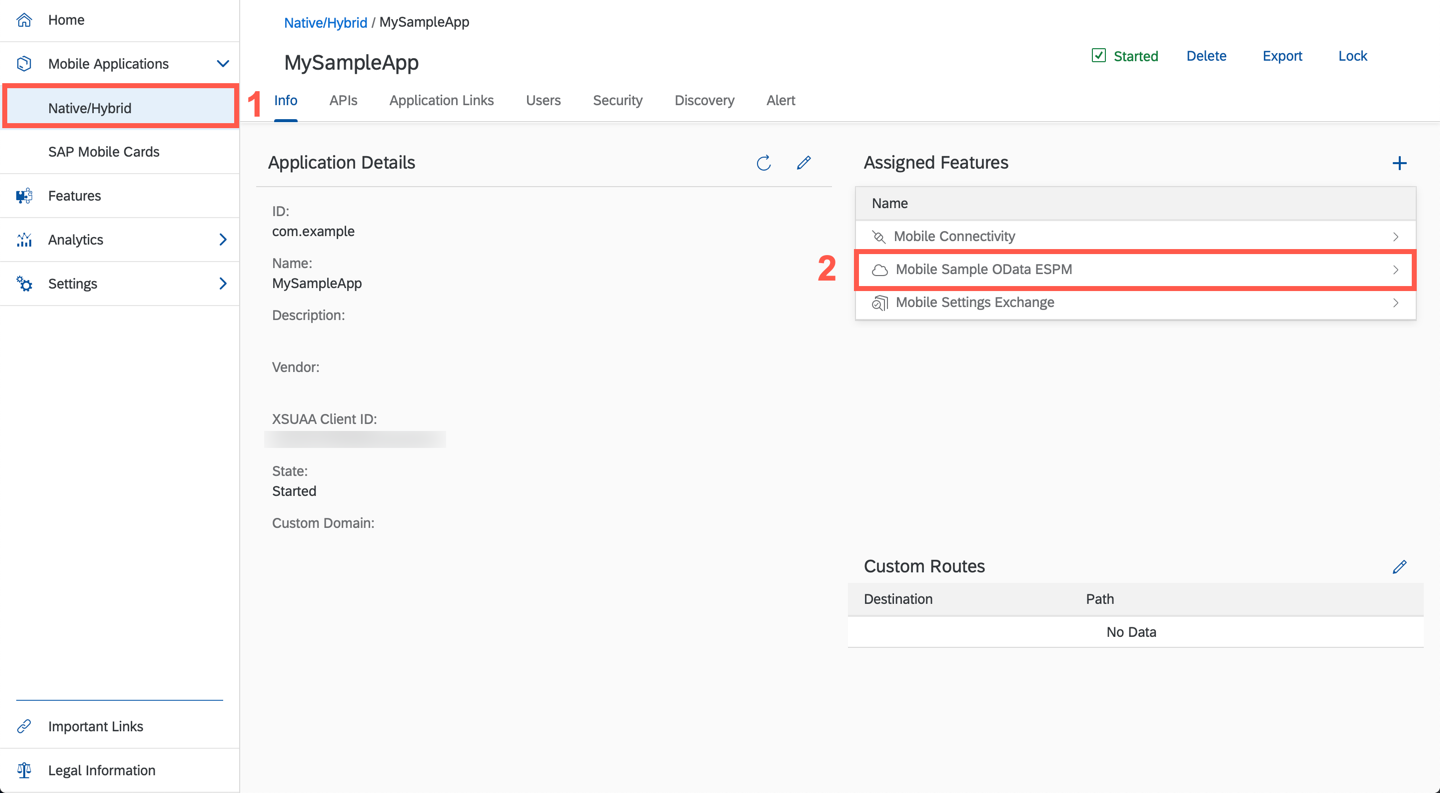 6. The detail screen for the `Mobile Sample OData ESPM` will open. There you find the **`Runtime Root URL`** for this service, copy the whole URL as you will need it in a second. !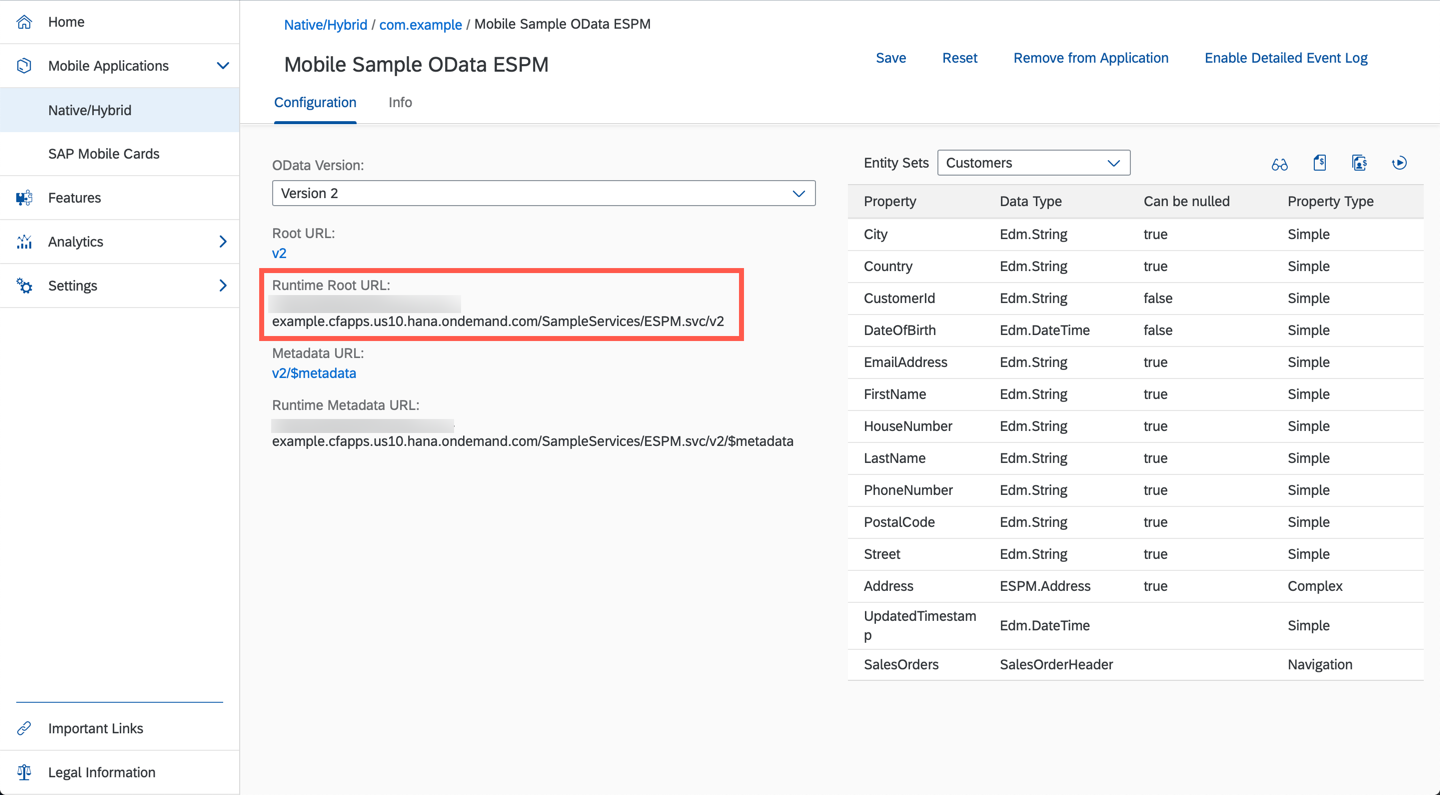 7. Let's bring some life into our screen: ```Swift[19] override func tableView(_ tableView: UITableView, cellForRowAt indexPath: IndexPath) -> UITableViewCell { switch indexPath.section { case 1: // Get the needed product using the IndexPath and deque the FUIObjectTableViewCell. let product = products[indexPath.row] let productCell = tableView.dequeueReusableCell(withIdentifier: FUIObjectTableViewCell.reuseIdentifier) as! FUIObjectTableViewCell // Set the data to the dequeued cell. productCell.headlineText = product.name ?? "-" productCell.subheadlineText = product.categoryName ?? "-" // Show In Stock or Out of Stock depending on the available quantity of the product. productCell.footnoteText = product.stockDetails?.quantity?.intValue() != 0 ? NSLocalizedString("In Stock" , comment: "") : NSLocalizedString("Out of Stock", comment: "") // set a placeholder image productCell.detailImageView.image = FUIIconLibrary.system.imageLibrary // This URL is found in Mobile Services API tab and is needed to fetch the product images. let baseURL = let url = URL(string: baseURL.appending(productImageURLs[indexPath.row])) guard let unwrapped = url else { logger.info("URL for product image is nil. Returning cell without image.") return productCell } // check if the image is already in the cache if let img = imageCache[unwrapped.absoluteString] { productCell.detailImageView.image = img } else { // The image is not cached yet, so download it. loadImageFrom(unwrapped) { image in productCell.detailImageView.image = image } } // Only visible on regular productCell.descriptionText = product.longDescription ?? "" productCell.accessoryType = .detailDisclosureButton return productCell case 3: let customerCollectionViewCell = tableView.dequeueReusableCell(withIdentifier: FUICollectionViewTableViewCell.reuseIdentifier) as! FUICollectionViewTableViewCell // The FUICollectionViewTableViewCell's collection view has a delegate and datasource as well. Your OverviewTableViewController will also provide those for the collection view. customerCollectionViewCell.collectionView.delegate = self customerCollectionViewCell.collectionView.dataSource = self // Use the horizontal scroll layout to display the customers horizontally with scroll enabled in the FUICollectionViewTableViewCell. Define the layouts parameters. let collectionViewLayout = FUICollectionViewLayout.horizontalScroll collectionViewLayout.minimumInteritemSpacing = CGFloat(16) collectionViewLayout.itemSize = CGSize(width: 120, height: 140) // Be aware of recommended margins in compact (left 16) and regular (left 48) mode customerCollectionViewCell.collectionView.contentInset = UIEdgeInsets(top: 16, left: 16, bottom: 16, right: 0) // Set the layout on the collection view and register the FUIItemCollectionViewCell customerCollectionViewCell.collectionView.collectionViewLayout = collectionViewLayout customerCollectionViewCell.collectionView.register(FUIItemCollectionViewCell.self, forCellWithReuseIdentifier: FUIItemCollectionViewCell.reuseIdentifier) return customerCollectionViewCell default: return UITableViewCell() } } ``` Inside the just implemented method, assign the copied `URL` as String to the `baseURL` instead of `` placeholder. 8. At the moment the code won't compile because your class doesn't conform to the `UICollectionViewDataSource` or the `UICollectionViewDelegate` protocol. To conform to these protocols you will implement a class extension where you will implement the protocol methods. Swift Extensions are declared outside the class's scope. Add the following extensions after the closing bracket of the `OverviewTableViewController` class: ```Swift extension OverviewTableViewController: UICollectionViewDelegate { //TODO: Implement navigation } extension OverviewTableViewController: UICollectionViewDataSource { func collectionView(_ collectionView: UICollectionView, numberOfItemsInSection section: Int) -> Int { return customers.count } func collectionView(_ collectionView: UICollectionView, cellForItemAt indexPath: IndexPath) -> UICollectionViewCell { let customerCollectionViewCell = collectionView.dequeueReusableCell(withReuseIdentifier: FUIItemCollectionViewCell.reuseIdentifier, for: indexPath) as! FUIItemCollectionViewCell return customerCollectionViewCell } } ``` 9. Run the app to see the result. 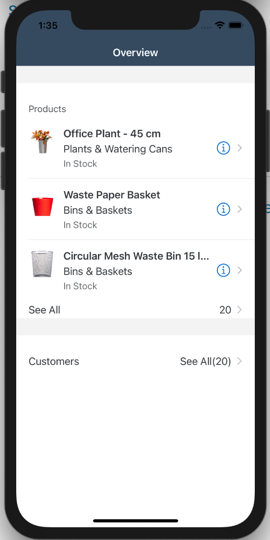 [VALIDATE_6] [ACCORDION-END] [ACCORDION-BEGIN [Step 7: ](Implement UICollectionViewDataSource)] To complete the UI, you need to implement the `UICollectionViewDataSource` protocol. Replace the `collectionView(_:numberOfItemsInSection:)` method in the class extension: ```Swift func collectionView(_ collectionView: UICollectionView, numberOfItemsInSection section: Int) -> Int { return customers.count } ``` Replace the `collectionView(_:cellForItemAt:)` method in the class extension: ```Swift func collectionView(_ collectionView: UICollectionView, cellForItemAt indexPath: IndexPath) -> UICollectionViewCell { let customer = customers[indexPath.row] let customerCollectionViewCell = collectionView.dequeueReusableCell(withReuseIdentifier: FUIItemCollectionViewCell.reuseIdentifier, for: indexPath) as! FUIItemCollectionViewCell let customerName = "\(customer.firstName ?? "") \(customer.lastName ?? "")" customerCollectionViewCell.title.text = customerName customerCollectionViewCell.detailImageView.image = UIImage(systemName: "person", withConfiguration: UIImage.SymbolConfiguration(scale: .small)) customerCollectionViewCell.detailImageView.isCircular = true // Use a Date Formatter to format the date to the medium style if let customerDOB = customer.dateOfBirth { let dateFormatter = DateFormatter() dateFormatter.dateStyle = .medium customerCollectionViewCell.subtitle.text = "\(dateFormatter.string(from: customerDOB.utc() ?? Date()))" } return customerCollectionViewCell } ``` You are using a system image that can be found in the **SF Symbols** app. You can download the app for free from the Apple Developer website [SF Symbols](https://developer.apple.com/design/human-interface-guidelines/sf-symbols/overview/). [DONE] [ACCORDION-END] [ACCORDION-BEGIN [Step 8: ](Add KPI Header to Table View)] To make the overview screen complete, you're going to add an `FUIKPIHeader` to the table view. >From the `FUIKPIHeader` documentation: > **`FUIKPIHeader`** extends **`UIView`** for a table view header displaying KPI items, of type **`FUIKPIView`** and **`FUIKPIProgressView`**. > A maximum of four KPI values can be displayed in the header, hence if more than four items are provided in the items > array as input to the header, only the first four are displayed and the rest of the items are ignored. 1. Create another class property declaring the KPI Header: ```Swift var kpiHeader: FUIKPIHeader! ``` 2. Add a method for setting up the KPI Header, by implementing the following method directly below the `viewDidLoad()` method: ```Swift // MARK: - KPI Header private func setupKPIHeader() { kpiHeader = FUIKPIHeader() // Create a new FUIKPIView displaying the customer satisfaction. let customerSatisfactionKPI = FUIKPIView() // Add a FUIKPIUnitItem for the unit and a FUIKPIMetricItem for the value itself. The value is mocked here as it is not existing in the OData service. customerSatisfactionKPI.items = [FUIKPIUnitItem(string: "%"), FUIKPIMetricItem(string: "82")] customerSatisfactionKPI.captionlabel.text = NSLocalizedString("Customer Satisfaction", comment: "") customerSatisfactionKPI.isEnabled = false // Create a new FUIKPIView displaying the sales order count. let salesOrdersKPI = FUIKPIView() // Retrieve a list of the salesOrders overall. let salesOrders = customers.flatMap { $0.salesOrders } salesOrdersKPI.items = [FUIKPIMetricItem(string: “(salesOrders.count)”)] salesOrdersKPI.captionlabel.text = NSLocalizedString(“Sales Orders”, comment: “”) salesOrdersKPI.isEnabled = false // Add the items to the header kpiHeader.items = [customerSatisfactionKPI, salesOrdersKPI] // Set the KPI Header as new table header view. tableView.tableHeaderView = kpiHeader } 3. Call the method in the `viewDidLoad()` method:Swift[13] override func viewDidLoad() { super.viewDidLoad() navigationItem.title = NSLocalizedString(“Overview”, comment: “”) tableView.register(FUIObjectTableViewCell.self, forCellReuseIdentifier: FUIObjectTableViewCell.reuseIdentifier) tableView.register(FUICollectionViewTableViewCell.self, forCellReuseIdentifier: FUICollectionViewTableViewCell.reuseIdentifier) tableView.register(FUITableViewHeaderFooterView.self, forHeaderFooterViewReuseIdentifier: FUITableViewHeaderFooterView.reuseIdentifier) tableView.estimatedRowHeight = 180 tableView.rowHeight = UITableView.automaticDimension setupKPIHeader() loadData() } 4. Also you have to call the `setupKPIHeader()` method as soon as the data is loaded to update the `KPIs`. Add the method call to the `loadData()` method:Swift[12] func loadData() { showFioriLoadingIndicator() let group = DispatchGroup() fetchCustomers(group) fetchProducts(group) group.notify(queue: DispatchQueue.main) { self.hideFioriLoadingIndicator() self.setupKPIHeader() self.tableView.reloadData() } } ``` You completed the overview screen. Run the app on iPhone or iPad to see the result.Overview Screen no Collection[DONE] [ACCORDION-END]
Development environment: Apple Mac running macOS Catalina or higher with Xcode 13 or higher
SAP BTP SDK for iOS: Version 7.0 or higher
Steps
Details
You will learn
How to create your first iOS screen
How to retrieve data and display it on the screen
How to follow the SAP Fiori for iOS guidelines.
Step 1Replace generated UI with your own
—
The Human Interface Guidelines for SAP Fiori for iOS has certain screens defined that you can use as guidance on how you could structure a business app.
Usually a business application has some sort of overview screen giving the user a entry point to key information he or she might need to do their daily work. From there, the user can navigate into more detailed information or more concrete workflows.
For this tutorial, you will implement an overview screen displaying a KPI Table View Header, products and customers.
Overview Screen
In the Set Up the SAP BTP SDK for iOS, you’ve learned how to create an Xcode project using the SAP BTP SDK Assistant for iOS. The result of the generation process of the Assistant can be a split view screen if chosen. In this tutorial you will change the generated UI to match the screen shown above, the overview screen of your app.
First, open you Xcode project if not opened already and select the Main.storyboard, this will open the Main.storyboard in the Interface Builder of Xcode.
The Interface Builder allows you to create complete app flows including the UI for each screen of those flows.
!Xcode Main Storyboard
For now go ahead and select all displayed View Controllers in the Main.storyboard and simply delete them.
!Xcode Main Storyboard
Next, click the Object Library and search for Table View Controller. Drag and drop the object on the canvas of the Interface Builder.
!Xcode Main Storyboard
Thinking ahead, you know that you want to have navigation to various screens from the overview screen. Using a Navigation Controller and embedding the just-created View Controller in it allows us to use the power of the Navigation Controller for navigation. The Navigation Controller handles the navigation stack for you, which is exactly what you want.
Select the added View Controller and click Editor > Embed In > Navigation Controller. This will embed your View Controller in a Navigation Controller. You should see the Navigation Bar appear in the View Controller.
!Xcode Main Storyboard
!Xcode Main Storyboard
Almost every View Controller you’re adding to the storyboard needs a Cocoa Touch Class representing the logic implementation of that View Controller.
Control + click your project source in the Project Navigator on the left-hand side and select New File.
!Xcode Overview Class
Select the Cocoa Touch Class in the upcoming modal sheet, and click Next.
!Xcode Overview Class
Make sure that your class is going to subclass of UITableViewController and change the name to OverviewTableViewController. Click Next and then Create.
!Xcode Overview Class
Great! You’ve created your first Table View Controller Swift class, now you have to set this class as Custom Class in the Main.storyboard View Controller.
Open the storyboard and select the created View Controller. On the right side, you can see the side bar. Click the Identity Inspector to set the custom class to OverviewTableViewController and hit return on your keyboard.
!Xcode Overview Class
Notice the title of the Table View Controller on the left side changes accordingly to the entered custom class.
Lastly you have to make the Navigation Controller an initial View Controller. Doing this will allow us to instantiate an initial View Controller from Storyboard and tells the system the main entry point for that specific Storyboard.
Select the Navigation Controller and open the Attributes Inspector to check the box next to Is Initial View Controller.
!Xcode Overview Class
Step 2Change the Application UI Manager code to display the overview
+
In order to display the newly added overview screen right after the onboarding process is finished, you have to make some manual changes in the ApplicationUIManager.swift class. This class is mainly responsible for coordinating the UI flow for user onboarding all the way to the first screen after the onboarding process.
Open the ApplicationUIManager.swift class using the Project Navigator and look for the showApplicationScreen(completionHandler:) method.
Hint: You can use the Open Quickly feature of Xcode to search for the ApplicationUIManager class with Command + Shift + O. Once you’ve opened the file, you can quickly jump to the showApplicationScreen(completionHandler:) function by using the jump bar at the top of the editor area pane.
!Application UI Manager
In the method you see an if-else statement initializing a Split View Controller, which is non-existing anymore because you have your Overview Table View Controller.
For all upcoming tutorials and code snippets, you will find inline comments used to help you understand what the code is actually doing. Read the inline comments carefully!
Change the method code to the following:
Swift[12-15]
func showApplicationScreen(completionHandler: @escaping (Error?) -> Void) {
    // Check if an application screen has already been presented
    guard isSplashPresented else {
        completionHandler(nil)
        return
    }

    // set rootViewController only once ie after onboarding when app screen is about to be shown
    // for restore, remove covering views previously added
    let appViewController: UIViewController
    if isOnboarding {
        let overviewTVC = UIStoryboard(name: "Main", bundle: Bundle.main).instantiateInitialViewController() as! UINavigationController

        appViewController = overviewTVC

        isOnboarding = false
        coveringViews.removeAll()

        // maintain this boolean since no splash screen is present now
        isSplashPresented = false
        window.rootViewController = appViewController
    } else {
        removeCoveringViews()
    }

    completionHandler(nil)
}
Great you did complete all necessary steps to replace the generated UI with your own. Go ahead and run the app on iPhone 12 Pro or any other simulator to see the result.
In case you haven’t onboarded yet, go through the onboarding process before seeing your Overview Screen appear.
Overview Screen Basic
Step 3Implement basic functionality of overview screen
+
As you can see, the overview screen is a little bit more complicated then just simply displaying a Table View with some data. The overview screen contains the following UI controls:
UITableView: A table dequeuing and displaying registered Table View Cells.
FUIObjectTableViewCell: A SAP Fiori control used to display business entity objects. FUIObjectTableViewCell
FUICollectionViewTableViewCell: A SAP Fiori control allowing you to display a UICollectionView in a Table View Cell. The cell handles the resizing for you. FUICollectionViewTableViewCell
UITableViewCell: The mother of all cells!
FUITableViewHeaderFooterView: A SAP Fiori control used to display Header Footer Views for a Table View section. FUITableViewHeaderFooterView
FUIKPIHeader: A SAP Fiori control used for displaying KPIs as a Table View Header. FUIKPIHeader
FUILoadingIndicatorView: A SAP Fiori control used to display a loading indicator on screen. FUILoadingIndicatorView
FUIItemCollectionViewCell: A SAP Fiori control used to display business entity objects in a Collection View Cell. FUIItemCollectionViewCell
If you look at the list of controls you might recognize that you’re picking from not only SAP Fiori controls but also from Apple UIKit controls. Because all of the SAP Fiori controls are written natively in Swift and inherit of UIKit controls, you can pick and choose the controls you need.
!Control Inheritance Overview
You will now implement some code to set up the OverviewTableViewController for displaying all the above mentioned controls, load data from the backend using the SAPOData framework, and perform navigation to the customer and product list.
Open the OverviewTableViewController.swift file and add the following import statements right below the import UIKit statement:
You are going to use APIs and classes from all of those SAP BTP SDK for iOS frameworks to build the Overview screen.
The overview screen will have a short list of products and a collection of customers. Implementing two arrays containing elements of type Product and Customer will do the job of storing the loaded entities later on.
The ESPMContainerFmwk is a helper framework which contains the OData proxy classes generated out of the Metadata document of the consumed OData service. Importing this framework allows you to access the OData proxy classes but also the generated dataservice.
Because you want to use the logging API of the SAPCommon framework you have to retrieve and store an instance of the logger. Luckily the logger gets initialized in the AppDelegate through generated code by the Assistant. The logger is initialized with a default log level of Debug.
Add the following line of code above the products array:
Next, implement all the needed Table View data source and delegate methods you need. Fortunately you used a Table View Controller instead of a View Controller, and because you did that you can simply override those methods directly in class without declaring the needed protocols (UITableViewDataSource, UITableViewDelegate) in the class definition.
Implement the needed methods below the viewDidLoad() method, so that your class looks like that:
Next, replace the tableView(_:viewForHeaderInSection) method with the implementation code:
Swift
/**
Dequeue the registered FUITableViewHeaderFooterView and force cast it to the respective class.
Again use a Switch-statement to distinguish between the different sections.
- Case 1: You want to see just the title for the Product section header
- Case 3: You want to see title and an attribute for the Customer section header.
- Default: Return the divider view.
*/overridefunctableView(_tableView:UITableView,viewForHeaderInSectionsection:Int)->UIView?{letheaderFooterView=tableView.dequeueReusableHeaderFooterView(withIdentifier:FUITableViewHeaderFooterView.reuseIdentifier)as!FUITableViewHeaderFooterViewswitchsection{case1:headerFooterView.style=.titleheaderFooterView.titleLabel.text=NSLocalizedString("Products",comment:"")returnheaderFooterViewcase3:headerFooterView.style=.attributeheaderFooterView.titleLabel.text=NSLocalizedString("Customers",comment:"")headerFooterView.attributeLabel.text=NSLocalizedString("See All(\(customers.count))",comment:"")headerFooterView.didSelectHandler={// TODO: Implement later}returnheaderFooterViewdefault:letdivider=UIView()divider.backgroundColor=.preferredFioriColor(forStyle:.separatorOpaque)returndivider}}
Replace the tableView(_:viewForFooterInSection) method with the following code:
Swift
/**
For the Footer you display a FUITableViewHeaderFooterView set to style attribute like the customer section header.
If it is not the product section then show an empty UIView.
*/overridefunctableView(_tableView:UITableView,viewForFooterInSectionsection:Int)->UIView?{ifsection==1{letheaderFooterView=tableView.dequeueReusableHeaderFooterView(withIdentifier:FUITableViewHeaderFooterView.reuseIdentifier)as!FUITableViewHeaderFooterViewheaderFooterView.didSelectHandler={// TODO: Implement later}headerFooterView.style=.attributeheaderFooterView.titleLabel.text=NSLocalizedString("See All",comment:"")headerFooterView.attributeLabel.text="\(products.count)"returnheaderFooterView}else{returnUIView(frame:CGRect(x:0,y:0,width:0,height:0))}}
Header Footer
Step 5Load customer and product data
+
Before you continue implementing the Table View’s data source and delegate methods, you go and implement the data loading methods.
Thanks to the generated data service and proxy classes, you don’t have to implement much to load data from the sample OData service.
You need to retrieve an instance of the ESPMContainer to be able to have access to the generated data layer. The data service is globally accessible through the onboarding session. Depending on how you generated your Xcode project you might support Online or Offline OData. This has an effect on what OData controller you use to retrieve the data service. Also importing the SharedFmwk is necessary to retrieve the data service as it holds information over the OData container which describes the model, and other central information of the OData service.
For Online OData
Add the following import statement to your class, if not already done:
Swift
importSAPODataimportSharedFmwk
Implement the following lines of code directly below the logger instance as class properties:
Swift
/// First retrieve the destinations your app can talk to from the AppParameters.letdestinations=FileConfigurationProvider("AppParameters").provideConfiguration().configuration["Destinations"]as!NSDictionary/// Create a computed property that uses the OnboardingSessionManager to retrieve the onboarding session and uses the destinations dictionary to pull the correct destination. Of course you only have one destination here. Handle the errors in case the OData controller is nil. You are using the AlertHelper to display an AlertDialogue to the user in case of an error. The AlertHelper is a utils class provided through the Assistant.vardataService:ESPMContainer<OnlineODataProvider>?{guardletodataController=OnboardingSessionManager.shared.onboardingSession?.odataControllers[ODataContainerType.eSPMContainer.description]as?ESPMContainerOnlineODataControllerelse{AlertHelper.displayAlert(with:"OData service is not reachable, please onboard again.",error:nil,viewController:self)returnnil}returnodataController.dataService}
Implement the following lines of code directly below the logger instance as class properties:
Swift
/// First retrieve the destinations your app can talk to from the AppParameters.letdestinations=FileConfigurationProvider("AppParameters").provideConfiguration().configuration["Destinations"]as!NSDictionaryvardataService:ESPMContainer<OfflineODataProvider>?{guardletodataController=OnboardingSessionManager.shared.onboardingSession?.odataControllers[ODataContainerType.eSPMContainer.description]as?ESPMContainerOfflineODataControllerelse{AlertHelper.displayAlert(with:"OData service is not reachable, please onboard again.",error:nil,viewController:self)returnnil}returnodataController.dataService}
To fetch available customers, implement the following method below the closing bracket of the viewDidLoad() method:
Swift
/**
First you define a DataQuery to perform an expand for the customer's sales orders.
This data query object you can simply pass into the fetchCustomers(:) method call. Handle the errors and display an Alert Dialogue to the user.
Using a DispatchGroup allows us to sequentially run background tasks and perform a certain action as soon as all tasks are completed. First you enter the group and you have to leave the group in any place where you return out of the block.
In case you retrieve data from the backend sort the customers by the amount of sales orders they have and set them to the array.
*/privatefuncfetchCustomers(_group:DispatchGroup){group.enter()letquery=DataQuery().expand(Customer.salesOrders)dataService?.fetchCustomers(matching:query){[weakself]result,errorinifleterror=error{AlertHelper.displayAlert(with:NSLocalizedString("Failed to load list of customers!",comment:""),error:error,viewController:self!)self?.logger.error("Failed to load list of customers!",error:error)group.leave()return}// sort the customer result set by the number of available sales orders by customer.self?.customers.append(contentsOf:result!.sorted(by:{$0.salesOrders.count>$1.salesOrders.count}))group.leave()}}
Next implement the method responsible for fetching all products. Add the following lines of code below the closing bracket of the fetchCustomers(_:) method:
Swift
/**
Handle the errors and display an Alert Dialogue to the user.
In case you retrieve data from the backend sort the customers by the amount of sales orders they have and set them to the array.
*/privatefuncfetchProducts(_group:DispatchGroup){group.enter()dataService?.fetchProducts(){[weakself]result,errorinifleterror=error{AlertHelper.displayAlert(with:NSLocalizedString("Failed to load list of products!",comment:""),error:error,viewController:self!)self?.logger.error("Failed to load list of products!",error:error)group.leave()return}self?.products.append(contentsOf:result!)group.leave()}}
Now let’s bring both of those methods together by implementing a loadData() method right above the fetchCustomers(_:) method.
Swift
/**
Show a loading indicator as soon as the method gets called.
Create a DispatchGroup and call both fetch methods and pass in the created group.
group.notify will be called as soon as both methods called group.leave(). If notify gets called execute the block which will hide the loading indicator, reload the data of the table view.
*/privatefuncloadData(){showFioriLoadingIndicator()letgroup=DispatchGroup()fetchCustomers(group)fetchProducts(group)group.notify(queue:DispatchQueue.main){self.hideFioriLoadingIndicator()self.tableView.reloadData()}}
The code won’t compile as you haven’t conformed to the SAPFioriLoadingIndicator protocol yet.
Let the OverviewTableViewController class conform to the SAPFioriLoadingIndicator protocol and implement the needed property:
Call the loadData() method as last statement in the viewDidLoad().
Step 6Implement cellForRowAt method
+
Now that you can fetch the needed data sets, you can go ahead and finish implementing the tableView(_:cellForRowAt:) method.
Before you do this you have to take care of the product image lazy loading. You’re going to use a simple image cache in the form of a Dictionary; also you need a property which holds the product image URLs.
Add the following lines of code directly above the product array class property:
To get the product image URLs, you need to add the following line of code to the fetchProducts(_:) method directly above the self?.products.append(contentsOf: result!) line:
Now you only have to implement the method responsible for loading the product images. Implement the following method directly below the closing bracket of the fetchProducts(_:) method:
Swift
/**
Retrieve an instance of the AppDelegate to get access to the SAPURLSession.
Safe unwrap the SAPURLSession with the help of a guard-statement.
Start a data task to download the image using the passed in URL. If the download task is completed check for errors. and safe the loaded image in the image cache.
Dispatch back to the main thread and pass the loaded image.
*/privatefuncloadImageFrom(_url:URL,completionHandler:@escaping(_image:UIImage)->Void){letappDelegate=UIApplication.shared.delegateas!AppDelegateifletsapURLSession=appDelegate.sessionManager.onboardingSession?.sapURLSession{sapURLSession.dataTask(with:url,completionHandler:{data,_,errorinifleterror=error{self.logger.error("Failed to load image!",error:error)return}ifletimage=UIImage(data:data!){// safe image in image cacheself.imageCache[url.absoluteString]=imageDispatchQueue.main.async{completionHandler(image)}}}).resume()}}
Before you can start dequeuing the needed cells, complete the viewDidLoad() method:
Swift[4-15]
override func viewDidLoad() {
    super.viewDidLoad()

    // Set the navigation item's title to "Overview".
    navigationItem.title = NSLocalizedString("Overview", comment: "")

    tableView.register(FUIObjectTableViewCell.self, forCellReuseIdentifier: FUIObjectTableViewCell.reuseIdentifier)
    tableView.register(FUICollectionViewTableViewCell.self, forCellReuseIdentifier: FUICollectionViewTableViewCell.reuseIdentifier)
    tableView.register(FUITableViewHeaderFooterView.self, forHeaderFooterViewReuseIdentifier: FUITableViewHeaderFooterView.reuseIdentifier)

    // To make sure the FUICollectionViewTableViewCell gets displayed correctly you set the estimated row height to 180 and the row height to automatic dimension which will allow the table view to resize the cell.
    tableView.estimatedRowHeight = 180
    tableView.rowHeight = UITableView.automaticDimension

    loadData()
}
Before you go ahead and implement the tableView(_:viewDidLoad:), you need to retrieve the URL of your service. The data task you’re going to use will use the URL to download the needed product images.
Open your Mobile Services instance and select your app configuration in the Native/Hybrid screen. There you click Mobile Sample OData ESPM in the Assigned Features section.
!MS APIs
The detail screen for the Mobile Sample OData ESPM will open. There you find the Runtime Root URL for this service, copy the whole URL as you will need it in a second.
!MS APIs
Let’s bring some life into our screen:
Swift[19]
override func tableView(_ tableView: UITableView, cellForRowAt indexPath: IndexPath) -> UITableViewCell {

  switch indexPath.section {
  case 1:
          // Get the needed product using the IndexPath and deque the FUIObjectTableViewCell.
          let product = products[indexPath.row]
          let productCell = tableView.dequeueReusableCell(withIdentifier: FUIObjectTableViewCell.reuseIdentifier) as! FUIObjectTableViewCell

          // Set the data to the dequeued cell.
          productCell.headlineText = product.name ?? "-"
          productCell.subheadlineText = product.categoryName ?? "-"

          // Show In Stock or Out of Stock depending on the available quantity of the product.
          productCell.footnoteText = product.stockDetails?.quantity?.intValue() != 0 ? NSLocalizedString("In Stock" , comment: "") : NSLocalizedString("Out of Stock", comment: "")
          // set a placeholder image
          productCell.detailImageView.image = FUIIconLibrary.system.imageLibrary

          // This URL is found in Mobile Services API tab and is needed to fetch the product images.
          let baseURL = <YOUR URL>
          let url = URL(string: baseURL.appending(productImageURLs[indexPath.row]))

          guard let unwrapped = url else {
              logger.info("URL for product image is nil. Returning cell without image.")
              return productCell
          }
          // check if the image is already in the cache
          if let img = imageCache[unwrapped.absoluteString] {
              productCell.detailImageView.image = img
          } else {
              // The image is not cached yet, so download it.
              loadImageFrom(unwrapped) { image in
                  productCell.detailImageView.image = image
              }
          }
          // Only visible on regular
          productCell.descriptionText = product.longDescription ?? ""

          productCell.accessoryType = .detailDisclosureButton

          return productCell
  case 3:
      let customerCollectionViewCell = tableView.dequeueReusableCell(withIdentifier: FUICollectionViewTableViewCell.reuseIdentifier) as! FUICollectionViewTableViewCell

      // The FUICollectionViewTableViewCell's collection view has a delegate and datasource as well. Your OverviewTableViewController will also provide those for the collection view.
      customerCollectionViewCell.collectionView.delegate = self
      customerCollectionViewCell.collectionView.dataSource = self

      // Use the horizontal scroll layout to display the customers horizontally with scroll enabled in the FUICollectionViewTableViewCell. Define the layouts parameters.
      let collectionViewLayout = FUICollectionViewLayout.horizontalScroll
      collectionViewLayout.minimumInteritemSpacing = CGFloat(16)
      collectionViewLayout.itemSize = CGSize(width: 120, height: 140)
      // Be aware of recommended margins in compact (left 16) and regular (left 48) mode
      customerCollectionViewCell.collectionView.contentInset = UIEdgeInsets(top: 16, left: 16, bottom: 16, right: 0)

      // Set the layout on the collection view and register the FUIItemCollectionViewCell
      customerCollectionViewCell.collectionView.collectionViewLayout = collectionViewLayout
      customerCollectionViewCell.collectionView.register(FUIItemCollectionViewCell.self, forCellWithReuseIdentifier: FUIItemCollectionViewCell.reuseIdentifier)


      return customerCollectionViewCell
  default:
      return UITableViewCell()
  }
}
Inside the just implemented method, assign the copied URL as String to the baseURL instead of <YOUR URL> placeholder.
At the moment the code won’t compile because your class doesn’t conform to the UICollectionViewDataSource or the UICollectionViewDelegate protocol.
To conform to these protocols you will implement a class extension where you will implement the protocol methods.
Swift Extensions are declared outside the class’s scope. Add the following extensions after the closing bracket of the OverviewTableViewController class:
Replace the collectionView(_:cellForItemAt:) method in the class extension:
Swift
funccollectionView(_collectionView:UICollectionView,cellForItemAtindexPath:IndexPath)->UICollectionViewCell{letcustomer=customers[indexPath.row]letcustomerCollectionViewCell=collectionView.dequeueReusableCell(withReuseIdentifier:FUIItemCollectionViewCell.reuseIdentifier,for:indexPath)as!FUIItemCollectionViewCellletcustomerName="\(customer.firstName??"")\(customer.lastName??"")"customerCollectionViewCell.title.text=customerNamecustomerCollectionViewCell.detailImageView.image=UIImage(systemName:"person",withConfiguration:UIImage.SymbolConfiguration(scale:.small))customerCollectionViewCell.detailImageView.isCircular=true// Use a Date Formatter to format the date to the medium styleifletcustomerDOB=customer.dateOfBirth{letdateFormatter=DateFormatter()dateFormatter.dateStyle=.mediumcustomerCollectionViewCell.subtitle.text="\(dateFormatter.string(from:customerDOB.utc()??Date()))"}returncustomerCollectionViewCell}
You are using a system image that can be found in the SF Symbols app. You can download the app for free from the Apple Developer website SF Symbols.
Step 8Add KPI Header to Table View
+
To make the overview screen complete, you’re going to add an FUIKPIHeader to the table view.
From the FUIKPIHeader documentation:
FUIKPIHeader extends UIView for a table view header displaying KPI items, of type FUIKPIView and FUIKPIProgressView.
A maximum of four KPI values can be displayed in the header, hence if more than four items are provided in the items
array as input to the header, only the first four are displayed and the rest of the items are ignored.
Create another class property declaring the KPI Header:
Swift
varkpiHeader:FUIKPIHeader!
Add a method for setting up the KPI Header, by implementing the following method directly below the viewDidLoad() method:
Swift
// MARK: - KPI HeaderprivatefuncsetupKPIHeader(){kpiHeader=FUIKPIHeader()// Create a new FUIKPIView displaying the customer satisfaction.letcustomerSatisfactionKPI=FUIKPIView()// Add a FUIKPIUnitItem for the unit and a FUIKPIMetricItem for the value itself. The value is mocked here as it is not existing in the OData service.customerSatisfactionKPI.items=[FUIKPIUnitItem(string:"%"),FUIKPIMetricItem(string:"82")]customerSatisfactionKPI.captionlabel.text=NSLocalizedString("Customer Satisfaction",comment:"")customerSatisfactionKPI.isEnabled=false// Create a new FUIKPIView displaying the sales order count.letsalesOrdersKPI=FUIKPIView()// Retrieve a list of the salesOrders overall.letsalesOrders=customers.flatMap{$0.salesOrders}salesOrdersKPI.items=[FUIKPIMetricItem(string:"\(salesOrders.count)")]salesOrdersKPI.captionlabel.text=NSLocalizedString("Sales Orders",comment:"")salesOrdersKPI.isEnabled=false// Add the items to the headerkpiHeader.items=[customerSatisfactionKPI,salesOrdersKPI]// Set the KPI Header as new table header view.tableView.tableHeaderView=kpiHeader}
Joule is an AI assistant. Generative AI may produce inaccurate, incomplete, or biased information. Always verify important details before acting on them.
Conversations are sent to SAP-hosted large language models for processing. Do not include personal data, credentials, or confidential information in your messages.
Joule's responses are based on the SAP tutorial catalog and may not reflect the latest product changes. For authoritative guidance, consult the linked tutorials and official SAP documentation.



