
Enable Multi-User Mode for Your Android Application
Learn how to configure a wizard-generated application to enable the multi-user mode, available as part of the Flows component of the Android SDK.
Overview
You will learn
- How the Android SDK supports multi-user mode
- How to enable multi-user mode for an online app
- How to enable multi-user mode for an offline app
- How to use several multi-user mode related APIs


Prerequisites
Prerequisites
- You have Set Up a BTP Account for Tutorials. Follow the instructions to get an account, and then to set up entitlements and service instances for the following BTP services.
- SAP Mobile Services
- You completed Try Out the SAP BTP SDK Wizard for Android.
- You completed Offline-Enable Your Android Application.
Steps
The Flows component of the SAP BTP SDK for Android provides the following functions to enable multi-user mode for your application:
Handle the onboarding process for multiple users.
Handle user information and user data management.
To enable multi-user for an application developed using Flows component, you only need follow the instructions at Try Out the SAP BTP SDK Wizard for Android to create a new application using the SAP BTP SDK Wizard for Android and check Enable Multiple Users for the Multiple Users on the Project Features tab. Or you can follow Step 2 and 3 to enable multi-user mode for online and offline, respectively.
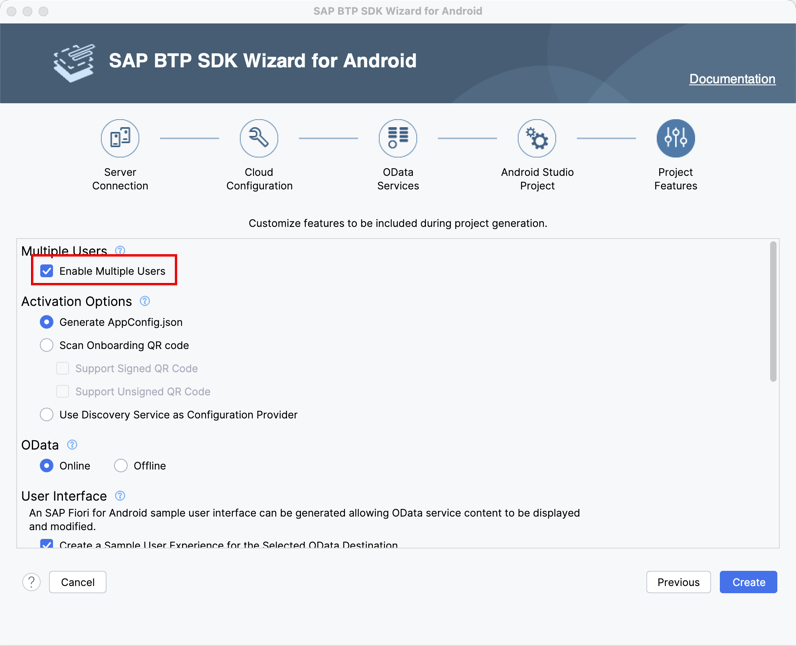
Enable multi-user mode
The following cases are not supported in multi-user mode:
Biometric authentication is not supported. The biometric screen will not be shown in the onboarding or unlock processes.
NoAuthauthentication type is not supported. Even if multi-user mode is turned on, an application using theNoAuthauthentication type will revert to single user mode.No passcode policyis not supported. A default passcode policy will be used if the server has disabled it.
Open the project you previously created using the SAP BTP SDK Wizard for Android.
On Windows, press
Ctrl+Shift+N, or on a Mac, presscommand+Shift+O, and typesap_mobile_services.jsonto opensap_mobile_services.json.Change the value of
multiUserfromfalsetotrue.Notice that the setting will only take effect when the very first user onboards. Once a user is onboarded, this setting will be saved in the local database. All subsequent flows will use the same setting from the database and ignore the one inside
sap_mobile_services.json. To change this setting, you need to reset the application to bring up the onboarding process, and the new setting will be updated in the local database after onboarding.Re-run (reset/uninstall first) the app and notice that the onboarding process is same as for single-user mode, except that no biometric authentication screen is shown. After onboarding, put the app in background until the sign in screen appears. In multi-user mode, there is a Switch or add user button at the bottom of the screen.

Sign in screen When the button is clicked, the user list is displayed. You can either select an existing user from the list or click the ADD USER icon at the right top of the screen. This will start the onboarding process for the new user.

User list screen
Open the project you previously created using the SAP BTP SDK Wizard for Android.
In Android Studio, on Windows, press
Ctrl+N, or on a Mac, presscommand+O, and typeWelcomeActivityto openWelcomeActivity.kt.On Windows, press
Ctrl+F12, or on a Mac, presscommand+F12, and typestartOnboardingto navigate to thestartOnboardingmethod. For theFlowContextinstance, change the parameter of thesetMultipleUserModemethod fromfalsetotrue:Kotlinval flowContext = FlowContextBuilder() .setApplication(appConfig) .setMultipleUserMode(true)Notice that the setting will only take effect when the very first user onboards. Once a user is onboarded, this setting will be saved in the local database. All subsequent flows will use the same setting from the database and ignore the one inside
flowContext. To change this setting, you need to reset the application to bring up the onboarding process, and the new setting will be updated in the local database after onboarding.On Windows, press
Ctrl+Shift+N, or on a Mac, presscommand+Shift+O, and typesap_mobile_services.jsonto opensap_mobile_services.json.Change the value of
multiUserfromfalsetotrue.Re-run (reset/uninstall first) the app and notice that the onboarding process is same as for single-user mode, except that no biometric authentication screen is shown. After onboarding, put the app in background until the sign in screen appears. In multi-user mode, there is a Switch or add user button at the bottom of the screen.

Sign in screen When the button is clicked, the user list is displayed. You can either select an existing user from the list or click the ADD USER icon at the right top of the screen. This will start the onboarding process for the new user.

User list screen
For an offline application, you have to enable the Allow Upload of Pending Changes from Previous User option on the server side first. Go to the SAP Mobile Services cockpit and select your application from the application list. Click Client Settings in the general settings list:
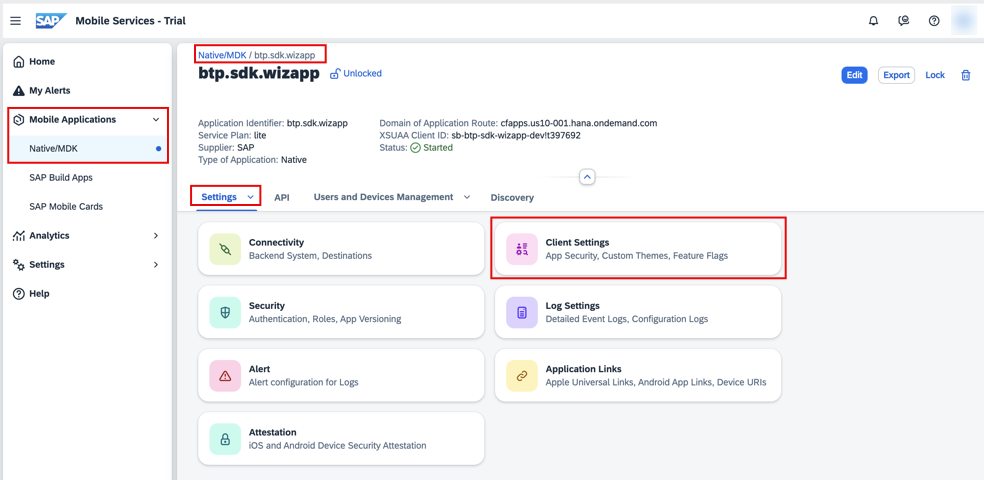
Cockpit app screen Scroll down to the bottom of the Client Configuration tab and enable the Allow Upload of Pending Changes from Previous User option (remember to click Save to save the change):
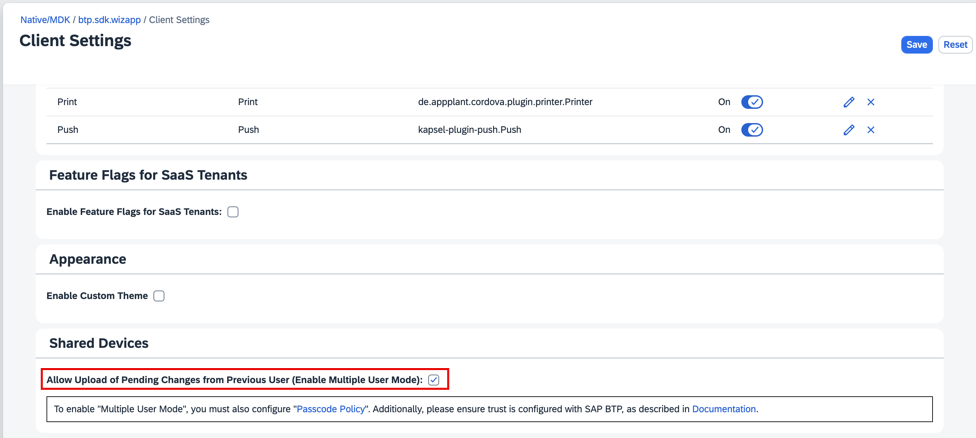
Cockpit app setting screen Open the project you previously created using the SAP BTP SDK Wizard for Android.
Enable
multiUserinsap_mobile_services.jsonsame as online app.In Android Studio, on Windows, press
Ctrl+N, or on a Mac, presscommand+O, and typeOfflineWorkerUtilto openOfflineWorkerUtil.kt.On Windows, press
Ctrl+F12, or on a Mac, presscommand+F12, and typeinitializeOfflineto navigate to theinitializeOfflinemethod. Notice that for theOfflineODataParametersinstance, the value of theisForceUploadOnUserSwitchparameter is set based on the value ofruntimeMultipleUserMode. This value is retrieved from theUserSecureStoreDelegate.getInstance().getRuntimeMultipleUserMode()API call inOfflineOpenViewModel.kt.Kotlin/* * Create OfflineODataProvider * This is a blocking call, no data will be transferred until open, download, upload * @return if initialization needed */ suspend fun initializeOffline( context: Context, appConfig: AppConfig, runtimeMultipleUserMode: Boolean ): Boolean { ... try { val url = URL(serviceUrl + CONNECTION_ID_ESPMCONTAINER) val offlineODataParameters = OfflineODataParameters().apply { ... isForceUploadOnUserSwitch = runtimeMultipleUserMode val encryptionKey = if (runtimeMultipleUserMode) { UserSecureStoreDelegate.getInstance().getOfflineEncryptionKey() } else { //If is single user mode, create and save a key into user secure store for accessing offline DB ... } storeEncryptionKey = encryptionKey }.also { ... } logger.debug("start init offline odata provider") ... return true } catch (e: Exception) { logger.error("Exception encountered setting up offline store: " + e.message) throw e } }In
OfflineOpenViewModel.kt:Kotlininit { viewModelScope.launch(Dispatchers.Default) { val isMultipleUserMode = UserSecureStoreDelegate.getInstance().getRuntimeMultipleUserMode() val appConfig = FlowContextRegistry.flowContext.appConfig if (OfflineWorkerUtil.initializeOffline(application, appConfig, isMultipleUserMode)) { startOpenOffline() } else { _uiState.update { currentState -> currentState.copy( result = OpenResult.OpenSuccess() ) } } } }Unlike the single-user mode scenario, the encryption key is not generated by the client code, but rather retrieved from the server by SDK. Client code can acquire the key using the
UserSecureStoreDelegate.getInstance().getOfflineEncryptionKey()API call.Re-run (reset/uninstall first) the app. Notice that the onboarding process and add/switch user process are the same as for the online app.
For an offline application, you have to enable the Allow Upload of Pending Changes from Previous User option on the server side first. Go to the SAP Mobile Services cockpit and select your application from the application list. Click Client Settings in the general settings list:
Cockpit app screen Scroll down to the bottom of the Client Configuration tab and enable the Allow Upload of Pending Changes from Previous User option (remember to click Save to save the change):
Cockpit app setting screen Open the project you previously created using the SAP BTP SDK Wizard for Android.
Enable
setMultipleUserModeforFlowContextinstance same as online app.Enable
multiUserinsap_mobile_service.jsonsame as online app.In Android Studio, on Windows, press
Ctrl+N, or on a Mac, presscommand+O, and typeOfflineWorkerUtilto openOfflineWorkerUtil.kt.On Windows, press
Ctrl+F12, or on a Mac, presscommand+F12, and typeinitializeOfflineto navigate to theinitializeOfflinemethod. Notice that for theOfflineODataParametersinstance, the value of theisForceUploadOnUserSwitchparameter is set based on the value ofruntimeMultipleUserMode. This value is retrieved from theUserSecureStoreDelegate.getInstance().getRuntimeMultipleUserModeAsync()API call inMainBusinessActivity.kt.Kotlin/* * Create OfflineODataProvider * This is a blocking call, no data will be transferred until open, download, upload */ @JvmStatic fun initializeOffline( context: Context, appConfig: AppConfig, runtimeMultipleUserMode: Boolean ) { ... try { ... val offlineODataParameters = OfflineODataParameters().apply { ... isForceUploadOnUserSwitch = runtimeMultipleUserMode val encryptionKey = if (runtimeMultipleUserMode) { UserSecureStoreDelegate.getInstance().getOfflineEncryptionKey() } else { //If is single user mode, create and save a key into user secure store for accessing offline DB ... } storeEncryptionKey = encryptionKey }.also { ... } ... } catch (e: Exception) { logger.error("Exception encountered setting up offline store: " + e.message) } }In
MainBusinessActivity.kt:Kotlinoverride fun onResume() { super.onResume() ... spforLockAndWipe.getString(SAPWizardApplication.LOCK_WIPE_INVOKING_FLAG, null)?.let { spforLockAndWipe.edit().remove(SAPWizardApplication.LOCK_WIPE_INVOKING_FLAG).apply() } ?: run { ... val isMultipleUserMode = UserSecureStoreDelegate.getInstance().getRuntimeMultipleUserModeAsync() == true ... OfflineWorkerUtil.initializeOffline(application, appConfig, isMultipleUserMode) ... } }Unlike the single-user mode scenario, the encryption key is not generated by the client code, but rather retrieved from the server by SDK. Client code can acquire the key using the
UserSecureStoreDelegate.getInstance().getOfflineEncryptionKey()API call.Re-run (reset/uninstall first) the app. Notice that the onboarding process and add/switch user process are the same as for the online app.
In the offline multi-user mode scenario, when a user makes changes to the local offline store, the changes may not be uploaded to the server when the device is handed over to another user. After the new user clicks Switch or add user button to sign in or do onboarding, the pending changes will be uploaded to the server automatically.
If there is an error during synchronization, a screen will be displayed, notifying the user about the synchronization failure.
If synchronization failed because there is no internet connection, a network error screen will be displayed.

Offline network error screen If synchronization failed due to a transaction issue, a transaction error screen will be displayed.
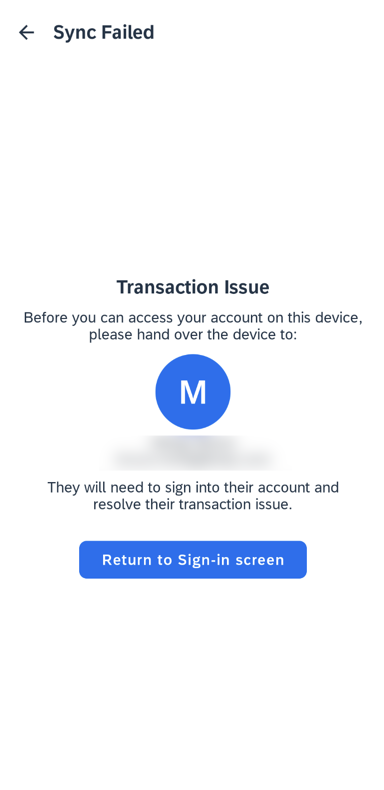
Offline transaction error screen The SDK provides a UI component for the two screens and apps can reference the screens to provide error handling.
For the Offline Network Error Screen, the client code implements the logic for button click events.
On Windows, press
Ctrl+Shift+N, or on a Mac, presscommand+shift+O, and typeOfflineSyncScreento openOfflineSyncScreen.kt.On Windows, press
Ctrl+F, or on a Mac, presscommand+F, and typeSyncFailureType.NETWORK_ERRORto move to the network error handling. When the network error occurs, make the Offline Network Error Screen visible and provide your logic for the button click event.KotlinOfflineNetworkIssueScreen( onBackButtonClick = navigateToWelcome, onMainButtonClick = viewModel::startOpenOffline )For Offline Transaction Issue Screen, the client code needs to set the user information of previous user and implement the logic for button click events.
On Windows, press
Ctrl+F, or on a Mac, presscommand+F, and typeSyncFailureType.TRANSACTION_ISSUEto move to the transaction issue handling. When the transaction issue occurs, make the Offline Transaction Issue Screen visible, set the information of the previous user and provide your logic for the button click event. To get the information of the previous user, call thegetPreviousUsermethod of theOfflineOpenViewModelclass.KotlinviewModel.previousUser?.let { OfflineTransactionIssueScreen( userName = it.name, email = it.email, onBackButtonClick = navigateToWelcome, onMainButtonClick = navigateToWelcome ) } ?: throw IllegalStateException("Unexpected offline transaction issue without previous user")
In the offline multi-user mode scenario, when a user makes changes to the local offline store, the changes may not be uploaded to the server when the device is handed over to another user. After the new user clicks Switch or add user button to sign in or do onboarding, the pending changes will be uploaded to the server automatically.
If there is an error during synchronization, a screen will be displayed, notifying the user about the synchronization failure.
If synchronization failed because there is no internet connection, a network error screen will be displayed.
Offline network error screen If synchronization failed due to a transaction issue, a transaction error screen will be displayed.

Offline transaction error screen The SDK provides a UI component for the two screens and apps can reference the screens to provide error handling.
Open the project you previously created using the SAP BTP SDK Wizard for Android, press
Shifttwice and typeactivity_main_business.xmlto openres\layout\activity_main_business.xml. To reference the two screens, the layout XML file includescom.sap.cloud.mobile.fiori.onboarding.OfflineNetworkErrorScreenandcom.sap.cloud.mobile.fiori.onboarding.OfflineTransactionIssueScreen.For the Offline Network Error Screen, the client code implements the logic for button click events.
On Windows, press
Ctrl+N, or, on a Mac, presscommand+O, and typeMainBusinessActivityto openMainBusinessActivity.kt.On Windows, press
Ctrl+F12, or, on a Mac, presscommand+F12, and typeofflineNetworkErrorActionto move to theofflineNetworkErrorActionmethod. When the network error occurs, make the Offline Network Error Screen visible and provide your logic for the button click event.Kotlinprivate fun offlineNetworkErrorAction() { this@MainBusinessActivity.runOnUiThread { binding.offlineNetworkErrorScreen.visibility = View.VISIBLE binding.offlineInitSyncScreen.visibility = View.INVISIBLE binding.mainBusResumeProgressBar.visibility = View.INVISIBLE val offlineNetworkErrorScreenSettings = OfflineNetworkErrorScreenSettings.Builder().build() with(binding.offlineNetworkErrorScreen) { initialize(offlineNetworkErrorScreenSettings) // Provide logic for the button click event setButtonClickListener(View.OnClickListener { OfflineWorkerUtil.addProgressListener(progressListener) OfflineWorkerUtil.open(application) startEntitySetListActivity() supportActionBar?.setTitle(R.string.initializing_offline_store) binding.offlineNetworkErrorScreen.visibility = View.INVISIBLE binding.offlineInitSyncScreen.visibility = View.VISIBLE }) } } }For Offline Transaction Issue Screen, the client code needs to set the user information of previous user and implement the logic for button click events.
On Windows, press
Ctrl+F12, or, on a Mac, presscommand+F12, and typeofflineTransactionIssueActionto move to theofflineTransactionIssueActionmethod. When the transaction error occurs, make the Offline Transaction Issue Screen visible, set the information of the previous user and provide your logic for the button click event. To get the information of the previous user, call thegetPreviousUserDetailsmethod from the flow context.Kotlinprivate fun offlineTransactionIssueAction() { this@MainBusinessActivity.runOnUiThread { binding.offlineTransactionIssueScreen.visibility = View.VISIBLE binding.offlineInitSyncScreen.visibility = View.INVISIBLE binding.mainBusResumeProgressBar.visibility = View.INVISIBLE val offlineTransactionIssueScreenSettings = OfflineTransactionIssueScreenSettings.Builder().build() with(binding.offlineTransactionIssueScreen) { initialize(offlineTransactionIssueScreenSettings) CoroutineScope(IO).launch { val user = FlowContextRegistry.flowContext.getPreviousUserDetails() withContext(Main) { user?.let { setPrevUserName(it.name) setPrevUserMail(it.email) } ?: run { setPrevUserName(OfflineWorkerUtil.offlineODataProvider!!.previousUser) } } } } binding.offlineTransactionIssueScreen.setButtonClickListener(View.OnClickListener { startActivity(Intent(this, WelcomeActivity::class.java).apply { addFlags(Intent.FLAG_ACTIVITY_NEW_TASK or Intent.FLAG_ACTIVITY_CLEAR_TOP) }) }) } }
The Flows-Compose component exposes one API in the
UserSecureStoreDelegateclass for you to acquire user information by ID, such as user name and email:suspend fun getUserInfoById(userId: String): DeviceUser?Notice that this function can only be called after the onboarding or restore flow.
After onboarding, the setting for multi-user mode enablement is saved in the local database. To get this setting, the
UserSecureStoreDelegateclass exposes the following API:suspend fun getRuntimeMultipleUserMode(): BooleanThe Flows component expose the following API in
FlowContextclass for you to acquire the details of the previous user, such as user name and email:fun getPreviousUser() : DeviceUser?The Flows component exposes one API in
FlowActionHandlerclass for you to customize the user information displayed on the Sign-in and user list screens, that will obfuscate the user name and email by default:open fun customizeSignInScreenUserInfo(user: DeviceUser): SignInScreenUserInfoNotice that a default obfuscate algorithm is provided in the APIs. You can override the APIs to provide your own obfuscate algorithm.
The
FlowStateListenerclass provides one callback,onOfflineEncryptionKeyReady(key: String?), for you to handle the encryption key ready event.
The Flows component exposes two APIs in the
UserSecureStoreDelegateclass for you to acquire user information by ID, such as user name and email:fun getUserInfoByIdAsync(userId: String) : DeviceUser?suspend fun getUserInfoById(userId: String): DeviceUser?The
getUserInfoByIdAsyncfunction is mainly used by the Java code. Notice that this function can only be called after the onboarding or restore flow.After onboarding, the setting for multi-user mode enablement is saved in the local database. To get this setting, the
UserSecureStoreDelegateclass exposes the following API:suspend fun getRuntimeMultipleUserMode(): Boolean?fun getRuntimeMultipleUserModeAsync(): Boolean?The
getRuntimeMultipleUserModeAsyncfunction is mainly used by the Java code.The Flows component expose the following API in
FlowContextclass for you to acquire the details of the previous user, such as user name and email:fun getPreviousUserDetails() : DeviceUser?The Flows component exposes two APIs in
FlowActionHandlerclass for you to obfuscate the user name and email displayed on the Sign-in screen:open fun obfuscateUserName(name: String): Stringopen fun obfuscateEmail(email: String): StringNotice that a default obfuscate algorithm is provided in the APIs. You can override the APIs to provide your own obfuscate algorithm.
The
FlowStateListenerclass provides one callback,onOfflineEncryptionKeyReady(key: String?), for you to handle the encryption key ready event.As a sample implementation of this callback, you can examine a wizard-generated offline app. In Android Studio, on Windows, press
Ctrl+N, or on a Mac, presscommand+O, and typeWizardFlowStateListenerto openWizardFlowStateListener.kt.On Windows, press
Ctrl+F12, or on a Mac, presscommand+F12, and typeonOfflineEncryptionKeyReadyto navigate to theonOfflineEncryptionKeyReadymethod. Examine the code and notice that it does some clean and reset work:Kotlinoverride fun onOfflineEncryptionKeyReady(key: String?) { logger.info("offline key ready.") userSwitchFlag = if (!application.preferenceManager.getBoolean(OfflineWorkerUtil.PREF_DELETE_REGISTRATION, false)) { flowContext.getPreviousUserId()?.let { flowContext.getCurrentUserId() != it } ?: false } else { application.preferenceManager.edit().putBoolean(OfflineWorkerUtil.PREF_DELETE_REGISTRATION, false).apply(); OfflineWorkerUtil.resetOffline(application) true } OfflineWorkerUtil.userSwitchFlag = userSwitchFlag /* * In single user scenario, * if offline data store initialized and its encryption key not found, * close and remove offline data store, meanwhile, set userSwitchFlag to true to trigger some important setting */ if (UserSecureStoreDelegate.getInstance().getRuntimeMultipleUserModeAsync() == false && application.preferenceManager.getBoolean(OfflineWorkerUtil.PREF_OFFLINE_INITIALIZED, false) && UserSecureStoreDelegate.getInstance().getData<String>(OfflineWorkerUtil.OFFLINE_DATASTORE_ENCRYPTION_KEY) == null) { userSwitchFlag = true OfflineWorkerUtil.resetOffline(application) } if (userSwitchFlag) { application.preferenceManager.apply { edit().putBoolean(OfflineWorkerUtil.PREF_OFFLINE_INITIALIZED, false) .apply() } application.repositoryFactory.reset() OfflineWorkerUtil.offlineODataProvider?.close() OfflineWorkerUtil.resetOfflineODataProvider() } }You can provide your own logic in this callback.
Congratulations! You have learned how to enable multi-user mode for your android applications!
Resources
Discussion
Share feedback on this tutorial or join the conversation in SAP Community.