
Overview
You will learn
- how to extend all of the involved components for the marketing campaign planning in order to allocate activity costs across multiple periods
- how to add additional properties to SAP Analytics Cloud dimensions
- how to change user interface elements in SAP Analytics Cloud stories
- how to change script functions in SAP Analytics Cloud stories
- how to adapt data actions SAP Analytics Cloud SAC


Prerequisites
Prerequisites
- Have an SAP Analytics Cloud tenant available with Planning enabled and a user with admin rights for it
- Import the xP&A Commercial Planning content as described in xP&A Commercial Planning - Get to know the Marketing Planning module
Steps
Intro
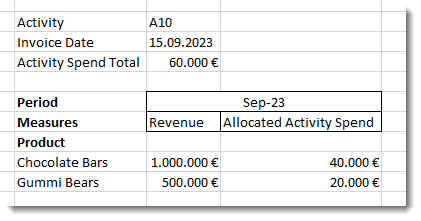
In the default content for marketing campaign planning, when planning a marketing activity, the marketing activity spend is allocated to a particular period only which is derived from the user input entered in the invoice date field. This is how the activity form looks by default:

The activity spend is then allocated according to the individual products revenues chosen during activity creation.
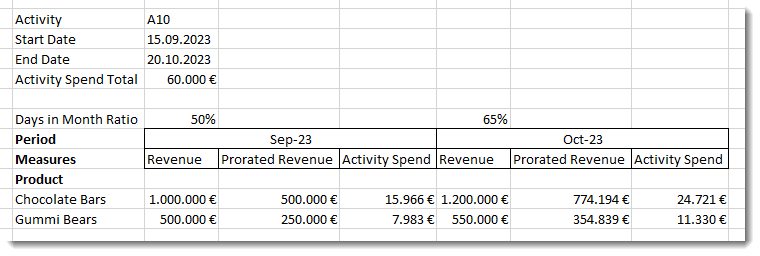
This tutorial will enable you to extend the concept to allocate marketing activity spend to a time period based on a start and end date provided by the user. The updated form will look like this:

The activity spend is then split/allocated according to the prorated product revenues for each product according to the number of days of each involved period within the chosen time interval.
To achieve this you will need to go though all components of the content:
- Data model (attributes of marketing activity time dimension)
- UI (Story and Scripting)
- Data action (adjust to do the prorating and allocation across a time interval)
So let us get started.
Have a look at the properties of the dimension Marketing Activity (SAP_MKT_CampaignActivity). To store the start and end date for an activity entered by the user we will need to extend the properties for the marketing activity dimension.
Open the marketing planning model Marketing Planning (SAP_MKT_IM_MarketingPlanning), searching for it in the file browser of SAP Analytics Cloud.

In the dimension on the left-hand side, click on the entry for Marketing Campaign Activity (SAP_MKT_CampaignActivity) to open the dimension details on the right-hand side.

On the right-hand side in the Properties list, click on the “+” to add two new properties.
| Id | Description | Type | Length |
|---|---|---|---|
StartDate | Start Date | Text | 10 |
EndDate | End Date | Text | 10 |
Enter the needed values and click on Create to close the property editor

Repeat the same to add the property EndDate.
Once you are done, click the Save icon to save the model.
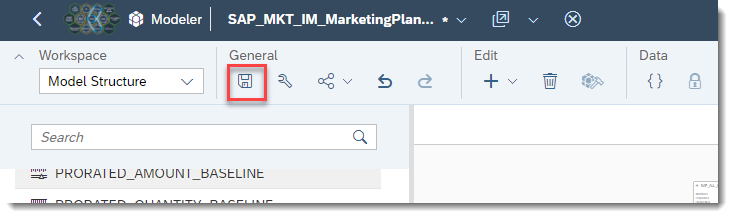
Now you have two properties to store the start and end date for the marketing activity.

As a next step, you will need to adjust the data action that allocates the activity spend according to the start- and end dates entered. While the prorating is done according to the dates set as attributes of the marketing activity, the parameters are passed to the data action on a month/period level derived from these dates.
In the File explorer search for data action Maintain Marketing Campaign Activity (SAP_MKT_IM_MarketingPlanning_MaintainActivity) and open it. This is the data action that is being called when you create or edit a marketing activity.

You will need to add additional parameters for the start and end period to the data action. Click on the parameter icon to open the list of parameters available for the data action.

As the parameter for the InvoiceDate will not be needed anymore, change it to become the parameter for the start period.
Click on the change icon next to the parameter.

Change the Id and Name for Prompt field to StartPeriod. While you are here you can also remove the Default Member currently set to P04.2024 by marking it with your mouse and pressing the Delete/DEL key on your keyboard.
Once you have made the changes click on Done.

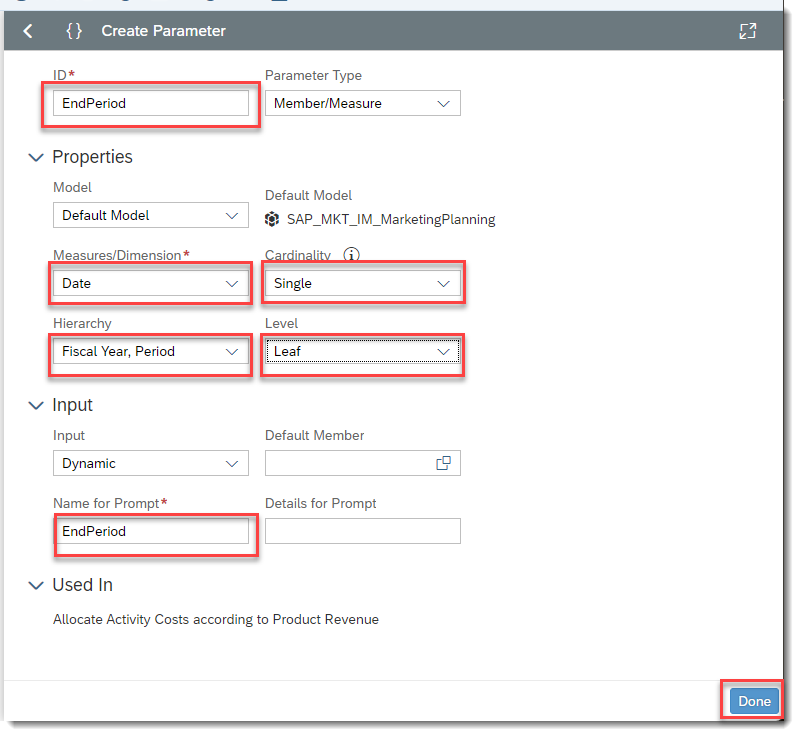
Now you will need to create a new parameter for the end date. Click on the Create Parameter below the parameter list.
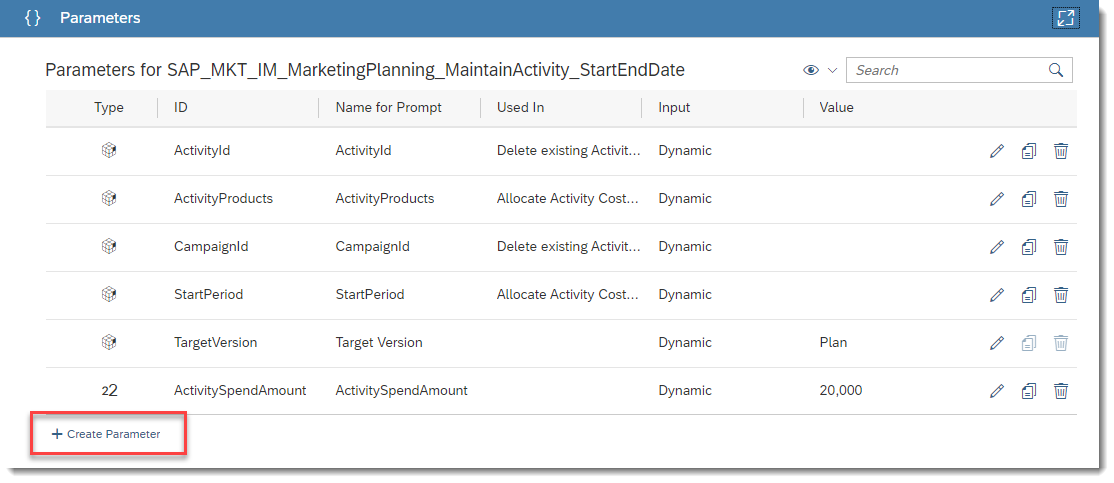
Enter the parameter details as follows and click on Done to save and close the new parameter.
While you are looking at the parameter list you can also delete the parameter for the ActivitySpendAmount as we will use the ATTRIBUTE function in the updated version of the data action. Click on the trash can icon next to it to delete it.

Now that you have the data action in place, make sure that these parameters are being used and the proration is set up correctly (similarly to the one for campaigns).
As this requires multiple changes across the second data action step, go ahead and click on the step called Allocated Activity Costs according to Product Revenue and replace everything in this step with the script provided below:

		```
		CONFIG.HIERARCHY = [d/SAP_ALL_PRODUCT].[h/Hierarchy4],[d/SAP_MKT_MarketingCampaign].[h/Hierarchy2], [d/SAP_MKT_MarketingActivity].[h/Hierarchy2]

		CONFIG.HIERARCHY.INCLUDE_MEMBERS_NOT_IN_HIERARCHY=
		[d/SAP_ALL_COMPANY_CODE],
		[d/t.S:SAP_ALL_SALESORGANISATION],
		[d/SAP_FI_IFP_QUANTITY_UNIT],
		[d/t.S:SAP_ALL_PLANT],
		[d/SAP_FI_XPA_GLAccount],
		[d/SpendType],
		[d/Driver]

		MEMBERSET [d/SAP_ALL_PRODUCT] = BASEMEMBER([d/SAP_ALL_PRODUCT], %ActivityProducts%)
		MEMBERSET [d/Date] = %StartPeriod% To %EndPeriod%
		MEMBERSET [d/SAP_MKT_MarketingCampaign] = %CampaignId%
		MEMBERSET [d/SAP_MKT_MarketingActivity] = %ActivityId%
		MEMBERSET [d/SAP_FI_XPA_GLAccount] = ("41000000", "MARKETING_ACTIV_COST") //Revenue and Marketing Expenses
		MEMBERSET [d/Driver] = "#"
		MEMBERSET [d/SAP_FI_IFP_QUANTITY_UNIT] = "PC"
		MEMBERSET [d/Measures] = ("AMOUNT","ACT_USER_SELECTION","PRORATED_AMOUNT_BASELINE_EXP","ACT_ALLOC_DRIVER")

		VARIABLEMEMBER #TotalWeightedRevenue OF [d/Measures]

		// "Mark all products initially set by user for the activity
		DATA([d/Measures] = "ACT_USER_SELECTION",
				[d/SAP_ALL_COMPANY_CODE] = [d/SAP_MKT_MarketingCampaign].[p/CompanyCode],
				[d/t.S:SAP_ALL_SALESORGANISATION] = "#",
				[d/t.S:SAP_ALL_PLANT] = "#",
				[d/SAP_MKT_MarketingCampaign] = %CampaignId%,
				[d/SAP_MKT_MarketingActivity] = %ActivityId%,
				[d/SAP_FI_XPA_GLAccount] = "41000000",
			//	[d/SAP_ALL_PRODUCT],
			//	[d/Date],
				[d/SpendType] = "#",
				[d/Driver] = "baseLine",
				[d/SAP_FI_IFP_QUANTITY_UNIT] = "#") = 1

		// Store Driver for recalculation of all Activities with start- and end date
		DATA([d/Measures] = "ACT_ALLOC_DRIVER",
				[d/SAP_ALL_COMPANY_CODE] = [d/SAP_MKT_MarketingCampaign].[p/CompanyCode],
				[d/t.S:SAP_ALL_SALESORGANISATION] = "#",
				[d/t.S:SAP_ALL_PLANT] = "#",
				[d/SAP_MKT_MarketingCampaign] = %CampaignId%,
				[d/SAP_MKT_MarketingActivity] = %ActivityId%,
			//	[d/SAP_ALL_PRODUCT],
			//	[d/Date],
				[d/SAP_FI_XPA_GLAccount] = "MARKETING_ACTIV_COST",
				[d/SpendType] = "#",
				[d/Driver] = "#",
				[d/SAP_FI_IFP_QUANTITY_UNIT] = "#") = DATERATIO([d/SAP_MKT_MarketingActivity].[p/StartDate], [d/SAP_MKT_MarketingActivity].[p/EndDate], [d/Date])


		//Determine prorated Baseline Revenue
			DATA([d/Measures] = "PRORATED_AMOUNT_BASELINE_EXP",
				[d/SAP_ALL_COMPANY_CODE] = [d/SAP_MKT_MarketingCampaign].[p/CompanyCode],
				[d/SAP_FI_XPA_GLAccount] = "41000000",
				[d/SpendType] = "#",
				[d/Driver] = "#") =

			Round(
			// Baseline revenue for products
			RESULTLOOKUP([d/Measures] = "AMOUNT",
						[d/SAP_ALL_COMPANY_CODE] = [d/SAP_MKT_MarketingCampaign].[p/CompanyCode],
						[d/SAP_MKT_MarketingCampaign] = "#",
						[d/SAP_MKT_MarketingActivity] = "#",
						[d/SAP_FI_XPA_GLAccount] = "41000000",
						[d/Driver] = "baseLine",
						[d/SpendType] = "#")
						//All Products in Scope
						*
			//Date ratio driver per period
			RESULTLOOKUP([d/Measures] = "ACT_ALLOC_DRIVER",
					[d/SAP_ALL_COMPANY_CODE] = [d/SAP_MKT_MarketingCampaign].[p/CompanyCode],
					[d/t.S:SAP_ALL_SALESORGANISATION] = "#",
					[d/t.S:SAP_ALL_PLANT] = "#",
					[d/SAP_MKT_MarketingCampaign] = %CampaignId%,
					[d/SAP_MKT_MarketingActivity] = %ActivityId%,
					//	[d/SAP_ALL_PRODUCT],
					//	[d/Date],
					[d/SAP_FI_XPA_GLAccount] = "MARKETING_ACTIV_COST",
					[d/SpendType] = "#",
					[d/Driver] = "#",
					[d/SAP_FI_IFP_QUANTITY_UNIT] = "#"),3 )

		// Determine Total Weighted Revenue across all products/periods
		DATA([d/Measures] = #TotalWeightedRevenue,
			[d/SAP_ALL_PRODUCT] = "#",
			[d/Date] = %StartPeriod%,
			[d/SAP_ALL_COMPANY_CODE] = [d/SAP_MKT_MarketingCampaign].[p/CompanyCode],
			[d/t.S:SAP_ALL_SALESORGANISATION] = "#",
			[d/t.S:SAP_ALL_PLANT] = "#",
			[d/SAP_FI_XPA_GLAccount] = "41000000")
		=
		RESULTLOOKUP([d/Measures] = "PRORATED_AMOUNT_BASELINE_EXP",
						[d/SAP_ALL_COMPANY_CODE] = [d/SAP_MKT_MarketingCampaign].[p/CompanyCode],
						[d/SAP_FI_XPA_GLAccount] = "41000000",
						[d/SpendType] = "#",
						[d/Driver] = "#")

		// Allocate Activity Spend Amount to individual products/periods based on contribution to overall revenue
		DATA([d/Measures] = "AMOUNT",
			[d/SAP_ALL_COMPANY_CODE] = [d/SAP_MKT_MarketingCampaign].[p/CompanyCode],
			[d/SAP_FI_XPA_GLAccount] = "MARKETING_ACTIV_COST",
			[d/SpendType] = [d/SAP_MKT_MarketingActivity].[p/SpendType] ) =

		RESULTLOOKUP([d/Measures] = "PRORATED_AMOUNT_BASELINE_EXP",
						[d/SAP_ALL_COMPANY_CODE] = [d/SAP_MKT_MarketingCampaign].[p/CompanyCode],
						[d/SAP_FI_XPA_GLAccount] = "41000000") /

		RESULTLOOKUP([d/Measures] = #TotalWeightedRevenue,
			[d/SAP_ALL_COMPANY_CODE] = [d/SAP_MKT_MarketingCampaign].[p/CompanyCode],
			[d/SAP_ALL_PRODUCT] = "#",
			[d/Date] = %StartPeriod%,
			[d/t.S:SAP_ALL_SALESORGANISATION] = "#",
			[d/t.S:SAP_ALL_PLANT] = "#",
			[d/SAP_FI_XPA_GLAccount] = "41000000")

		* ATTRIBUTE([d/SAP_MKT_MarketingActivity].[p/ActivitySpendAmount])
		```
Click on the Save icon to have your updated data action saved.

Do not skip this step, in case you also use the Marketing Demand Planning story to plan total demand values which will have an effect on the baseline quantities as well as on the driver quantities like campaign lift, market share etc.
Changed baseline quantities and respective revenues might have an impact on the allocation of activity spend across products, hence after a change all activities will need to be recalculated. So you will also need to take care of the data action that recalculates all planned marketing activities to reconcile the spend across products.
Go into the File explorer and search for data action Recalculate all activities (SAP_MKT_IM_MarketingPlanning_RecalculateActivities).

Click on the step Recalculate all Activities and replace the whole script in the editor with the one provided in the box below.

		```
		CONFIG.HIERARCHY = [d/SAP_ALL_PRODUCT].[h/Hierarchy4],[d/SAP_MKT_MarketingCampaign].[h/Hierarchy2], [d/SAP_MKT_MarketingActivity].[h/Hierarchy2]

		CONFIG.HIERARCHY.INCLUDE_MEMBERS_NOT_IN_HIERARCHY=
		[d/SAP_ALL_COMPANY_CODE],
		[d/t.S:SAP_ALL_SALESORGANISATION],
		[d/SAP_FI_IFP_QUANTITY_UNIT],
		[d/t.S:SAP_ALL_PLANT],
		[d/SAP_FI_XPA_GLAccount],
		[d/SpendType],
		[d/Driver]

		MEMBERSET [d/SAP_MKT_MarketingCampaign] != "#"
		MEMBERSET [d/SAP_MKT_MarketingActivity] != "#"
		MEMBERSET [d/SAP_FI_XPA_GLAccount] = ("41000000", "MARKETING_ACTIV_COST") //Revenue and Marketing Expenses
		MEMBERSET [d/Driver] = "#"
		MEMBERSET [d/SAP_FI_IFP_QUANTITY_UNIT] = "PC"
		MEMBERSET [d/Measures] = ("AMOUNT","PRORATED_AMOUNT_BASELINE_EXP","ACT_ALLOC_DRIVER")

		VARIABLEMEMBER #myDate OF  [d/Date]
		VARIABLEMEMBER #TotalWeightedRevenue OF [d/Measures]

		//Determine weighted Baseline Revenue
			DATA([d/Measures] = "PRORATED_AMOUNT_BASELINE_EXP",
				[d/SAP_ALL_COMPANY_CODE] = [d/SAP_MKT_MarketingCampaign].[p/CompanyCode],
				[d/SAP_FI_XPA_GLAccount] = "41000000",
				[d/SpendType] = "#",
				[d/Driver] = "#") =

			Round(
			// Baseline revenue for products
			RESULTLOOKUP([d/Measures] = "AMOUNT",
						[d/SAP_ALL_COMPANY_CODE] = [d/SAP_MKT_MarketingCampaign].[p/CompanyCode],
						[d/SAP_MKT_MarketingCampaign] = "#",
						[d/SAP_MKT_MarketingActivity] = "#",
						[d/SAP_FI_XPA_GLAccount] = "41000000",
						[d/Driver] = "baseLine",
						[d/SpendType] = "#")
						//All Products in Scope
						*
			//date ratio driver per period
			RESULTLOOKUP([d/Measures] = "ACT_ALLOC_DRIVER",
					[d/SAP_ALL_COMPANY_CODE] = [d/SAP_MKT_MarketingCampaign].[p/CompanyCode],
					[d/t.S:SAP_ALL_SALESORGANISATION] = "#",
					[d/t.S:SAP_ALL_PLANT] = "#",
				//	[d/SAP_MKT_MarketingCampaign]
				//	[d/SAP_MKT_MarketingActivity]
				//	[d/SAP_ALL_PRODUCT],
				//	[d/Date],
					[d/SAP_FI_XPA_GLAccount] = "MARKETING_ACTIV_COST",
					[d/SpendType] = "#",
					[d/Driver] = "#",
					[d/SAP_FI_IFP_QUANTITY_UNIT] = "#"),3 )

		DATA([d/Measures] = #TotalWeightedRevenue,
			[d/SAP_ALL_COMPANY_CODE] = [d/SAP_MKT_MarketingCampaign].[p/CompanyCode],
			[d/t.S:SAP_ALL_SALESORGANISATION] = "#",
			[d/t.S:SAP_ALL_PLANT] = "#",
			[d/SAP_ALL_PRODUCT] = "#",
			[d/Date] = #myDate,
			[d/SAP_FI_XPA_GLAccount] = "41000000") =

		RESULTLOOKUP([d/Measures] = "PRORATED_AMOUNT_BASELINE_EXP",
						[d/SAP_ALL_COMPANY_CODE] = [d/SAP_MKT_MarketingCampaign].[p/CompanyCode],
						[d/SAP_FI_XPA_GLAccount] = "41000000",
						[d/SpendType] = "#",
						[d/Driver] = "#")

		// Allocate Activity Spend Amount to individual products/periods based on contribution to overall revenue
		DATA([d/Measures] = "AMOUNT",
			[d/SAP_ALL_COMPANY_CODE] = [d/SAP_MKT_MarketingCampaign].[p/CompanyCode],
			[d/SAP_FI_XPA_GLAccount] = "MARKETING_ACTIV_COST",
			[d/SpendType] = [d/SAP_MKT_MarketingActivity].[p/SpendType] ) =

		Round(
		RESULTLOOKUP([d/Measures] = "PRORATED_AMOUNT_BASELINE_EXP",
						[d/SAP_ALL_COMPANY_CODE] = [d/SAP_MKT_MarketingCampaign].[p/CompanyCode],
						[d/SAP_FI_XPA_GLAccount] = "41000000",
						[d/SpendType] = "#",
						[d/Driver] = "#")	 /

		RESULTLOOKUP([d/Measures] = #TotalWeightedRevenue,
			[d/SAP_ALL_COMPANY_CODE] = [d/SAP_MKT_MarketingCampaign].[p/CompanyCode],
			[d/t.S:SAP_ALL_SALESORGANISATION] = "#",
			[d/t.S:SAP_ALL_PLANT] = "#",
			[d/SAP_ALL_PRODUCT] = "#",
			[d/Date] = #myDate,
			[d/SAP_FI_XPA_GLAccount] = "41000000")

		* ATTRIBUTE([d/SAP_MKT_MarketingActivity].[p/ActivitySpendAmount]) ,3)
		```
Click on the Save icon to have your updated data action saved.

Now you need to do some work on the screen for the marketing activity form to cater for a start and end date input field.
Go to the file menu and search for the story Marketing Campaign Planning (SAP_MKT_MarketingCampaignPlanning).

In case you want to try this out on a copy of the story, mark the checkbox left to the story and hit the Copy button on top. Provide a name for your story copy and have it saved. Now open the saved copy.

Switch to Edit mode so you can make changes to the story. In the View section click on button to Left Display Panel to display the outline panel on the left-hand side.

In the outline panel on the left-hand side locate the dialog_maintainActivity pop-up, which you will need to adjust. You will reuse the existing Invoice Date input field for the start date and duplicate it to have a second input field for the end date. For the second input field you can use the empty space right next to it (currently filled up with placeholder panel d2_pnl_cs1_placeholder02).

Start with the duplication, mark the panel d2_pnl_cs1_invoiceDate and in the Edit menu on top select option Duplicate.

You will get a duplicate group containing a panel, the input field and the label field. Now drag this set below the placeholder panel d2_pnl_cs1_placeholder02.

It should look like this.
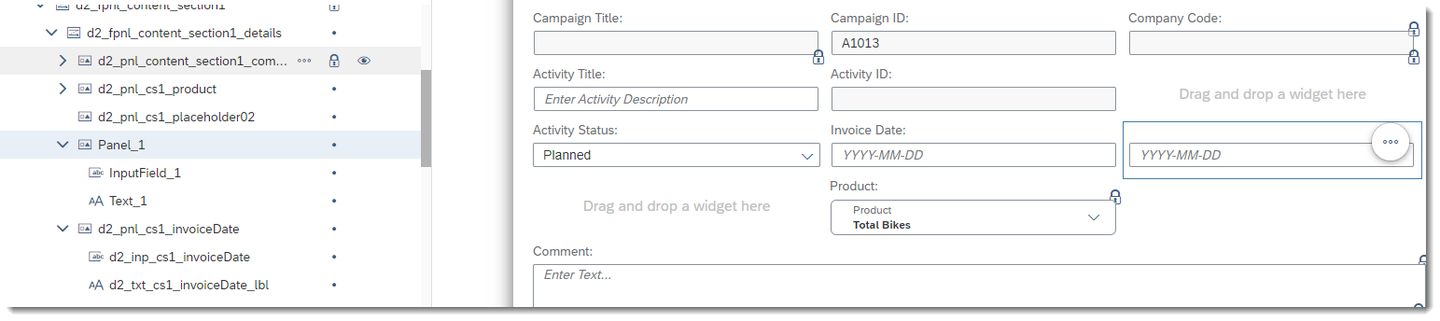
Delete the placeholder panel d2_pnl_cs1_placeholder02 as it is not needed anymore and rename the two date input groups for start and end date (panel, input field and text) as follows:
| Type | Old Name | New Name |
|---|---|---|
Panel | Panel_1 | d2_pnl_cs1_endDate |
Input Field | InputField_1 | d2_inp_cs1_endDate |
Text | Text_1 | d2_txt_cs1_endDate_lbl |
Panel | d2_pnl_cs1_invoiceDate | d2_pnl_cs1_startDate |
Input Field | d2_inp_cs1_invoiceDate | d2_inp_cs1_startDate |
Text | d2_txt_cs1_invoiceDate_lbl | d2_txt_cs1_startDate_lbl |
The only thing left to change is to add proper labels for start and end date to the form. Double click on the labels above the text boxes ( d2_txt_cs1_startDate_lbl and d2_txt_cs1_endDate_lbl) in the form UI and enter Start Date and End Date respectively.
After that your form should look like this.

Great, now that you are done with the UI, head over to adapt the scripting part for it.
The input fields for start and end date are being handled once when initializing the pop-up for creating or editing an activity, and once when saving an activity. In this step let us handle the initialization of the pop-up.
First, we will introduce two new global key/value pairs in the variable cfg_activityAttr for the two activity properties start and end date, so they can easily be addressed throughout the scripts. Click on the fx icon next to the story page object Page_1 to edit the onInitialization function.

Search for the assignment of variable cfg_activityAttr and add two additional key/value pairs to it, so it looks like this.

Once you are done, locate the function initializeActivityPopUp below the applicationScripts object and click on the fx icon to open it in the editor.
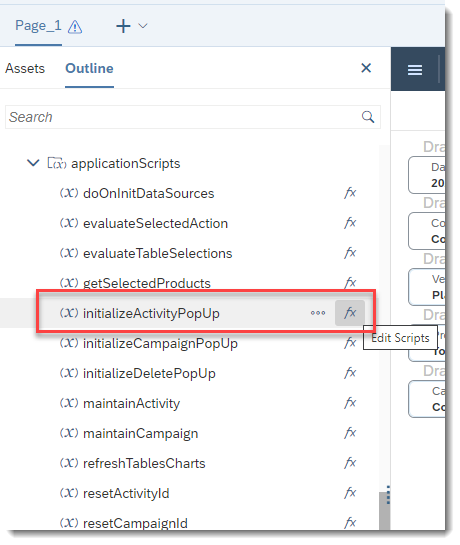
In the switch statement, there is a case block for creating a new activity. Within this block of code, you need to make sure the new input fields are properly initialized to empty strings (i.e., no value) when opening the pop-up. Note that when you renamed the input field for invoice date to start date, the variable name had already been adjusted in this script automatically:

So you just need to add a line for initializing the end date input field (and update the comment).

In the same switch statement, there is also a case block for editing an existing activity. Within this block of code, you need to make sure the new input fields for start and end date are properly filled from the activity properties. Initially it looks like this, still being filled from invoice date.
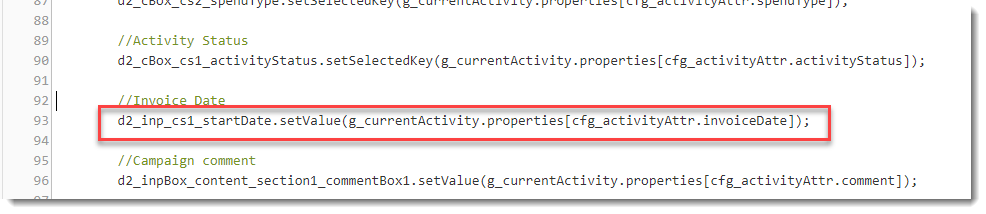
Change the assignment to read the value from the start date property instead of invoice date of the Marketing Activity dimension. Additionally you will need to add a line for the end date input field and assign the end date property of the Marketing Activity dimension to it (and update the comment).

Great, now continue with the next step to handle the saving of an activity.
In this step you need to make sure that the values for start and end date entered by the user are passed into the data action as well as saved in the dimension id properties.
Locate the function maintainActivity below the applicationScripts object and click on the fx icon to open it in the editor.

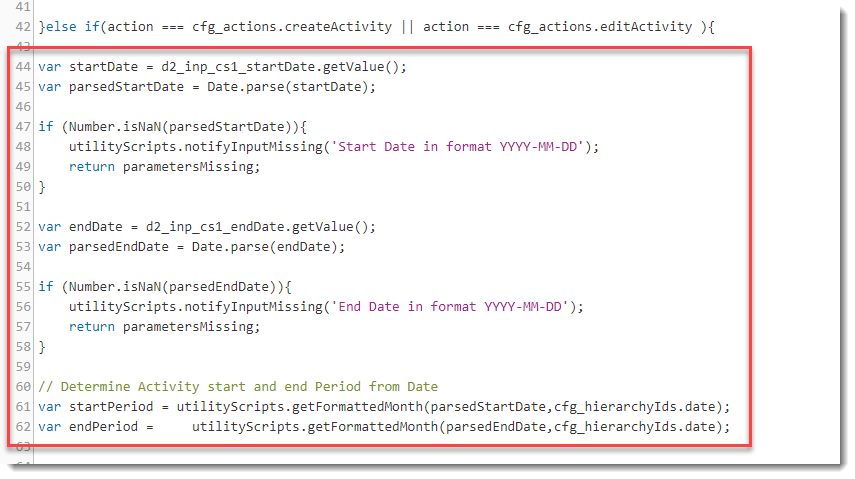
At first you need to retrieve the values entered by the user from the input fields. For start date we reuse and rename the formerly used invoice date while for the end date we need to add this similarly.
Change this section

So it looks like this, i.e handling, reading and validating start and end date input
Now you need to make use of the read values for updating the activity’s properties. This is how it looks before the change

Change the line to adjust for start date instead of invoice date and add an additional line for the end date so it looks like this

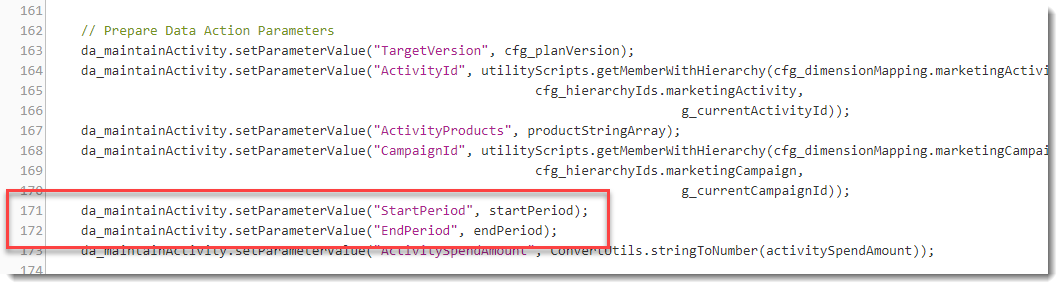
Additionally to updating property values, the derived start and end period need to be passed as parameters to the data action Maintain Marketing Campaign Activity (SAP_MKT_IM_MarketingPlanning_MaintainActivity) for calculating the activity data.
Information You could use CTRL + Space to get a value help for the available parameter names of the data action.
You need to adjust this section
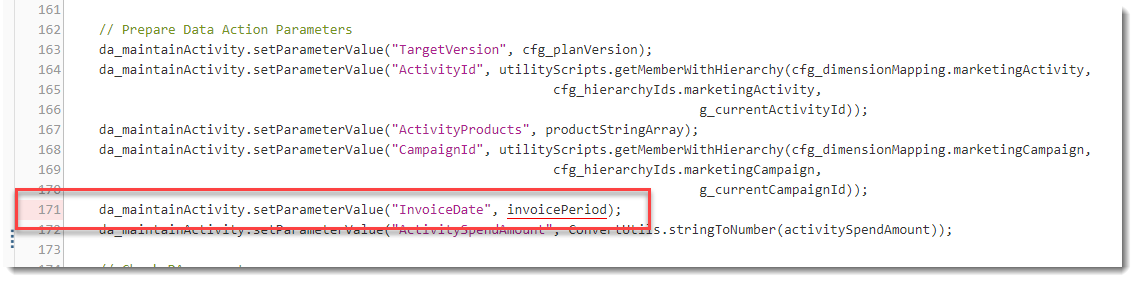
to look like this
Do not forget to save all the changes you have made to the story.
That is it, great job on making it here!
You have just enabled multi-period cost allocation on your marketing activities by:
- Adding additional properties to a dimension in a model
- Updating data actions with new parameters and script
- Updating UI elements in a story
- Updating script functions in a story
Now you can go ahead and create a new activity for a campaign and check how the activity spend is allocated across products and periods. Congratulations on completing this tutorial! Visit our community page Extended Planning & Analysis Business Content.
Resources
Discussion
Share feedback on this tutorial or join the conversation in SAP Community.